Our team recently shipped a new UPF which is a huge improvement on our old UPF, and I drew the short straw of doing all the interop testing for the IMS.
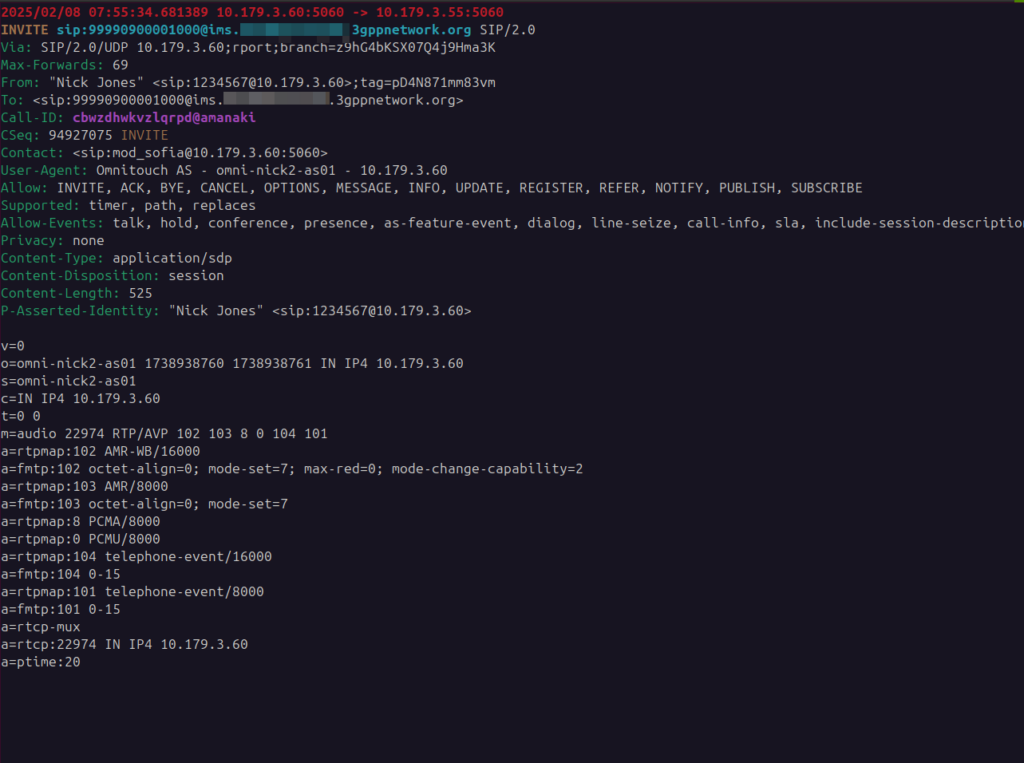
Initially I thought there was an issue with IP routing, as I’d never see the SIP register from the UE, but I would see the IMS APN coming up.
I could access the internet from the UE IPs just fine, but that’s going to public IPs, whereas the P-CSCF is in private address space, and hosted on the same box as the UPF.
I spent hours on this as my lab servers do routing on a stick, and I thought some hardware offload somewhere was trying to fast path my packets and send them back to the server without going via the router.
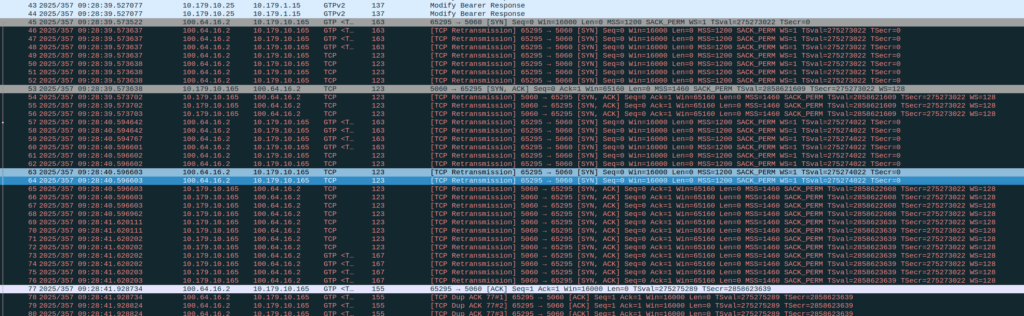
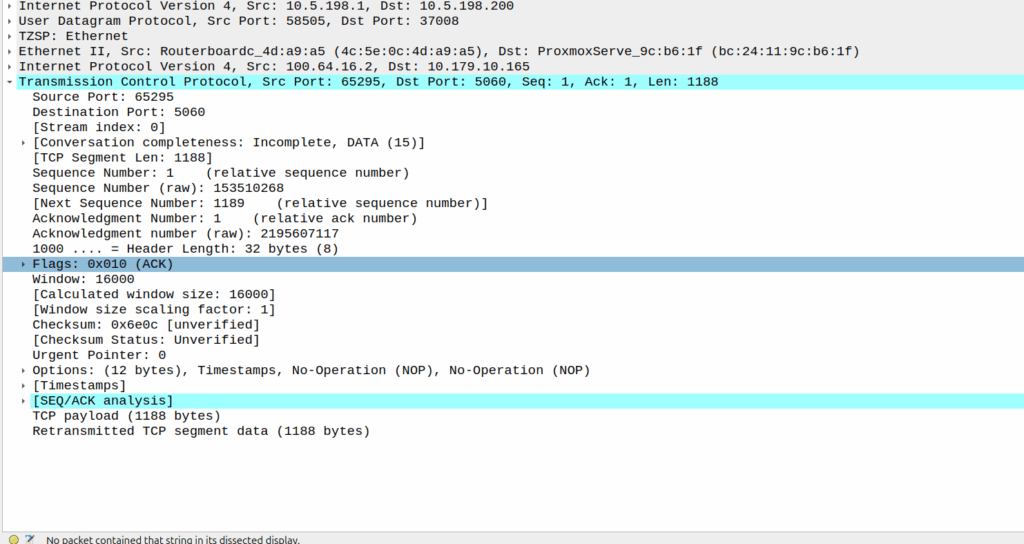
Then I dug a little deeper and found I could see the 3 way handhake between the UE an the P-CSCF, but no SIP packets.
Successful 3 way handshake between the UE and the P-CSCF on TCP 5060
This was confusing, clearly we had at least intermittent two way comms – the 3 way TCP handshake confirmed that, but then why were packets not getting across?
We have an XCAP server hosted on our P-CSCF instances, so I tried hitting that from the phone in case there was something weird about routing to the network segment that hosts the P-CSCF, but I could hit the XCAP server just fine, so now I was certain the UE IP pool could route to the P-CSCF and 3 way handshake for TCP was working and payload could be pushed.
Clearly we can route to the P-CSCF as that’s where this XCAP server is hosted
Then I dug into what happened after the 3 way handshake, and I found a TCP payload containing the start of the SIP REGISTER.
Hmm, we have a SIP Fragment here at least…
I traced it all the way through and lo, it’s hitting the P-CSCF:
And the fragment is recieved on the P-CSCF
Okay, but then what happens, because it’s only a fragment, not the complete re-assembled packet, so what’s going on?
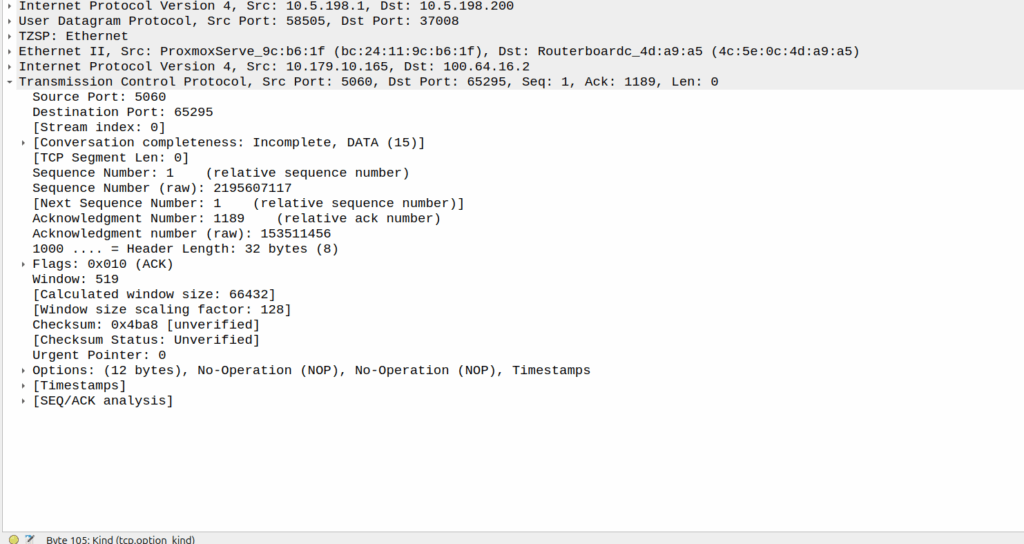
Well, the P-CSCF sends a TCP ACK back to the UE.
And the TCP fragment containing the first part of the REGISTER gets an ACK back from the P-CSCF
The ACK gets forwarded to the UPF:
And that TCP ack makes it to the P-CSCF
And then… Nothing? The UPF never encaps the TCP ACK back into GTP-U and never sends it onto base station.
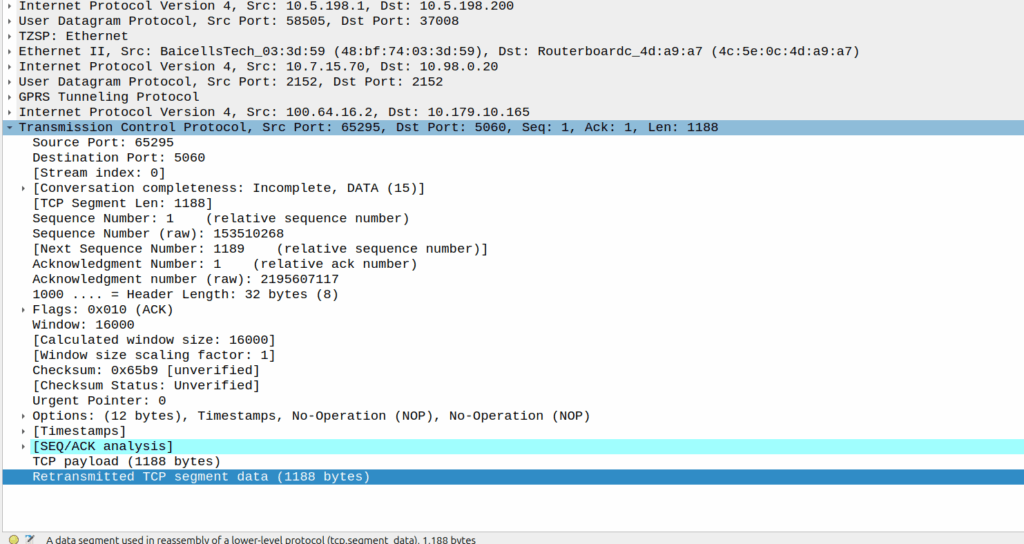
Eventually the UE re-sends the payload with the start of the REGISTER, but it does not get the ACK from the P-CSCF.
Retransmitted TCP segment containing the REGISTER from the UE
So naughty UPF right? Not forwarding that ACK for some reason?
I started digging, maybe the ACK was getting routed weirdly and landing on the UPF without going through the router?
Well not quite…
When I started digging into the QER rules being installed I noticed the MBR bitrate we had on the IMS APN in the HSS was tiny.
The UPF can only gate on traffic to the UE, so was gating the ACK traffic, as the QER had consumed all the bandwidth so the ACK never made it back.
Time wasted – About 4 hours, but I will not make this mistake again!
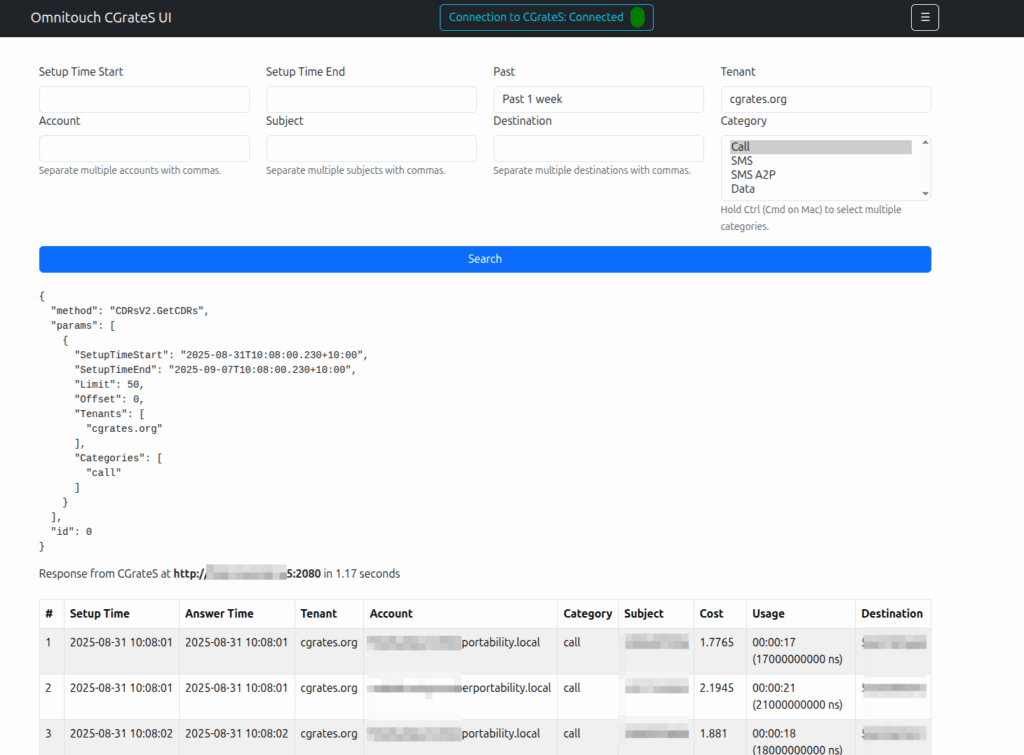
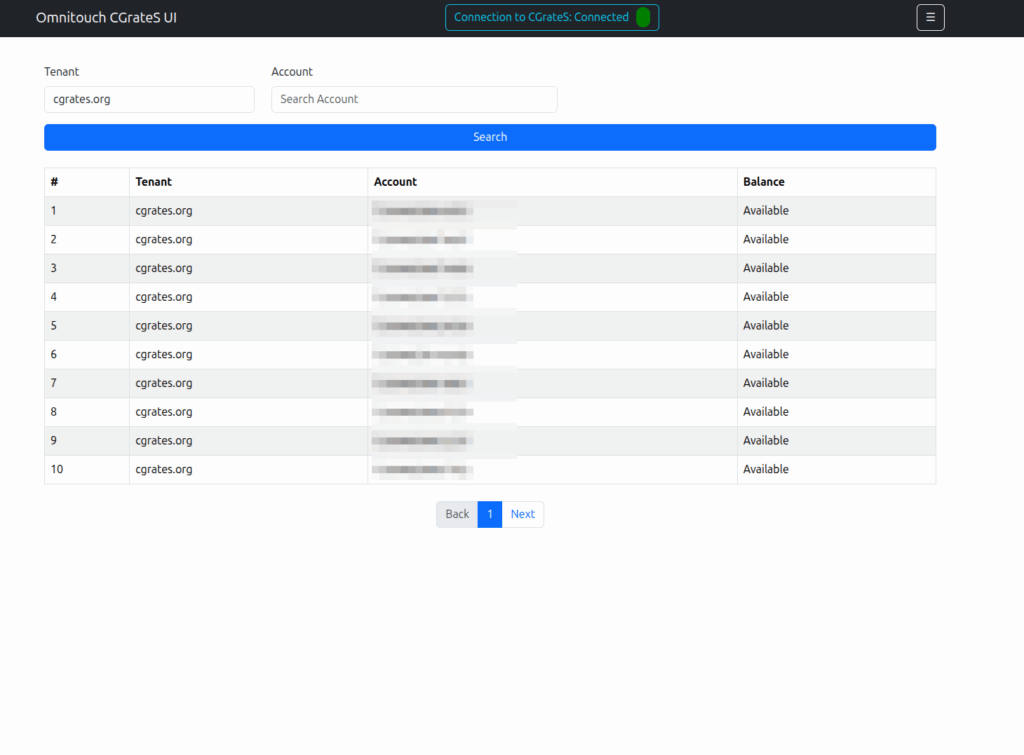
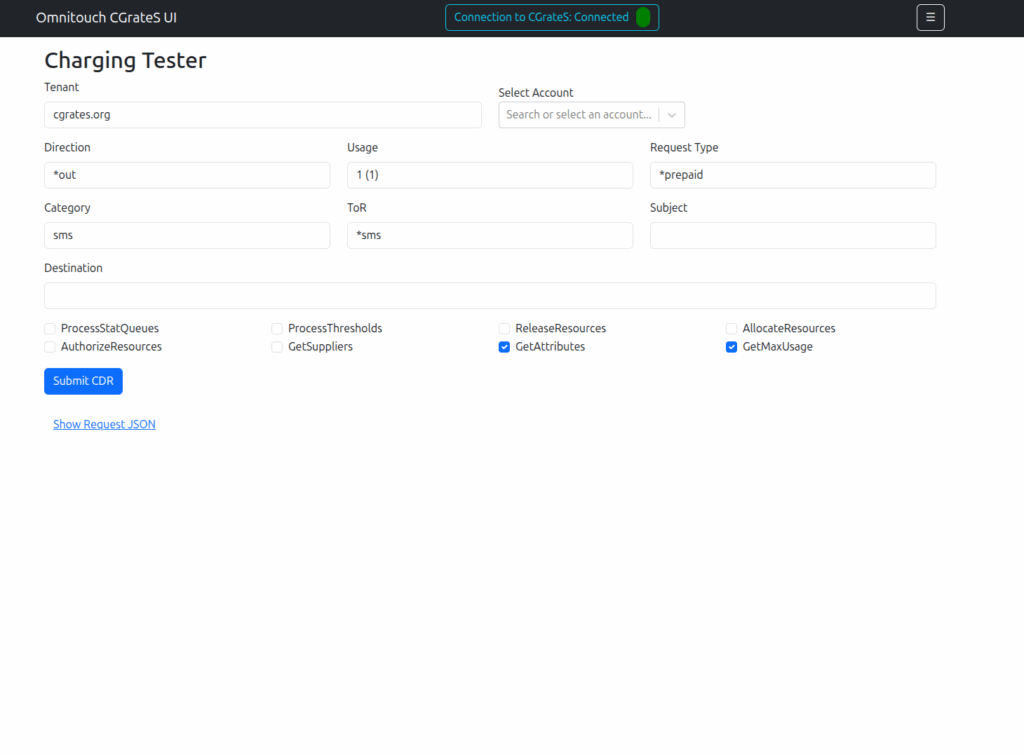
Working a lot with CGrateS I found myself doing the same tasks somewhat regularly, one common task was being asked to get CDRs for a certain thing on an ad-hoc basis, ie “Can you get the call records for XXXX for last month?” or “How much did we spend on calls to YY this quarter?” or “How many GB of data did roamers use on these 3 cell cites this week?”
As those were all CDR related queries, I knocked up a quick React Web UI to search CDRs.
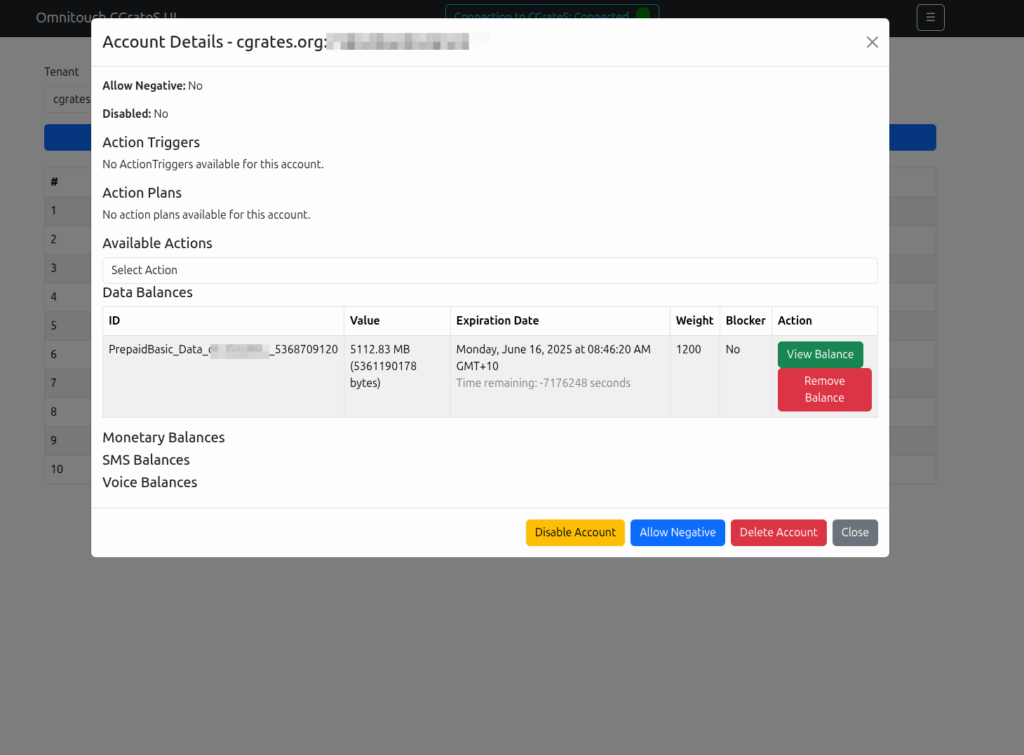
Then we introduced accounts with balances, and there were queries about checking balances, adding roaming packs, etc.
And then things just kinda spiraled…
Managing Actions and Action Plans, rates, simulating cost, Attributes, SessionS, etc, etc.
This isn’t meant as a GUI – If you don’t know how CGrateS works, this tool won’t help you.
But if you’re already working with CGrateS and sending random HTTP POSTs of JSON blobs from your language of choice, this a toolbox to manipulate data will hopefully be useful to you.
I think of it as kinda like Postman but a bit simpler and just focused on CGrateS.
At the time of writing it can view/manage: Searching and exporting CDRs
- name: Fetch the DataDB dump from remote cgrates to local machine fetch: src=/tmp/redis_dump_{{ inventory_hostname }}_{{ ts }}.rdb dest={{ backup_path }}/ flat=yes
Obviously you need to backup your .json config files, but to restore is just a matter of restoring the StorDB data with MySQL on the new machine, copying the Redis database into /var/lib/redis/dump.rdb on the new machine, and starting MySQL, Redis and CGrateS.
A concept that’s always been a bit unclear to me was how the Sh Profile, XCAP data for call forwarding / barring and RepositoryData all fit together.
Let’s start off with the basics.
The Diameter Sh interface sits between an Application Server (Typically TAS, SMSc, XCAP server, etc) and the HSS.
This AS can run a Diameter User Data Request to get the contents of Sh Data, which is returned in the User Data AVP (702) for a given subscriber.
Application Servers can also subscribe to be notified of changes in the Sh data on the HSS, by sending a Subscriber Notification Request, and when the data changes they’ll get a “Push Notification Request” to inform them of the change.
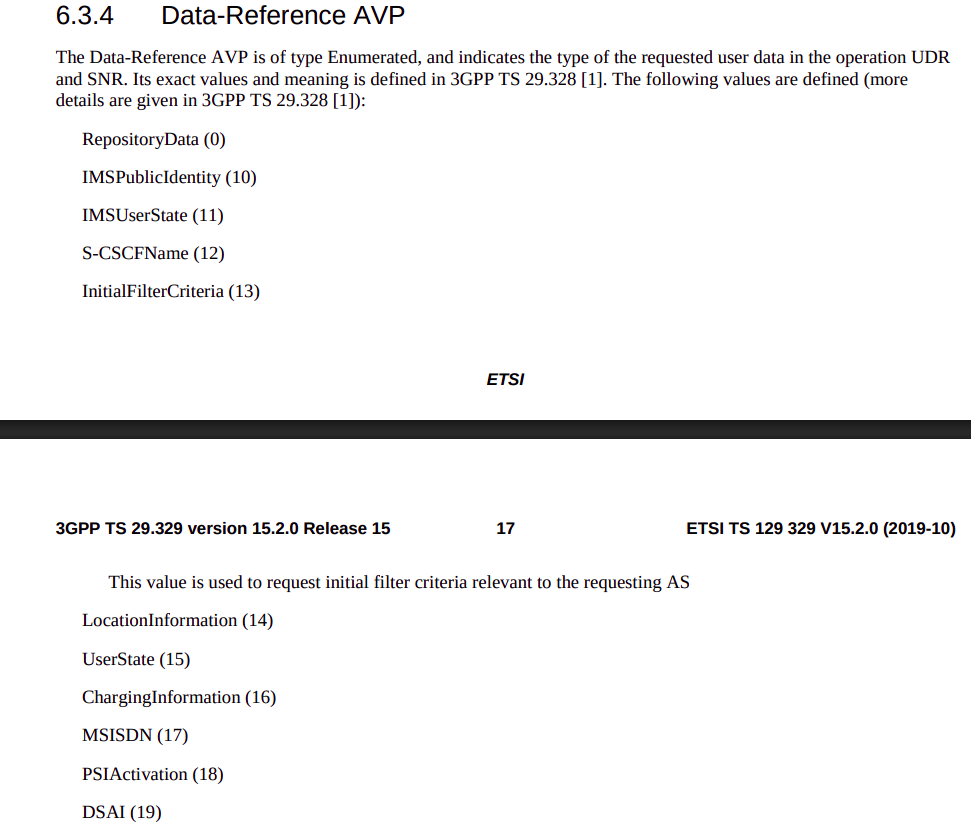
When sending this User Data Request the AS can specify what data it wants to get returned, for example an AS might want to know the current S-CSCF of a given subscriber, in which case, the AS would set the DataReference AVP (703) to 12 for S-CSCFName.
Not the complete list…
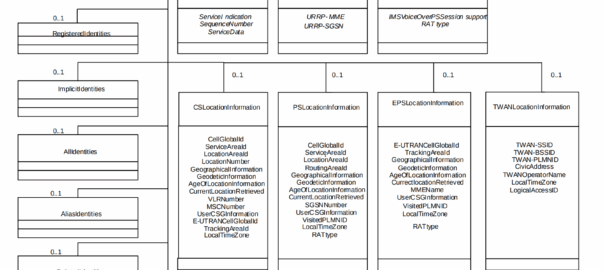
The the AS can request can be public and private identities (IMSIs and MSISDNs), location in the PS and CS networks, TADS info, SRVCC parameters, etc, etc.
Data like TADS Info, CS and PS network location, Public and Private identities, come from the HSS and cannot be modified, these values either come from the static subscriber definition in the HSS (what was set when provisioning the subscriber), or based on the subscriber’s state (ie where they’re registered on the network).
RepositoryData
But there is a section of data we can request the HSS return called RepositoryData which can be modified/updated by the end user or other applications in the network (Modified by ASes), via a Profile Update Request.
This data is where we put the call forwarding, call barring, caller ID presentation/restriction info – The HSS doesn’t really care what is stored in RepositoryData, it’s just a transparent place to store this data.
Think of it as a simple folder containing text files, each text file has a name (ServiceNotification) which allows us to reference the blobs of data by name, a SequenceNumber to identify duplicates, and then the actual contents of the file itself ServiceData.
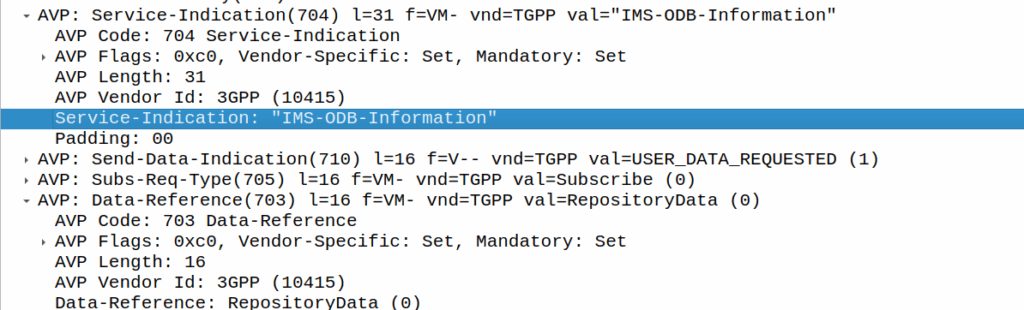
We can then request the contents of these files from the HSS by calling DataReference of RepositoryData and setting the ServiceIndication to be the “file” we want returned to the AS by the HSS.
For example, if the Data-Reference AVP is set to zero (Repository Data) and the Service-Indicator AVP is set to “IMS-ODB-Information” the HSS will return the data for the file IMS-ODB-Information of repository data.
This RepositoryData is just “transparent” storage of XML data by the HSS, and this is where we’d put Call Forwarding, Operator Defined Barring and CLI presentation/restriction parameters.
In theory you could also store 3rd party custom unstructured data here (Move over AWS S3 buckets, I’m moving all my storage to Diameter!), but it’s not commonly used beyond call routing parameters.
The two most common types of ServiceIndication keys you’ll see stored in RepositoryData are MMTEL-Services and IMS-ODB-Information. Each of these are defined by their own XML spec, but the MMTel-Services key is where all of our Call Forwarding, Caller ID Presentation/Restriction parameters live, while IMS-ODB-Information contains the parameters for Operator Defined barring – Both of these XML definitions we’ll dive into in a post of their own, but for now all you need to remember is that they’re stored transparently as XML on the HSS.
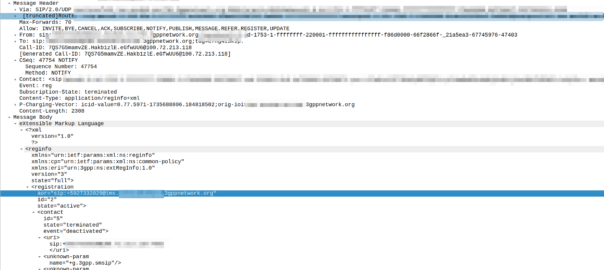
An example use case of this would be when a user wants to manage their call forwarding data via XCAP. When the user pulls up the Call Forwarding menu on their phone, the first entry point will be the XCAP Server (AS) to get all the User Data for MMTelServices, so it’ll do that via a Diameter User Data Request with the DataReference set to RepositoryData and the ServiceIndication set to MMTel-Service so the XCAP server can pass the full XCAP XML body to the UE.
The UE can then update this data, and the XCAP server just sends a Profile Update Request to push the updated XML to be stored on the HSS.
Fitting this all Together
Data sent to the AS by the HSS will always include the <Sh-Data> XML, but the child keys within it depend on the data the AS requested under the Data-Reference.
If we requested IMSI as the DataReference, then the returned XML might look like:
<Sh-Data>
 <imsi>9990112345677</imsi>
</Sh-Data>
Likewise, if you requested IMSPublicIdentity as the DataReference you’d get:
The spec goes into full detail on all the possible keys, but in short, when the AS queries the data for the provided DataReference, the HSS sends back an Sh-Data XML body containing at a minimum those keys.
This one replaces nicktest.com with mobile.operatorx.numberportability.local and after that replaces 10.171.2.134 with fixed.operatorx.numberportability.local
Recently we ran into an issue with certain devices while roaming not including an ICSCI field in the Contact header while registering onto the IMS, leading to MT call failures.
So what is ICSI and why were these calls failing?
The IMS standards are littered with novel ideas for smart telephony features that no one ever implimented, and presents a minefield of conditionals about features you never even knew existed.
Today’s dead feature is the “IMS Communication Service Identifier” (ICSI), no, it’s not a TV show about IMS Crime Scene Investigators (don’t steal my pitch), instead ICSI identifies IMS services by using “IMS Enablers” which allows multiple IMS applications to run on the phone.
It’s like a VLAN or a VRF but for IMS, one IMS stack but multiple sub-IMS stacks I guess.
Why would you want to do this you might ask? Well, the example from the Specs is if you were using OMA’s very short lived OMA Instant Messaging and Presence application, which uses SIP for transport, but needs the SIP messages routed to the OMA client application in the phone, rather than the standard IMS SIP client in the phone for making calls / texts.
Alternately, you could have a mobile PBX application for office workers, and with a different ICSI this could use a secondary dialler with a contacts list and presence for all your co-workers, these sorts of “sub” IMS clients and applications were possible with ICSI.
So how does it actually work? Well, it’s stupid simple, during register the phone indicates in the Contact header what ICSI applications that client supports.
When a call is made by the UE based on this value the iFCs can route to different Application Servers based on the values.
For mobile originated calls, the terminal in this scenario is kinda meant to work like a SIP Proxy, dispatching a SIP message to the correct application (in the terminal another IMS client that spoke to the main phone).
In reality though, there is only one ICSI service seen in 99.999% of IMS traffic and that’s the 3gpp-service.ims.icsi.mmtel ICSI, used by IMS clients to denote that they support IMS Multimedia Telephony, aka just normal IMS.
For reasons best know to VENDOR X (you know who you are) their phones include the 3gpp-service.ims.icsi.mmtel in the Contact header when registering on the home network, but while registering while roaming do not include this.
Our TAS ignores the lack of ICSI for mmtel in the contact on regular MT calls, but one of the other TAS vendors in the mix got grumpy because it was missing, and they didn’t have a contact for MMtel for the registered subscriber.
In the end we rewrote the headeron on our CSCFs before passing it to their TAS, which resolved the issue.
Who’s in the wrong? Well, the particular phone vendor who doesn’t include MMtel in the ICSI Contact, but that’s not going to change any time soon. So as the old saying goes, if the mountain won’t come to Mohammed… Mohammed will rewrite SIP headers.
Here’s a Kamailio question I posed to the mailing list the other day:
I’m working on a scenario with a Kamailio box with a private IP, with a public IP 1:1 NATed to it (but the VM does not see the public IP on the NICs).
When forwarding requests to some hosts I want to set the Via address to be the public IP, but when forwarding requests to other hosts I want to leave the Via address to the internal IP address.
If I set the Advertise parameter in the bind config, this sets the Via to the advertised IP, but I’m seeing that address used even when communicating with hosts on the private IP.
Of course if the IP was on the VM itself I could use $fs or force_send_socket, but that only works if I’ve got the public IP bound, which I can’t do.
Is there a simple way to set / override what IP gets baked into the Via header?
Where you’ve got multiple IPs on your box, you can include the advertise paramter to override the IP you show, for example if you have the IP 100.64.253.251 on your NIC, but you’ve NATed the traffic and instead want to show 1.2.3.4 you can set this in the general config:
But then every message Kamailio forwards, will contain the 1.2.3.4 address int he Via header. For my scenario, this didn’t work, as I wanted to only use the 1.2.3.4 IP when communicating with hosts outside of the RFC1918 address space (only conditionally use that address).
Because of this I couldn’t use the advertise option, but I found the set_advertised_address() function to use in my routing logic, where I set the advertised address just on the given routes I care about:
#General Config:
listen=tcp:100.64.253.251:5061


#My routing blocks that go to hosts outside RFC1918 address space:
                rtpengine_manage("media-address=1.2.3.4");
                set_advertised_address("1.2.3.4:5060");
                msg_apply_changes();
So now any packets by default will have a Via of 100.64.253.251 but when I want to I can set the Via to the 1.2.3.4 public IP (and I do the same in RTPengine).
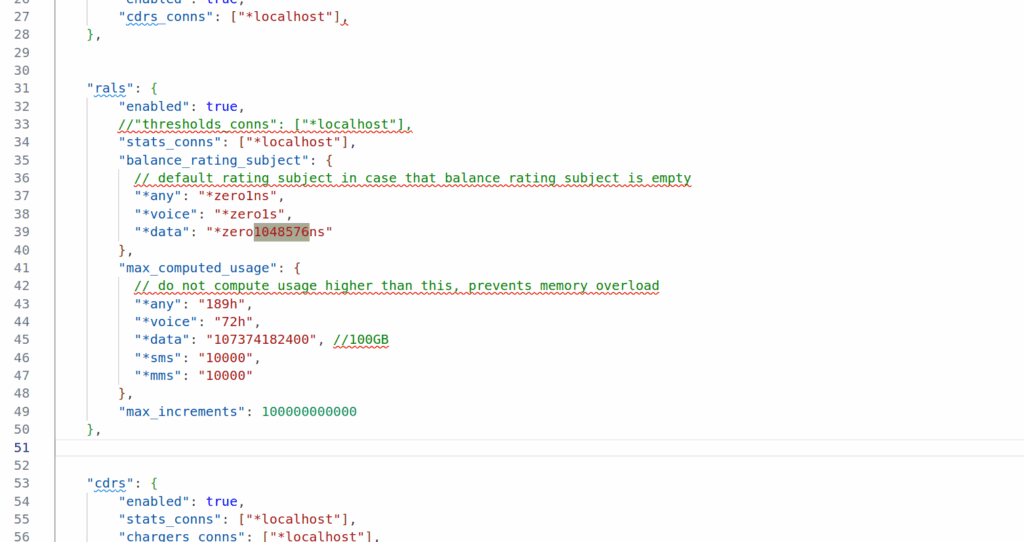
Well CGrateS deducts for each incriment in the usage, and in my case, a usage of 107374182 meant CGrateS was trying to deduct from the balance 107 million times.
But as you can imagine, we don’t actually charge our customers per byte but rather we round up our incriments.
This is where the RatingSubject comes into play. RatingSubject sets what “blocks” of balance get calculated.
For example rather than calculating usage of 107,374,182 bytes, with CGrateS deducting from the balance 107 million times, we could set the value *zero1048576ns which means we’d calculate per Megabyte, so we’re only calculating 102 times 1 megabyte.
Likewise we could set the RatingSubject value to *zero1024ns to get it in Kilobytes.
What’s with the ns suffix? Well CGrateS (actually Go) treats units as duration, and the smallest unit is nanoseconds, but we can ignore the meaning in this context, as just 1 integer unit.
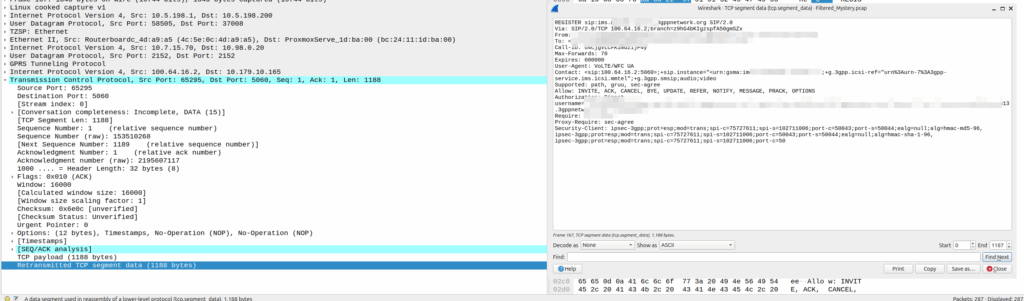
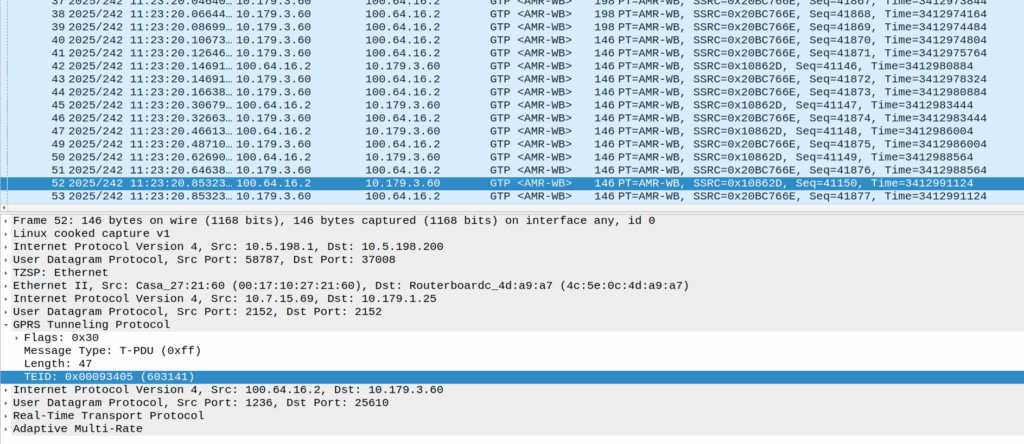
So we’ve found this scenario that occurs on some Samsung UEs, in certain radio contions, where midway through an otherwise normal voice call, the UE sends “mystery” data (Not IP data), which in turn causes the UPF to send the error indication and drop the bearer, which in turn drops the call.
The call starts, like any normal call, SIP REGISTER, INVITE, etc.
The P-CSCF / PCRF / PGW set up the dedicated bearer for the voice traffic, and the RTP stream starts flowing over it.
Then the UE sends these weird packets instead of the RTP stream:
These are GTP-U encapsulated data, with the TEID that matches the TEID used for the RTP stream, but there’s no IP data in them – they’re only 14 bytes long and sent by the UE.
Here’s some examples of what’s sent (each line is a packet):
An IPv4 header is 20 bytes long, and IPv6 header is 40, so this is too short for either of those protocols, but what else could it be?
There’s some commonality of course, starts d0 as the first octet, then d1, d2, d3, etc. So that’s something?
I thought perhaps it was a boundary issue, that the standard RTP packet was being split across multiple GTP-U payloads, but that doesn’t appear to be the case.
An Ethernet header is 14 bytes, but if we were to decode this as Ethernet there’s still nothing it’s transporting, and the destination MAC is changing sequentailly if that’s the case, which would be even weirder.
I also thought about RTP that for some reason has lost it’s IP/UDP header, as the sequentially counting byte at the start could be the RTP sequence number, but that’d be 19 bytes minimum and the sequence number is the 3rd and 4th byte, not the first.
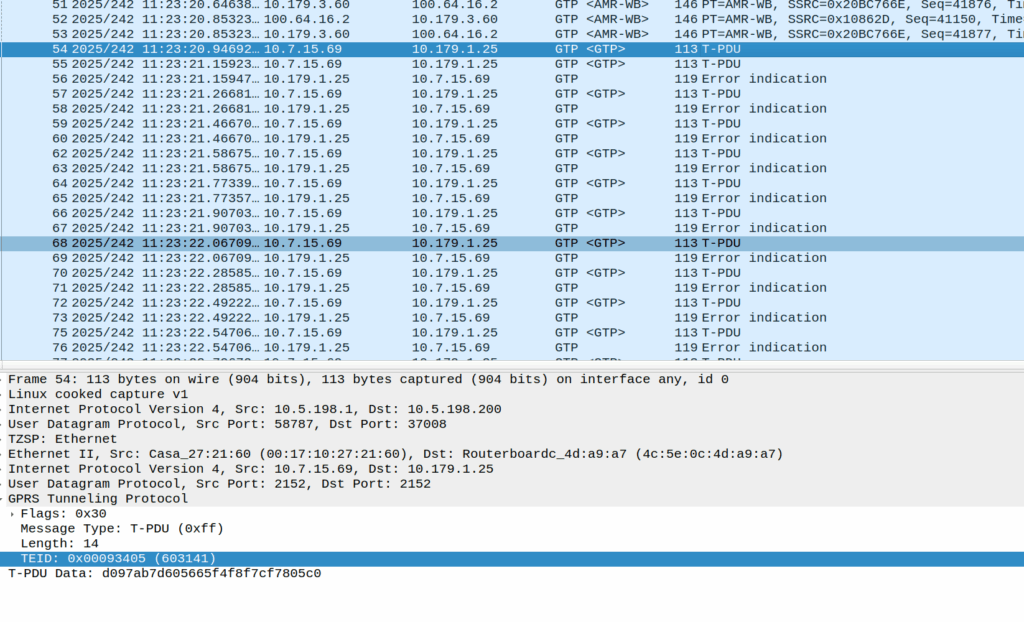
Whatever they contain, we see this sent over and over for a few seconds, then bam, back to normal RTP stream flowing.
Or at least it should be, but the invalid packet causes the UPF to generate a GTP-U Error Indication.
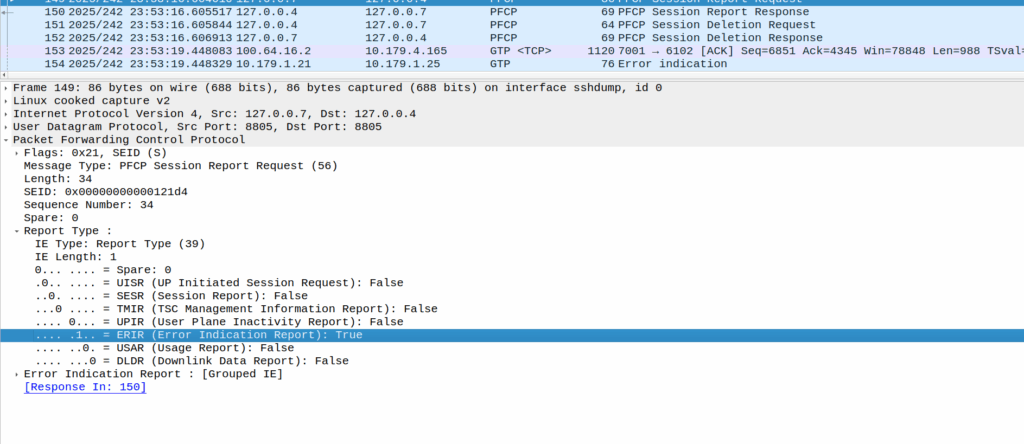
These Error Indication payloads eventually lead to the next PFCP Session Report Request having the Error Indication Report (ERIR) flag set to True.
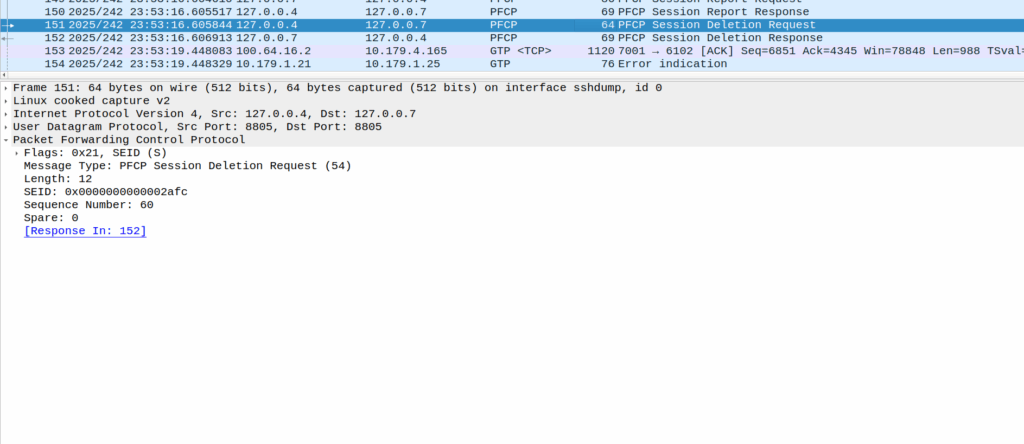
When the PGW-U gets this, it sends a Session Delete Request, which dutifully drops the bearer.
Meaning the session drops on the EPC side, and the RTP drops with it, eventually a BYE is sent from the phone due to RTP timeout.
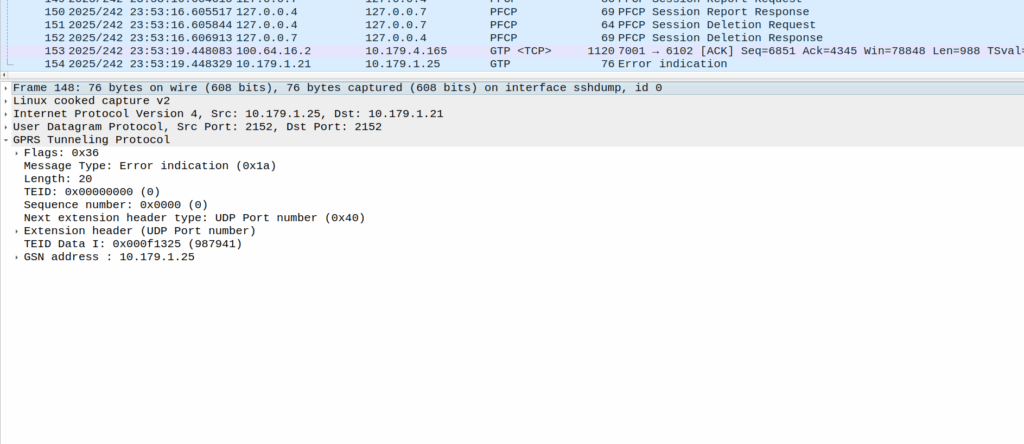
The above screenshot shows a different cause of GTP-U Error Indication – At this point the bearer has been dropped on the EPC side and these are Error Indications to report it doesn’t know the TIED / bearer.
How to fix this?
Well, unlikely we’ll get a fix on the Samsung side, so we’ll need to not drop the bearer on the PGW-C if we get a lot of Error Indications, and hope for the best.
In a scenario where we don’t know how long an event will be (for example at the start of a voice call, we don’t know how long it’s going to go for, or the start of a data session but we don’t know how much data will be used) but need to: A) charge for it and B) apply some credit control to make sure the subscriber doesn’t consume more than their allowed balance
For a voice call for example, we reserve talk time in advance, before the user actually consumes it, for example when the call starts, we reserve 30 seconds of credit from the user’s balance, then when the user has consumed this first 30 seconds of credit, we go back and request another 30 seconds of credit. If there’s credit available, we grant it and the call is allowed to continue for another 30 seconds, and then the process repeats, until either the call ends or we go back for more credit and there’s none available, at which point we terminate the call.
Why is this important? We may have multiple sources drawing down on an account at the same time, if you’re on a call while browsing, you’re doing two events that are charged, and may be charged from the same balance, and we don’t want to give you free calls or data just because you’re able to walk and chew gum at the same time.
CGrateS Agents such as Asterisk, Kamailio, FreeSWITCH, RADIUS and Diameter Agents handle most of the heavy lifting for us, but understanding how SessionS works for me at least, made working with these modules much easier.
So let’s set the scene, we’re going to create an Account with 10 units of *generic balance (I’m using generic as if we use time the numbers end up kinda big and it gets confusing to look at) and then consume over several transactions it until all the balance is gone
In the config we’ve disabled the debit_interval in session – Usually this is handled by the Agents, but for our demo we’re going to do it manually, so it’s off.
Let’s get setup, we’ll define a charger, and create an account and allocate some balance to it.
#Define default Charger
print(CGRateS_Obj.SendData({
"method": "APIerSv1.SetChargerProfile",
"params": [
{
"Tenant": "cgrates.org",
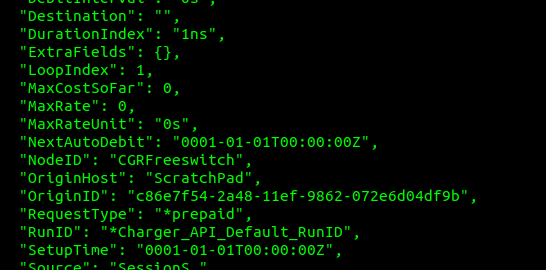
"ID": "Charger_API_Default",
"RunID": "*Charger_API_Default_RunID", #Arbitrary Sting
'FilterIDs': [],
'AttributeIDs': ['*none'],
'Weight': 999,
}
] } ))
#Add a balance to the account with type *generic with 10 units of balance
Create_Voice_Balance_JSON = {
"method": "ApierV1.SetBalance",
"params": [
{
"Tenant": "cgrates.org",
"Account": "Nick_Test_123",
"BalanceType": "*generic",
"Categories": "*any",
"Balance": {
"ID": "10_units_generic_balance",
"Value": "10",
"Weight": 25,
"Blocker": "true", #This stops the Monetary Balance from being used
}
}
]
}
print(CGRateS_Obj.SendData(Create_Voice_Balance_JSON))
Alright, with that out of the way let’s start a session using SessionSv1.UpdateSession we’re going to define a CGrateS event to pass to it, and we’ll call it multiple times, but change the usage as we go.
To make our demo easier, I’ve nested a little for loop, so we can keep deducting balance,
So now with this all in place, we define the default charger add add balance to an account (as the account doesn’t exist yet, this step creates the account too) in the first block of code, and this second block of code defines the event.
By running these together, we can start our session.
When you run it you’ll be prompted to press enter to continue or input q to quit, let’s enter to continue, then you’ll be asked for the usage, I’ve put 1 in the below example.
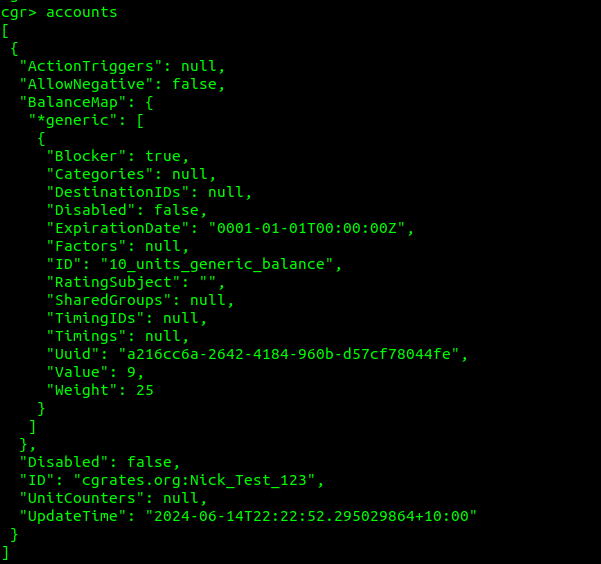
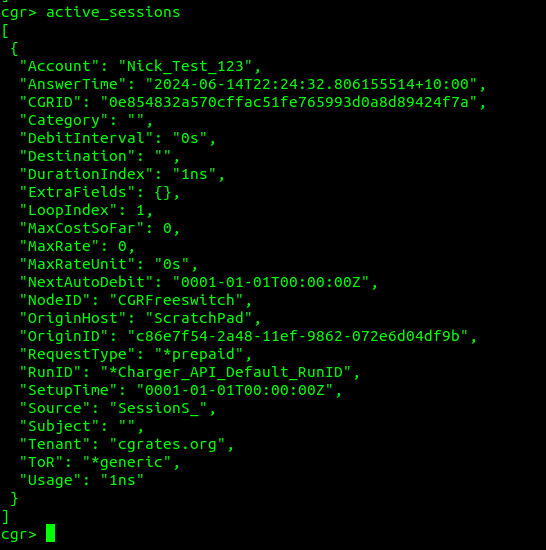
Alright, now let’s take a quick sidebar, and check in with cgr-console in a different tab, what do we think is going to show as our balance?
Well, if we run the accounts command from within cgr-console we can see our account which had a balance of 10 before, now has a balance of 9, as we’ve deducted 1 from the balance by inputting it as our usage:
And if we run the active_sessions command in the same console, we see the active sessions, where we can see where that one unit of balance went.
A few things to call out here:
The DebitInterval is how often this balance will be deducted, for our test scenario we’ve turned off automatic debiting, but Agents like FreeSWITCH and Kamailio leave this on and automatically tick off time as it passes (Obliviously this doesn’t work for data, so we’d leave it off)
The LoopIndex is how many UpdateSessions events the API has handled for this session (the unique session is identified by the ID / CGRID field)
SetupTime is blank because we didn’t set it in our initial UpdateSession API Call
The Usage in cgr-console is sometimes shown as nanoseconds, that’s because 1ns is equal to 1 generic unit.
So let’s go back to our Python script, go through the loop again but this time set the usage to 7.
Now if we flip back to cgr-console and check again, we’ll see, as expected that our account balance is now 2, and the active session has 8 of usage.
That’s because we started with 10, then we deducted 1, then we deducted 7, gives us 2 remaining. If we’re to run active_sessions again at cgr-console we’ll see the Usage of the session is now 8.
And lastly let’s try and take another 7 of balance, knowing we’ve only got 2 units left.
No dice; 7 is greater than 2 of course, so CGrateS stops us there by rejecting the request with RALS_ERROR:INSUFFICNET_CREDIT_BALANCE_BLOCKER – SessionS has done it’s job of making sure we didn’t allocate more of the credit than we were allowed and told us we have insufficient credit and that this balance is a blocker.
In this little demo we had one service drawing on the same source, but imagine if you’d fired up two copies of the script, you could have those two sources both consuming data at the same time, and this is where CGrateS shines; CGrateS can do all the heavy lifting to make sure that the resources are never over allocated, and that we’re not ending up with a negative balance.
When it comes time to terminating the session, there’s a trick to this.
Unit reservation is all about allocating resources in advance, this means we’ve generally have taken more money from the balance than we actually ended up consuming, so we have to give this back to the customer.
If we include the Usage field in the TerminateSession request, this must be the total usage for the entire session (start-to-finish), not just since the last UpdateSession API call.
For example if we allocated 30 seconds balance at the start of a call, then as that 30 seconds was consumed, we allocated another 30 seconds, and then when the call got 60 seconds in, we allocate another 30 seconds of balance. But if the call ends at a total of 70 seconds, we’ve allocated 90 seconds (3x 30 seconds), so we’d be over billing the customer. This is where we set Usage to 70 and CGrateS will refund the 20 seconds of balance we over charged them. This is because 3x 30 seconds = 90 seconds allocated, but the call only ended up using 70 seconds, so we need to refund 20 seconds of balance (90 – 70 = 20) to the Account balance.
That’s one way of doing it, but the other option is if we’ve just tracked usage since the last update, we have a 70 second call that we had allocated 3x 30 seconds Session Updates, we can set LastUsed to be 10 seconds (as we only used 10 seconds of the 30 seconds allocated in the last Update) which will also refund the 20 seconds.
In practice, you’ll probably use CGrateS Agents like the FreeSWITCH Agent, Asterisk Agent or Kamailio Agent to handle the charging in those applications. By using the premade CGrateS Agents, it handles generating the UpdateSession calls and all of this logic under the hood, but it’s super useful to know how it all works.
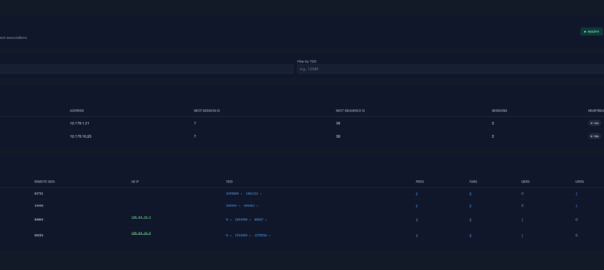
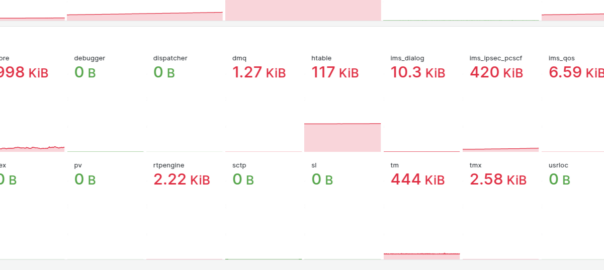
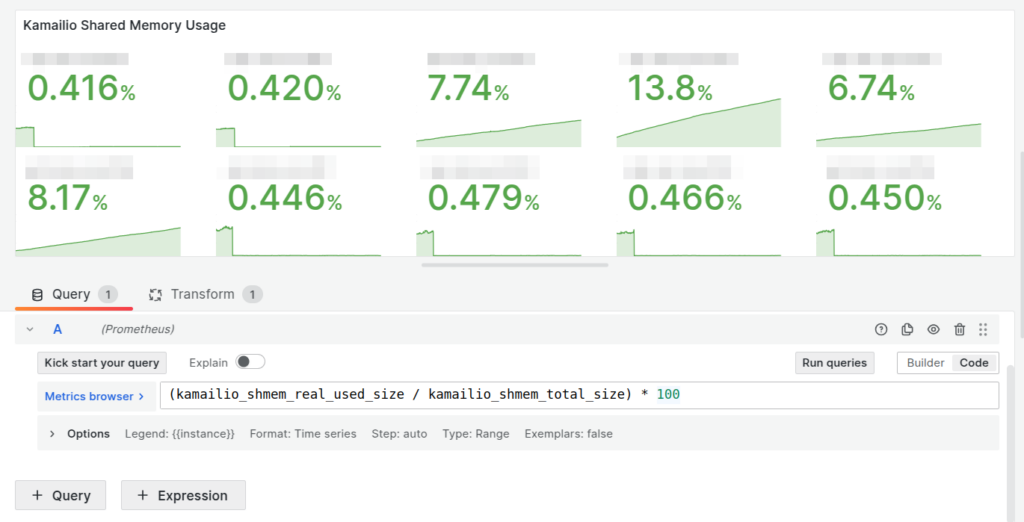
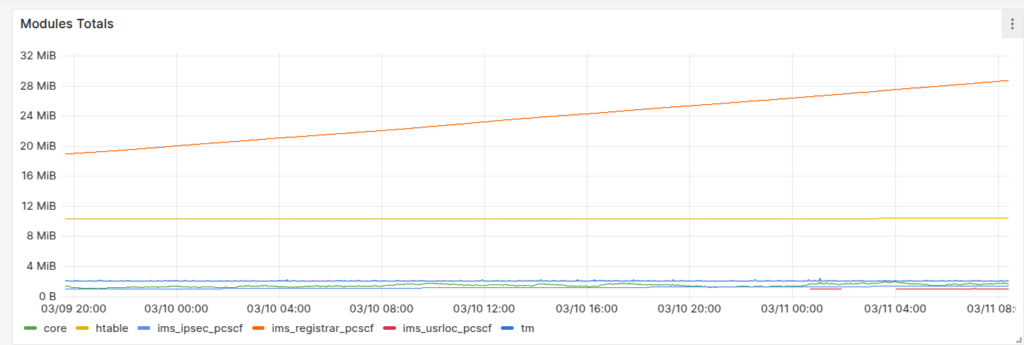
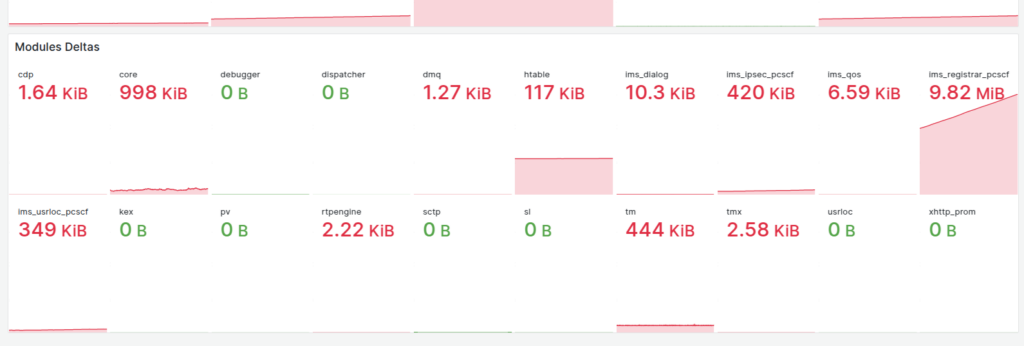
Our dashboards showed this slow memory leak, with the memory slowly ticking up on a certain group of machines, we knew there was a memory leak, but in which Kamailio module?
Shared memory usage per Kamailio instance
So we know there’s a memory leak on some boxes (different boxes run different modules) but which ones?
kamcmd will show you a breakdown of the shared memory usage per module, so I started with a little cronjob to dump the data every so often, with the idea I would diff the values and look for big increases.
Then the idea of processing the data from the files started to scare me.
So in the end I went overboard and wrote a little script to get the memory usage of each module and export it via Prometheus, so I can track down what module is at fault.
If I were a better C programmer I’d have added this into the main Kamailio Prometheus module, but I’m terrible at C.
SIP has got a multitude of ways of showing Caller ID, PAI, R-PAI, From, even Contact, but the other day I got a tip (Thanks John!) that you can set a name as the Caller ID in the “Username field “display name” part of the P-Asserted-Identity for the leg from the TAS to the UE, and it’ll show up on the phone, and they’re right.
One thing that it doesn’t do is show the name in the call history, and if you go to “Add as Contact” it still makes you enter the name, clearly that’s not linked in, but it’s a kinda neat feature.
I’ve always been kinda intrigued by the idea of parallel universes, the idea that there are infinite copies of the universe, with myself and all the people I care about, but each with slight differences to the universe I inhabit.
The ChargerS module provides the Butterfly Effect needed to create infinite instances of our CGrateS events, each with subtle differences.
Typically if you’re charging subscribers for calls, someone else (or multiple someones) may charge you for those calls, for example you charge your subscribers for an outbound call, but other carriers you interconnect with will charge you for terminating those calls to their subscribers, and for incoming calls you may want to charge the other carriers that terminate calls into your network.
By defining in CGrates what your suppliers charge you, or what you charge suppliers, or reseller rates, or commissions, or any other varied call charge, allows us to:
See profit on each call
Understand supplier costs
Enable reselling at different rates
Opens the door to Least-Cost Routing (Without knowing the cost, we can’t find the cheapest)
Ensure you don’t have calls where you make a loss (Supplier charged you more than you charged the customer)
So how do we do this?
Well, we do this with ChargerS.
When I first looked at CGrateS, the ChargerS module seems like an extra step that did nothing,
In ngrep you’d see the ChargerSv1.ProcessEvent request, and the response, but it doesn’t really do anything, and it’s a PITA when you don’t have a Charger defined and everything stops working.
I’ve spoken a lot about SIP on this blog, and I’m going to assume some level of familiarity with telephony since we’re talking about CGrateS (which is mostly used for telephony), but the best concept I can relate ChargerS to is Serial Forking in SIP, but for the CGrateS event.
A single CGrateS “event” (JSON RPC) comes into CGrateS from wherever, but with ChargerS, we can fork that single event into multiple CGrateS events, which are all treated as unique events.
This is where it starts to get interesting, let’s say we want to calculate a supplier cost and a retail cost, well, with ChargerS we define a rule for supplier and a rule for retail, one single event comes into CGrateS, but with ChargerS setup to create a retail and supplier event, then there are now two events inside CGrateS, one for the supplier and one for the retail.
Well, now when the ChargerSv1.ProcessEvent request hits chargers two events will come out and get processed by the rest of CGrateS as if they’re unique events / calls to be rated.
We’ve cloned our event, now we’ve got two copies of the same event.
The first copy (the original event), will be treated exactly as it is now, the other will see a new event generated inside CGrateS, it’ll be a copy of the original event, except for a few minor changes.
Let’s take a look at what happens to our event going through ChargerS when we generate a CDRsV2.ProcessExternalCDR API request:
I’ve tried to keep the above example as minimal as possible, but if we have a look we can now see two events, the first is our default charger, where nothing is changed; it’s got the same category as we set on the ProcessExternalCDR request (call) and the RunID is “default” per the default charger.
But look below and we’ve got another copy, this time the RunID is set to charger_retail, because that’s what we’ve set it to inside the RunID parameter for the charger named CHARGER_Retail, this means when filtering CDRs we’ll be able to spot these ones really easily, and know it’s a fork of a different event.
But importantly we’ve changed some of the values in the CGrateS Event, the same way AttributeS changes stuff.
So what have we changed? Well the Category of the new request is now RetailCharge.
Now if we cast our mind back to setting the RatingProfile back in Tutorial 3, you may remember we set the Category on the RatingProfile.
Now is when this matters. By setting different Categories in our Rating Profile, we can create a new RatingProfile, with the category set to RetailCharge, but referencing a whole different RatingPlan, with different destinations and rates, and this second event that was forked by ChargerS, will match that RatingProfile, and the RatingPlans that go with it.
For everything matching we’ll get two CDRs (if we’re calling *cdrs that is) and they’re treated as totally separate records.
Think about it; by defining a new RatingProfile with category Wholesale with your wholesale rate, and then creating a Charger for that category, you’ll have a retail CDR and a wholesale CDR. Same for reseller rates, commissions, anything!
We’re using this in one of our networks to handle rating for all the SMS traffic, we’ve got various suppliers and sources for A2P and P2P traffic, and having additional chargers to calculate different rates in a different currency for billing our suppliers is super useful.
#Second charger used for calculating the A2P charge for SMS in USD
print(CGRateS_Obj_local.SendData({
    "method": "APIerSv1.SetChargerProfile",
    "params": [
        {
            "ID": "CHARGER_SMS_A2P",
            "FilterIDs": ["*string:~*req.Category:sms", "*notstring:~*req.Account:gsm_0340"],
            'AttributeIDs' : ['*constant:*req.RequestType:*rated;*constant:*req.Category:sms_a2p'],
            'RunID' : 'charger_a2p',
            'Weight': 0,
        }
    ]   }   ))
Nope – it doesn’t do anything useful. So why is it there?
The SUBSCRIBE method in SIP allows a SIP UAC to subscribe to events, and then get NOTIFY messages when that event happens.
In a plain SIP scenario (RFC 3261), we can imagine an IP Phone and a PBX scenario. I might have “Busy Lamp Field” aka BLF buttons on the screen of my phone, that change colour when the people I call often are themselves on calls or on DND, so I know not to transfer calls to them – This is often called the “presence” scenario as it allows us to monitor the presence of another user.
At a SIP level, this is done by sending a SUBSCRIBE to the PBX with the information about what I’m interested in being told about (State changes for specific users) and then the PBX will send NOTIFY messages when the state changes.
But in IMS you’ll see SUBSCRIBE messages every time the subscriber registers, so what are they subscribing for?
Well, you’re just subscribing to your own registration status, but your phone knows your own registration status, because it’s, well, the registration status of the phone.
So what does it achieve? Nothing.
The idea was in a fixed-mobile-convergence scenario (keeping in mind that’s one of the key goals from the 2008 IMS spec) you could have the BLF / presence functionality for fixed subscribers, but this rareley happens.
For the past few years we’ve just been sending a 200 OK to SUBSCRIBE messages to the IMS, with a super long expiry, just to avoid wasting clock cycles.
There’s a bunch of reasons you might want to re-rate CDRs in CGrateS.
For me recently I wanted to introduce StatS to process historical CDR data, and I’d messed up some rates and wanting to correct it without deleting the existing data.
We can re-rate CDRs with the *rerate flag like so:
Something to be aware of that’s tripped me up, is that if while re-rating any of the CDRs fails, CGrateS will stop rating the CDRs after it. For example if you get something like this:
Then the full list of CDRs you’ve requested to be re-rated won’t have been re-rated, only the CDRs up to the error, then CGrateS will stop processing the records after it.
So keep an eye on ngrep and make sure you’ve got all your rates and destinations defined correctly, I found putting:
To filter out any CDRs with a -1 cost in the CDR filters means I filter out any CDRs that had failed to rate last time (Assuming you don’t want to fix CDRs that have failed to get rated).
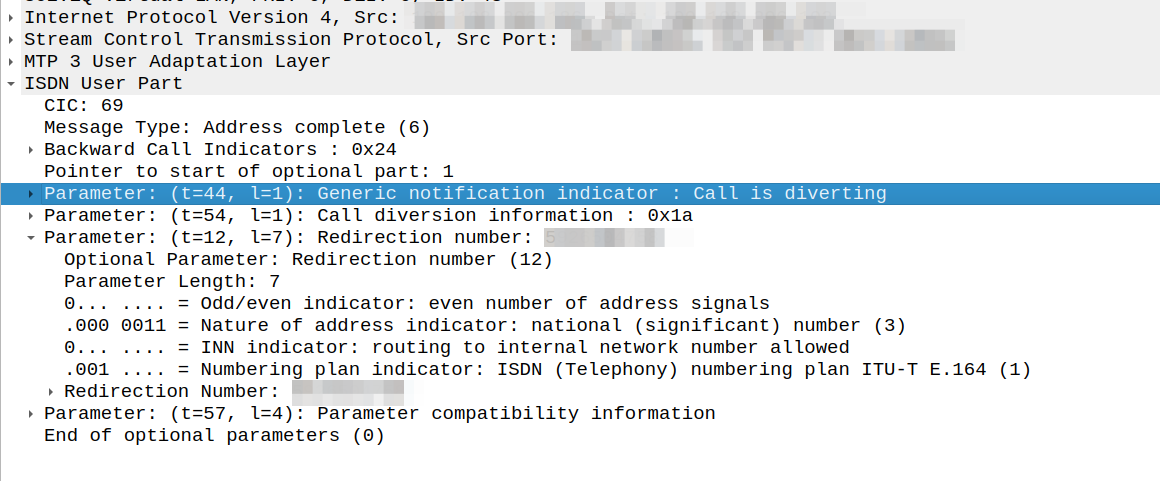
Had an interesting fault come across my desk the other day; calls were failing when the called party (an SSP we talk to via SS7/ISUP) had an exchange based call forward in place.
We’re a SIP based network, but we do talk some SS7/ISUP on the edges, and it was important that we handled this correctly.
I could see in the Address Complete Message (ACM) sent back to our network that there was redirection information here:
We would see the B party SSP release the call as soon as it sent this.
This made me wonder if we, as the originating network, were supposed to redirect to the new B party and send a new Initial Address Message?
After a lot of digging in the ITU Q.7xx docs (I’m not where near as fast at finding information in specs written prior to my birth, than I am with the 3GPP specs) I found my answer – These headers are informational only, the B party SSP is meant to re-target the message, and send us an Alerting or Answer message when it’s done so.
The StatS subsystem allows us to calculate statistics based on CGrateS events.
Each StatS object contains one or more “metrics” which are things like Average call duration, Total call duration, Average call cost or totals and average of other fields.
The first thing we’ll need to do is enable stats in our JSON config file:
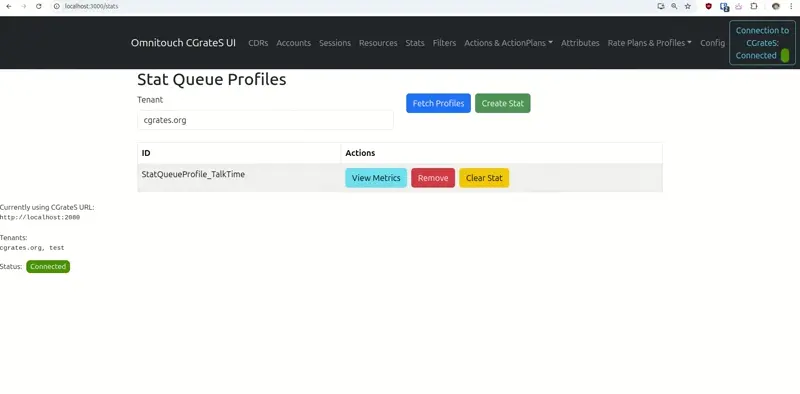
Well we’ve created a StatQueueProfile named StatQueueProfile_VoiceStats, in which we’ll store a maximum of 10000000 datapoints (this is important because to calculate an average we need to know all the previous datapoints), for a maximum of forever (Because TTL is -1, if we wanted to store for 1 hour we’d set TTL to 1h.
We’re not matching any FilterIDs, but based on what we covered on the post in FilterS, you can imagine using this to match calls from a given Account / customer, or to a specific group of destinations, or maybe from a given supplier, etc, etc.
What we do have that’s interesting is we have defined a series of metrics.
So what happens if we now generate a bunch of calls? Well, for starters as we’ve got no FilterS defined here, every call will match this StatQueueProfile, and so we’ll collect data for each.
The example code I’ve provided in the repo for this post generates a bunch of calls, and we can check the values for all our Metrics with GetQueueStringMetrics for our :
If we’ve got a TTL set, old values that have existed in the QueueProfile longer than the TTL are removed, but we can also manually clear the values by using the ResetStatQueue endpoint:
One thing to keep in mind is you can’t modify a StatQueue object via the API without resetting the values.
string_indexed_fields in the config file
Sidebar on this – By specifying the string_indexed_fields means that CGrateS will not evaluate every field against Filter rules, but instead only those defined here. This means if you’ve got an event with say 20 fields (AnswerTime, Account, Subject, Destination, RunID, SetupTime, Extra Fields, etc, etc) each of these gets evaluated against a filter, which is pretty processor intensive if your FilterS only ever look at Account and Destination, so by specifying which fields are indexed here to only the fields you use in your filters, you can boost your performance. On the flip side, you can leave this blank to evaluate all fields, but you’ll take a performance hit by doing so.
FilterS do what it says in the name, they are a generic way to define filter rules that an event may or may not match.
Think of them as like a WHERE statement in SQL, they allow us to condition match.
So what would we use FilterS for? Well, let’s first checkout some example use cases:
We might want to provide 100 free minutes on Tuesdays, we know from this post on creating Balances in CGrateS how to create the balance, but we’d use FilterS to make sure the balance is only used on the Tuesday, by adding a filter to check for the day of the week to only match on a Tuesday.
We might define an Attribute to rewrite the Destination number into E.164, but we only want to apply that transformation if the number is in 0NSN format, we apply the translation with AttributeS but we would create a filter to match Destinations that match the given prefixes.
We might want to trigger a counter for calls where the duration of the call (Usage) is greater than 1 hour, we can do this with Thresholds to handle the counting and FilterS to only match if the call duration is greater than 1 hour.
A customer may have multiple DIDs / phone numbers they present as the From header, and we need a way to map phone number “99990001” through to “99990099” as the Account and change the Account to “Customer X”, we can do that with AttributeS to update the Account value in the request, and FilterS to control if that AttributeS rule is matched or not.
FilterS are used all over in CGrateS, if you’ve been following along, you’ve already come across FilterS in the FilterIDs fields in the API, which we’re going to look at using today.
There’s two ways to handle Filters inside CGrateS, they both act the same way but each have some pros and cons.
Inline Filters
The first option is an “inline” filter. Take for example this AttributeS rule using an inline Filter.
A filter is made up of 3 components, the match “type”, the element to compare using the match and the values.
Match Types: The above example is matching based on it being a string (match type *string), but we can also match on prefixes, suffixes, destinations, empty, not equal to something, greater than, less than, timings and more.
Match Elements: Next up we’ve got the element, this is what part of a CGrateS event we’re matching with the Match Type we’ve selected. In the above example we’re matching for if the value is type *string and the Element is ~*req.Account. If you look at the requests (~*req.) in CGrateS, you can see the events, there’s all the standard fields like Account, Subject, Category, Tenant, Destination, etc, plus any custom ones you’re using, all of which we can use as an element to compare with our match type.
Match Values: Lastly we’ve got the conditions we’ll match on, in the example above it’s the string “Nick” – So what we’re checking is the match is *string and the element we’re getting the string from is ~*req.Account and if that matches the value “Nick” then ding-ding-ding- we’ve matched.
Obviously the values change based on what we’re doing, if we were prefix matching, we’d put the prefix to match in the value.
Value can also be a list, separated by the pipe (|) symbol for inline filters, so for example we could match “Nick” and also “Nicholas” (if I’m in trouble) with this inline filter:
Let’s look at one more example, if the Usage is greater than 1 hour:
*gt:~*req.Usage:1h
Inline filter for any Australian E164 prefixes
FilterProfiles
Now we’ve covered the basics of creating Filters with the “Inline” method, let’s consider the limits of this.
If I had defined objects in AttributeS, ThresholdS, ResourceS, Balances and StatS to match when ~*req.Account is “Nick” using an inline filter, and then I change my name, I’d have to go to each of those elements and update them, and that’d be a pain (especially because I’d need to also change my domain name.)
Instead I can create a “Filter Profile” – A reference to a filter that I can reference from AttributeS, ThresholdS, ResourceS, Balances and StatS, and then I only need to update the Filter.
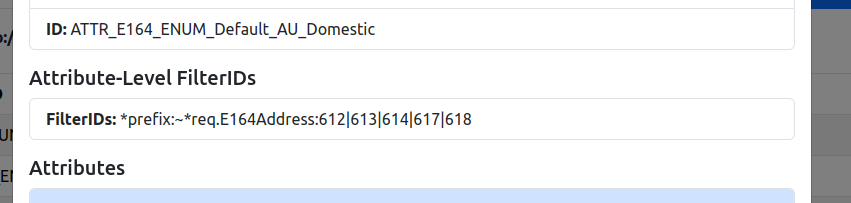
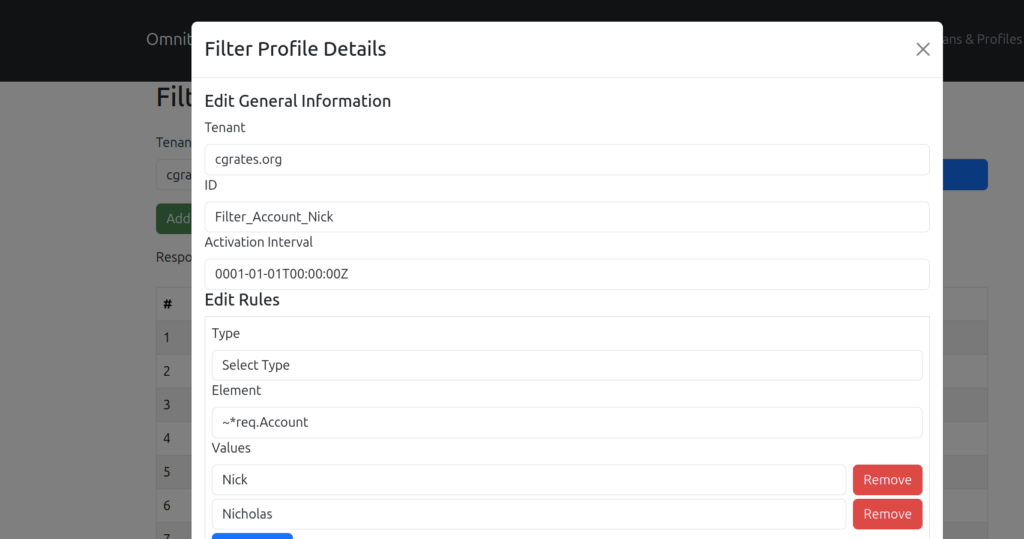
Let’s look at how that would look, first we’d create a new Filter Profile object using the API with:
This is the same as the below inline Filter, like the inline filter it’ll match any time the ~*req.Account is a string that matches “Nick” or “Nicholas”
"*string:~*req.Account:Nick|Nicholas"
And then to update our AttributeS example from earlier, rather than defining the inline filter in the FilterIDs section, we just put the ID of the filter we created above:
We saw in the example above that we could do Logical OR operations, if the Account is equal to “Nick” or “Nicholas”. But what one neat thing we can do with FilterProfiles is to do local AND Operations.
Let’s create a new FilterProfile called Filter_Sunday to match when the AnswerTime matches Timing named “Timing_Sunday”:
Now we can define an Attribute that will only match if the Account is equal to “Nick” or “Nicholas” AND the AnswerTime matches our “Timing_Sunday” timing profile:
So we can evaluate as AND by just putting both FilterProfiles in the FilterIDs field:
"FilterIDs": ["FLTR_X", "FLTR_Y"],
It’s up to you where you use Inline Filters vs Filter Profiles. As a general rule, if you don’t mind setting it on every object you’re touching, or you don’t reuse the Filter much, inline Filters is probably the way to go. But if you use multiple subsystems and want to keep your logic more readable, perhaps use Filter Profiles – but again, there’s no hard rules.
Filter Profiles is something we’ve got fairly good coverage of in the CGrateS UI, but as far as I’m aware there’s not a simple “Test Filter” API endpoint, so generally I test out with AttributeS.
Up until this point in the series, I’ve tried to hide all the complexity of CGrateS, so people following along can see some progress and feel like they’re making it somewhere with CGrateS, but it’s time to tear off the plaster and talk about the actual concepts, about what’s under the hood, and how all the components interact, as it’ll make it much easier then for us to learn more about how to use CGrateS.
This will be the last post in the “CGrateS in Baby Steps” series (Which I started in 2022), if you’ve made it this far congratulations, all the future posts will be on specific topics and build upon the concepts we’ve covered here.
This took me a while to grasp – CGrateS is both crazy complex and beautifully simple, but getting to the stage where you can “see through the matrix” on CGrateS and see the beautiful simplicity involves a bit of understanding how everything fits together.
Once you realize once you can see the pattern, and understand the building blocks, everything else CGrateS related becomes super simple.
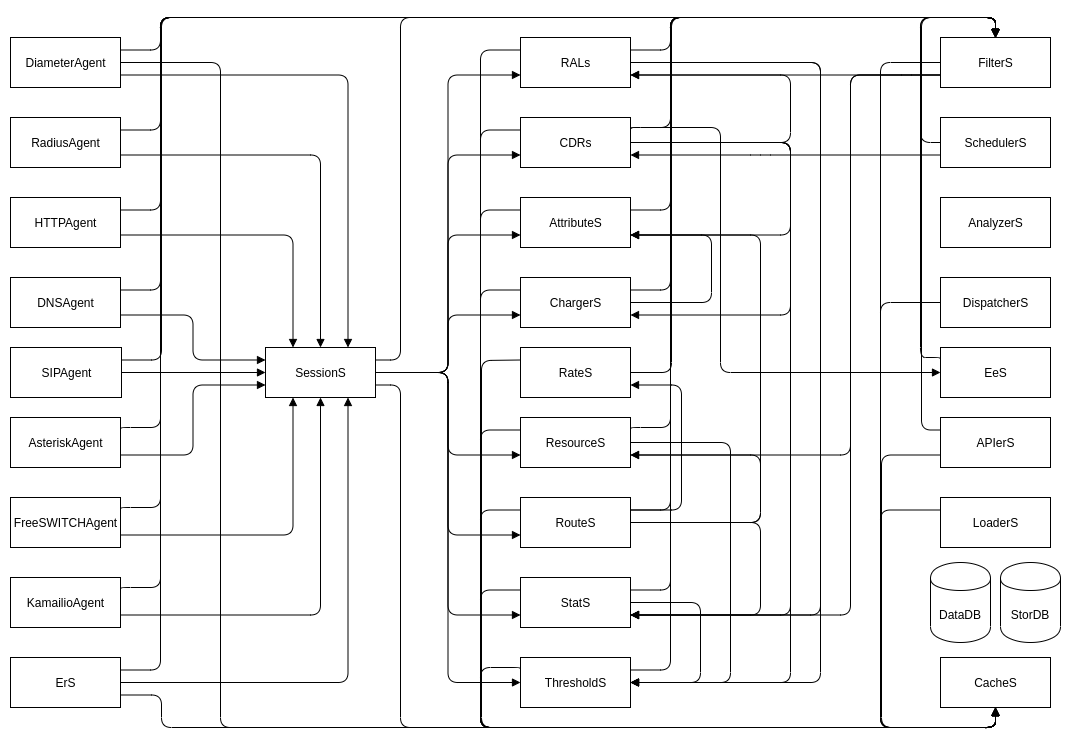
Agents
in CGrateS Agents are consumers of the services. That’s a super generic answer, but let’s take a closer look at what that actually means with some examples:
Diameter is a protocol that can be used for Online Charging.
CGrateS has a common interface for API calls that can perform Online Charging.
The CGrateS Diameter Agent translates between Diameter on one side, and CGrateS API calls on the other.
Likewise, if we want to speak Radius, we can use the CGrateS Radius Agent, this translates between RADIUS and the CGrateS API calls.
FreeSWITCH, Asterisk and Kamailio don’t use specific protocols like Diameter or Radius, but rather modules or plugins to connect that application to a CGrateS Agent, and they all just end up talking the same CGrateS API calls.
Lastly, there’s even an HTTP agent so you could define your own agent to talk another protocol if you wanted to use CGrateS for anything else (We’ve been playing with CAMEL based charging with CGrateS and 5GC charging).
The config for each of the CGrateS Agents happens in the cgrates.json config file (Typically in /etc/cgrates).
Because the Agents just translate everything into API calls, logic for billing a call from FreeSWITCH is the same as for Diameter, the same as for RADIUS, the same as for SIP, the same as for Asterisk.
The Agents just translate all the domain-specific stuff into the common CGrateS RPC API, which we’ve been working with up to this point.
This is key part to understand; because once you understand how to do the CGrateS part, moving from Asterisk to FreeSWITCH, to DNS, to RADIUS, to any other Agent, it’s all the same to you.
The Agents just translate domain-specific stuff (Diameter requests, CSV files, Asterisk Calls, FreeSWITCH calls, etc, etc) and act as a translator to translate these requests into CGrateS RPC API calls.
On the left side of the image below are the Agents, and on the right side, the Subsystems that do stuff with things.
Subsystems
So with these API calls, where do they go, what do they do?
Well, it’s the Subsystems that do the things.
What things?
Well, everything of use.
Each subsystem has a purpose, AttributeS transforms stuff, EeS exports CDRs, RALs applies our charging logic, CDRs writes CDRs to StorDB, etc, etc.
In each event we can set flags to denote which subsystems it should be routed to, and we can set the links between components in our cgrates.json file.
Based on the flags, we pass events between these subsystems.
Events
So our Agents create the API calls, which contain Events, which are JSON RPC calls.
They look like all the API examples we’ve played with, because that’s exactly what they are.
We can access them via the JSON RPC API, but when you start a call on Kamailio, the Kamailio Agent generates a JSON RPC API call containing an Event into CGrateS for that call on Kamailio.
When you send a DNS request, the DNS Agent translate this DNS request into a CGrateS JSON RPC API containing the event for the DNS request.
Let’s take an example, we’re going to use the ErS as it’s the simplest to demonstrate with.
So if you setup your enviroment per the tutorial above (but don’t load the CSV yet), we’ll start running some experiments…
Anatomy of an Event
We can “sniff” the events bouncing around between the Agent and the various Subsystems in real time, by using ngrep:
sudo ngrep -t -W byline port 2012 or port 2080 or port 8021 or port 2014 or port 2053 -d any
So let’ we’ve got ngrep running, we can move our CSV file in to be processed in another tab.
Plonking the CSV file into the path ERS is monitoring will mean the ErS Agent will generate a CGrateS JSON RPC “event” for each row in the file, it’ll look something like this:
Sidebar – you’re going to spend a lot of time with `ngrep`.
Alright, that event probably looks familiar, after all, it’s the same structure as the API requests we’ve made to CGrateS so far, to set rates and handle accounts.
But what we’re witnessing here isn’t us making an API request to the JSON RPC interface from a Python script, it’s the ERS Agent inside CGrateS, calling CGrateS.
The ERS Agent inside CGrateS reads the CSV file we dropped in, and based on what we had set in the ERS section of the CGrateS config file (cgrates.json), the ERS Agent create JSON RPC events and sent it to CGrateS for processing.
You may be thinking “Wow, the ERS Agent is really dumb, it just sends an API request (events)”, and you’d be right.
We could replace the ERS Agent with a Python script to read the CSV and send the same request, and we’d get the exact same outcome, but CGrateS is mostly “batteries included” so we don’t have to.
Ok, so you’ve heard me drum in the fact that Agents are pretty simple, and all they do is make JSON RPC requests for the event which are sent to CGrateS. So now what happens?
Well, the event is calling CDRsV1.ProcessEvent, so that means the Event is passed by CGRengine to the CDRs subsystem.
What does CDRs subsystem do with it? Well, that’s going to depend on what’s in our cgrates.json config file,
In the above example, CDRs is setup with connections to the different subsystems, AttributeS, Chargers and RALs are all the subsystems linked from here.
Having these links here does not force the Event to always route to these Subsystems, but unless we’ve got the links there, the Event won’t be able to get routed from CDRs to that subsystem if we want it to.
But we can see what’s going to happen with this request based on our CDRsV1.ProcessEvent event, it’s got Flags set to rals, so we know it wants RALs to be called.
So looking in ngrep we see our CDRsV1.ProcessExternalCDR event makes it to the CDRs module with ID 1.
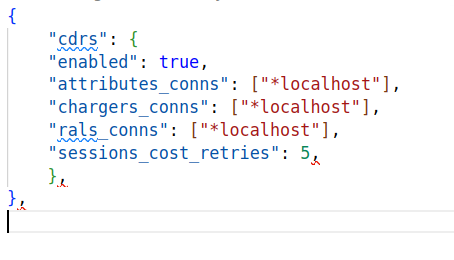
The API call has flags set to *rals so the CDRs will call RALs , and inside our config the CDRs section has a link in the config (shown in the image below) to RALs (rals_conns) – if we didn’t have that link, CGrateS wouldn’t know how to connect to RALs, and the event would fail.
Note at the bottom the APIOpts section tells us this API call was made by the *cdrs subsystem and the ID is 2 (This is a different request to the original CDRsV1.ProcessExternalCDR request which had ID 1 – we can use this to match responses to requests).
Again, because our config also includes links ChargerS and RALS subsystems, we’ll see requests to (you guessed it) ChargerS (The ChargerSv1.ProcessEvent) and RALS (Responder.GetCost).
# T 2024/12/22 09:09:47.465711 127.0.0.1:2012 -> 127.0.0.1:50456 [AP] #414 {"id":4,"result":{"Category":"call","Tenant":"cgrates.org","Subject":"61812341234","Account":"61412341234","Destination":"61812341234","ToR":"*voice","Cost":14,"Timespans":[{"TimeStart":"2024-01-01T01:00:00+11:00","TimeEnd":"2024-01-01T01:01:00+11:00","Cost":14,"RateInterval":{"Timing":{"ID":"*any","Years":[],"Months":[],"MonthDays":[],"WeekDays":[],"StartTime":"00:00:00","EndTime":""},"Rating":{"ConnectFee":0,"RoundingMethod":"*up","RoundingDecimals":4,"MaxCost":0,"MaxCostStrategy":"","Rates":[{"GroupIntervalStart":0,"Value":14,"RateIncrement":60000000000,"RateUnit":60000000000}]},"Weight":10},"DurationIndex":60000000000,"Increments":[{"Duration":0,"Cost":0,"BalanceInfo":{"Unit":null,"Monetary":null,"AccountID":""},"CompressFactor":1},{"Duration":60000000000,"Cost":14,"BalanceInfo":{"Unit":null,"Monetary":null,"AccountID":""},"CompressFactor":1}],"RoundIncrement":null,"MatchedSubject":"*out:cgrates.org:call:*any","MatchedPrefix":"618","MatchedDestId":"Dest_AU_Fixed","RatingPlanId":"RatingPlan_VoiceCalls","CompressFactor":1}],"RatedUsage":60000000000,"AccountSummary":null},"error":null}
What we’re seeing is the CDRs module, calling RALs, to get the cost information for this event.
Finally the CDRsV1.ProcessEvent that was initially sent by ErS gets a result (we can find the result to the request as it’ll have the same id parameter)
So that’s it, that’s the secret sauce – CGrateS is just a bunch of little APIs we combo together to create something great.
Recap
Agents translate data sources into API calls.
Each little API belongs to a Subsystem, like ChargerS, AttributeS or RALs, and we can chain them together in our config file or through the flags in the API request.
Once you’ve got your head wrapped around this, everything in CGrateS becomes way easier.
From now on I’ll pivot to talking about specific modules, and how we use them, starting with AttributeS (which I wrote last year while still drafting this), and diving into how to use each module in more detail.