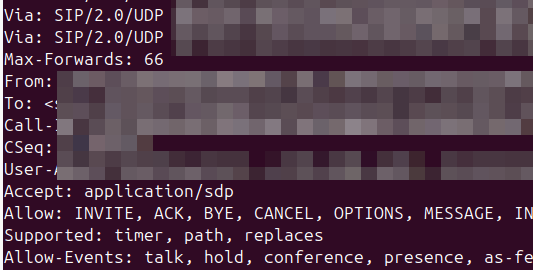
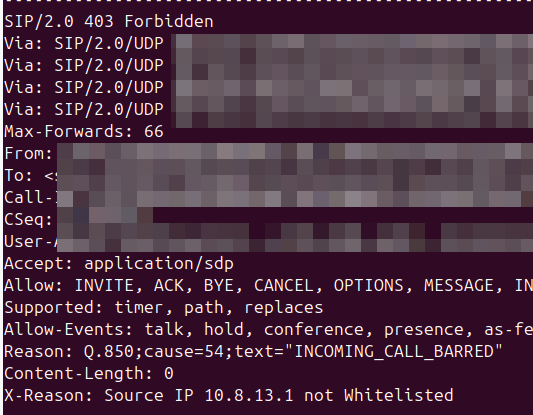
Whenever I reject a call, or hang it up, I like to provide some extra info in the response to help explain why the server made the decision, so anyone looking at the traces will understand.
So you try to pick the most appropriate hangup cause code for your scenario, but it’s not always clear to the other party why you’re hanging up the call.
What we can do is include a SIP header to explain it, X-Dbg or X-Reason or something similar, to provide some context.
<action application="set" data="sip_rh_X-Reason=Source IP not Whitelisted"/>
<action application="hangup" data="INCOMING_CALL_BARRED"/>
The sip_rh_ (SIP Response headers) variable is used to set the headers in the SIP response to reject the call.
By including this before the calling the hangup application, FreeSWITCH will add those headers when sending the hangup.
The Network Repository Function is essentially a database used to store/query information about NFs on the network.
To do this, the NRF has 3 services: the Nnrf_NFManagement Service is used to insert/update/remove records into the database of NFs on the network, the Nrf_NFDiscovery service is used to query this database, and the OAuth2 Authorization service is used to authenticate / authorize the transactions of the first two securely.
The Nnrf_NFManagement Service
The Nnrf_NFManagement Service is the service that handles the registration, deregistration and updating the database of service-producing NFs.
When a NF offering a service becomes ready for service, it registers with the NRF to advise the NRF of the services it offers and so service-consumers (Clients) are able to find and then request services from this NF.
Let’s take a look at the NFRegister process, which is the service operation used to register an NF in the NRF.
At its heart, the NFRegister process is a HTTP2 PUT sent from the NF to the NRF to the path <nrf_ip>/nnrf-nfm/v1/nf-instances/{nrf-instance-id} with a JSON payload containing all the specifics of the services being offered by the NF (NFProfile), which is sent to the NRF.
The NRF parses through the message body (That JSON Payload containing the NFProfile) and adds all this info to the internal database in the NRF as to which service producers it has available.
If this is all OK from the NRF’s perspective, then a 200 OK is sent back by the NRF.
The NFProfile JSON body
The NFProfile is a JSON encoded message body that contains all the info about the NF that the NRF takes and adds to its internal database of services offered by that NF.
nfInstanceID – The Network Function Instance ID is the unique identity if this NF. (It’s also included in the Request URI) It’s a unique ID and typically generated randomly by the NF itself.
nfType – The type of the NF itself, there’s a long list of supported NF Types, NRF, UDM, AMF, SMF, AUSF, etc, etc.
nfStatus – Is the status of the NF, either REGISTERED (Discoverable by other NFs), SUSPENDED (Registered in the NRF but not able to be discovered / invisible, NFs in this state are usually here because they’ve had a high failure rate or haven’t been responding to heartbeats), UNDISCOVERABLE (Used when an NF wants to stop offering services to new consumers, but is still able to offer services to existing consumers, the idea being this is taking it out of the discovery pool, but still able to serve in-process requests).
plmnList – This is a list of PLMNs that this NF serves.
fqdn – The Fully Qualified Domain name of the NF
IPv4Address / IPv6Address – The IPv4 and/or IPv6 address of the NF
nfService – This is a list of JSON objects, detailing the services offered by the NF, such as the service names it is offering, version of the service, IDs of the service instances and IP Endpoints for requests to be sent to.
priority / capacity / load – Used for selection of this NF from the pool and the order of results returned
The Nnrf_NFManagement Service also includes a Subscription service, to allow NFs to subscribe to changes in state, for example getting a notification if a NF that was registered becomes deregistered.
The UE Authentication Service is consumed by the AMF. The AMF initiates the authentication operation, when indicated, as part of the UE registration process. The AUSF performs either 5G-AKA or EAP-based authentication based on information received from the AMF. If EAP authentication is used then the AUSF and the UE exchange EAP messages through the AMF.
3GPP TS 29.509 V16.3.0; 5G System; Authentication Server Services
Common Dialogs on Nausf-auth Service
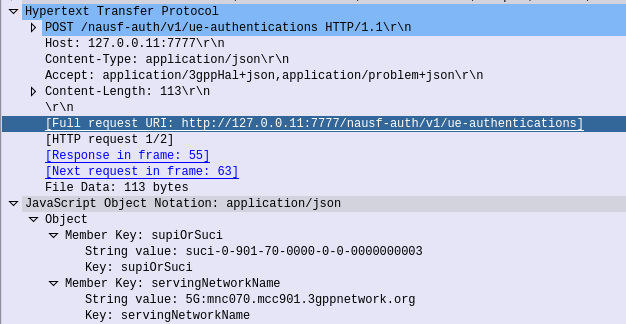
Authenticate UE – Request
HTTP POST sent from the AMF to the AUSF, to the URL /nausf-auth/v1/ue-authentications with JSON body containing the SUPI or the SUCI, and the serving network name.
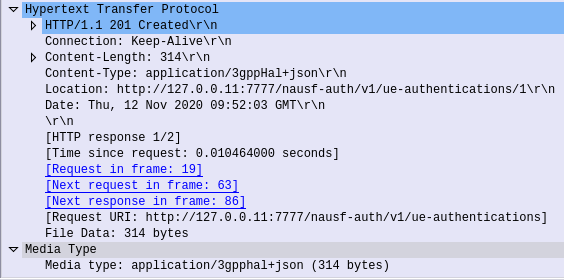
Authenticate UE – Response
If request from the AMF is successfully processed by the AUSF, it sends back a “201 Created” response, with a JSON Body containing the authentication vectors:
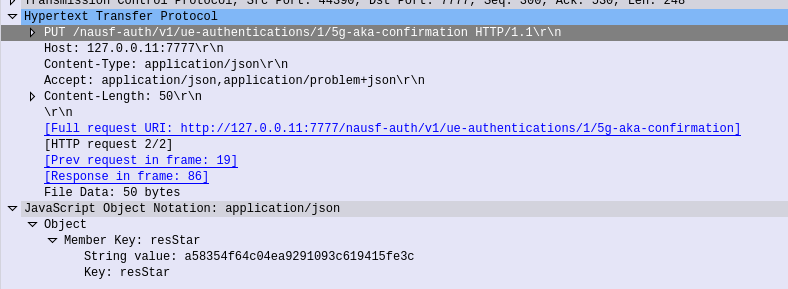
The AMF needs to advise the AUSF the RES returned from the Subscriber (if one was returned) to confirm the UE successfully authenticated, so the AMF sends this in the form of an HTTP PUT to the AUSF to the URL /nausf-auth/v1/ue-authentications/1/5g-aka-confirmation
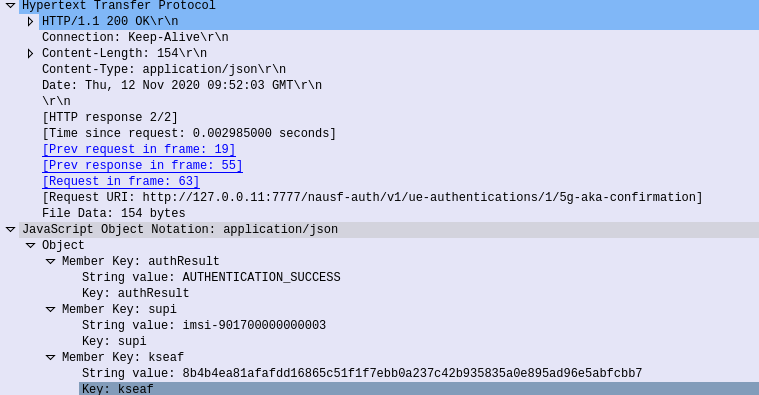
5G-AKA Confirmation – Response
If successful a 200 OK is sent back to the AMF by the AUSF with a JSON body containing the SUPI of the Subscriber (keep in mind the subscriber may have authenticated with a SUCI, so up until this point the AMF doesn’t know the SUPI of the Subscriber), and the Kseaf key used for ciphering and integrity protection.
Common Dialogs on Nudm-ueau Service
The Nudm_UEAuthentication service is used by NF service consumers to obtain UE authentication vectors from the UDM, to inform the UDM of authentication results, to query authentication results, and to purge authentication results.
3GPP TS 29.503 Unified Data Management Services
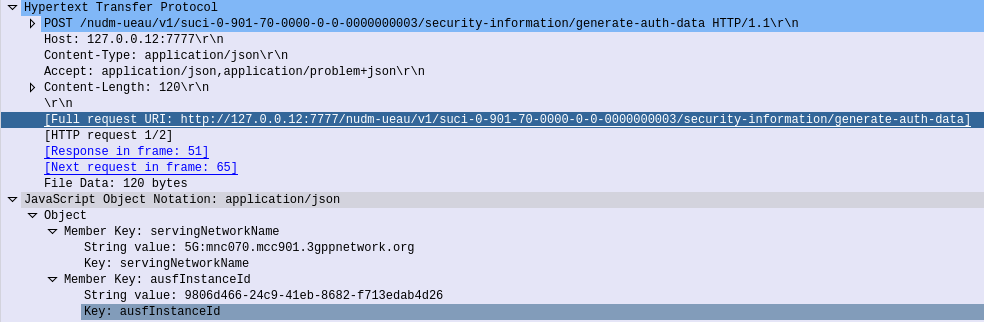
Generate Authentication Data – Request
When the AUSF needs to authenticate a subscriber, for example because an AMF has requested vectors, it in turn needs to request this information be generated by the UDM.
So the AUSF sends a HTTP POST to /nudm-ueau/v1/suci-0-901-70-0000-0-0-0000000003/security-information/generate-auth-data on the UDM (Where 901-70-0000-0-0-0000000003 is the SUPI or SUCI of the subscriber), and with a JSON body containing the AUSF’s Instance ID.
Generate Authentication Data – Response
Once the UDM has
The UDM will need to take the SUPI/SUCI provided by the AUSF and generate the authentication vectors following the AKA Process taking the OP/OPc & K keys as inputs.
The UDM sends a 200 OK back to the AUSF that requested the information, with a JSON Body containing the full vectors, including the Kausf to be provided to the AMF when the subscriber has successfully authenticated.
The AUSF sends an HTTP GET to the UDM with the SUPI/SUCI in the URI /nudr-dr/v1/subscription-data/imsi-901700000000003/authentication-data/authentication-subscription
To do this the UDM needs the K & OP (or OPc) values for that subscriber, depending on the UDM configuration, it may have this data cached, or it may need to retrieve these values from the UDR.
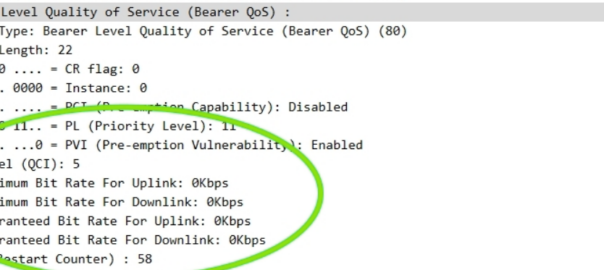
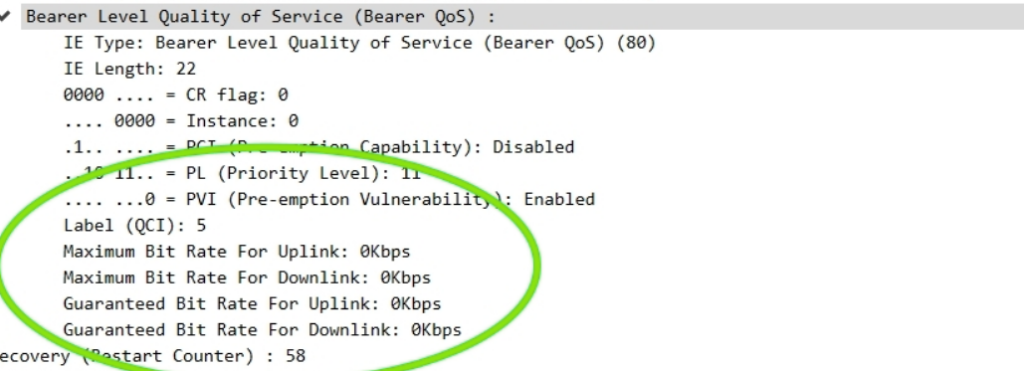
The other day I had a query about a roaming network that was sending Bearer Level QoS parameters in the Create Session Request to 0Kbps, up and down rather than populating the MBR values.
I knew for Guaranteed Bit Rate bearers that this was of course set, but for non GBR bearers (QCI 5 to 9) I figured this would be set the to MBR, but that’s not the case.
So what gives?
Well, according to TS 29.274:
For non-GBR bearers, both the UL/DL MBR and GBR should be set to zero.
So there you have it, if it’s not a QCI 1-4 bearer then these values are always 0.
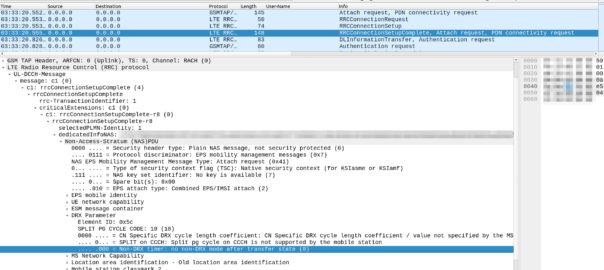
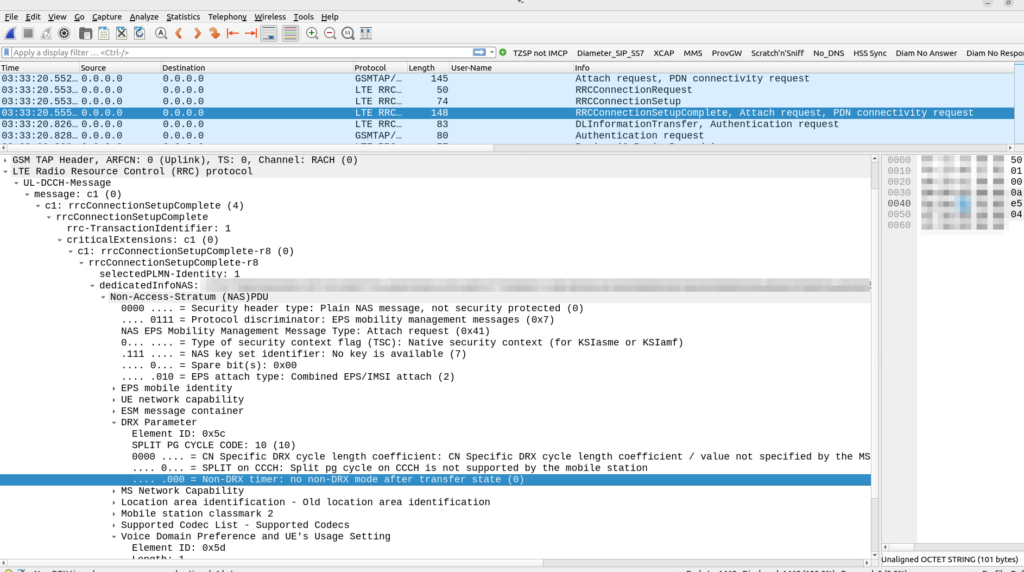
Recently we were on a project and our RAN guy was seeing UEs hand between one layer and another over and over. The hysteresis and handover parameters seemed correct, but we needed a way to see what was going on, what the eNB was actually advertising and what the UE was sending back.
In a past life I had access to expensive complicated dedicated tooling that could view this information transmitted by the eNB, but now, all I need is a cellphone or a modem with a Qualcomm chip.
The mobility management and connection management process in 5GC focuses on Connection Management (CM) and Registration Management (RM).
Registration Management (RM)
The Registration Management state (RM) of a UE can either be RM-Registered or RM-Deregistered. This is akin to the EMM state used in LTE.
RM-Deregistered Mode
From the Core Network’s perspective (Our AMF) a UE that is in RM-Deregistered state has no valid location information in the AMF for that UE. The AMF can’t page it, it doesn’t know where the UE is or if it’s even turned on.
From the UE’s perspective, being in RM-Deregistered state could mean one of a few things:
UE is in an area without coverage
UE is turned off
SIM Card in the UE is not permitted to access the network
In short, RM-Deregistered means the UE cannot be reached, and cannot get any services.
RM-Registered Mode
From the Core Network’s perspective (the AMF) a UE in RM-Registered state has sucesfully registered onto the network.
The UE can perform tracking area updates, period registration updates and registration updates.
There is a location stored in the AMF for the UE (The AMF knows at least down to a Tracking Area Code/List level where the UE is).
The UE can request services.
Connection Management (CM)
Connection Management (CM) focuses on the NAS signaling connection between the UE and the AMF.
To have a Connection Management state, the Registration Management procedure must have successfully completed (the UE being in RM-Registered) state.
A UE in CM-Connected state has an active signaling connection on the N1 interface between the UE and the AMF.
CM-Idle Mode
In CM-Idle mode the UE has no active NAS connection to the AMF.
UEs typically enter this state when they have no data to send / recieve for a period of time, this conserves battery on the UE and saves network resources.
If the UE wants to send some data, it performs a Service Request procedure to bring itself back into CM-Connected mode.
If the Network wants to send some data to the UE, the AMF sends a paging request for the UE, and upon hearing it’s identifier (5G-S-TMSI) on the paging channel, the UE performs the Service Request procedure to bring itself back into CM-Connected mode.
CM-Connected Mode
In CM-Connected mode the UE has an active NAS connection with the AMF over the N1 interface from the UE to the AMF.
When the access network (The gNodeB) determines this state should change (typically based on the UE being idle for longer than a set period of time) the gNodeB releases the connection and the UE transitions to CM-Idle Mode.
In our last post we looked at Actions and ActionPlans, and one of the really funky things we can do is setting ActionPlans to trigger on a time schedule or setting ActionTriggers to trigger on an event.
We’re going to build on the examples we had on the last post, so we’ll assume your code is up to the point where we’ve added a Signup Bonus to an account, using an ActionPlan we assigned when creating the account.
In this post, we’re going to create an action that charges $6, called “Action_Monthly_Charge“, and tie it to an ActionPlan called “ActionPlan_Monthly_Charge“, but to demo how this works rather than charging this Monthly, we’re going to charge it every minute.
Then with our balances ticking down, we’ll set up an ActionTrigger to trigger when the balance drops below $95, and alert us.
Defining the Monthly Charge Action
The Action for the Monthly charge will look much like the other actions we’ve defined, except the Identifier is *debitso we know we’re deducting from the balance, and we’ll log to the CDRs table too:
Next we’ll need to wrap this up into an ActionPlan, this is where some of the magic happens. Inside the action plan we can set a once off time, or a recurring time, kinda like Cron.
We’re setting the time to *every_minute so things will happen quickly while we watch, this action will get triggered every 60 seconds. In real life of course, for a Monthly charge, we’d want to trigger this Action monthly, so we’d set this value to *monthly. If we wanted this to charge on the 2nd of the month we’d set the MonthDays to “2”, etc, etc.
If you think the accounts will start getting debited every 60 seconds after applying this, you’d be wrong, we need to associate this ActionPlan with an Account first, this is how we control which accounts get which ActionPlans tied to them, to do this we’ll use the SetAccout API again we’ve been using to create accounts:
Well, for starters the ActionPlan named “ActionPlan_Signup_Bonus” is going to be triggered, as in the ActionPlan it’s Timing is set to *asap, so CGrateS will apply the corresponding Action (“Action_Add_Signup_Bonus“) right away, which will credit the account $99.
But a minute after that, we’ll trigger the ActionPlan named “ActionPlan_Monthly_Charge”, as the timing for this is set to *every_minute, when the Action “Action_Monthly_Charge” is triggered, it’s going to be deducting $6 from the balance.
We can check this by using the GetAccount API:
# Get Account Info
pprint.pprint(CGRateS_Obj.SendData({'method': 'ApierV2.GetAccount', 'params': [
              {"Tenant": "cgrates.org", "Account": str(Account)}]}))
You should see a balance of $99 to start with, and then after 60 seconds, it should be down to $93, and so on.
Triggering Actions based on Balances with ActionTriggers
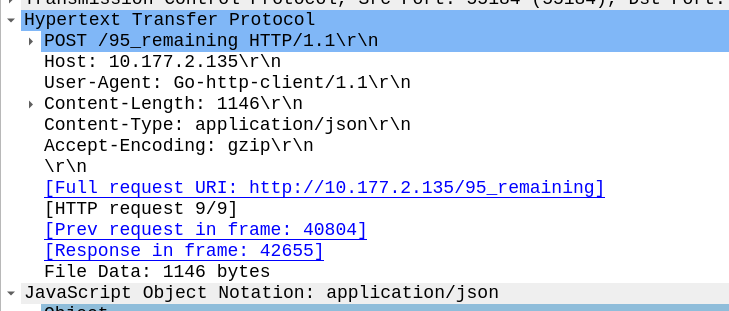
Okay, so we’ve set up recurring charges, now let’s get notified if the balance drops below $95, we’ll start, like we have before, with defining an Action, this will log to the CDRs table, HTTP post and write to syslog:
Now we’ll define an ActionTrigger to check if the balance is below $95 and trigger our newly created Action (“Action_HTTP_Notify_95“) when that condition is met:
We’ve defined the ThresholdType of *min_balance, but we could equally set this to ThresholdType to *max_balance, *balance_expired or trigger when a certain Counter has been triggered enough times.
Adding an ActionTrigger to an Account
Again, like the ActionPlan we created before, before the ActionTrigger we just created will be used, we need to associate it with an Account, for this we’ll use the AddAccountActionTriggers API, specify the Account and the ActionTriggerID for the ActionTrigger we just created.
If we run this all together, creating the account with the “ActionPlan_Signup_Bonus” will give the account a $99 Balance. But after 60 seconds, “ActionPlan_Monthly_Charge” will kick in, and every 60 seconds after that, at which point the balance will get to below $95 when CGrateS will trigger the ActionTrigger “ActionTrigger_95_Remaining” and get the HTTP POST to the HTTP endpoint and log entry:
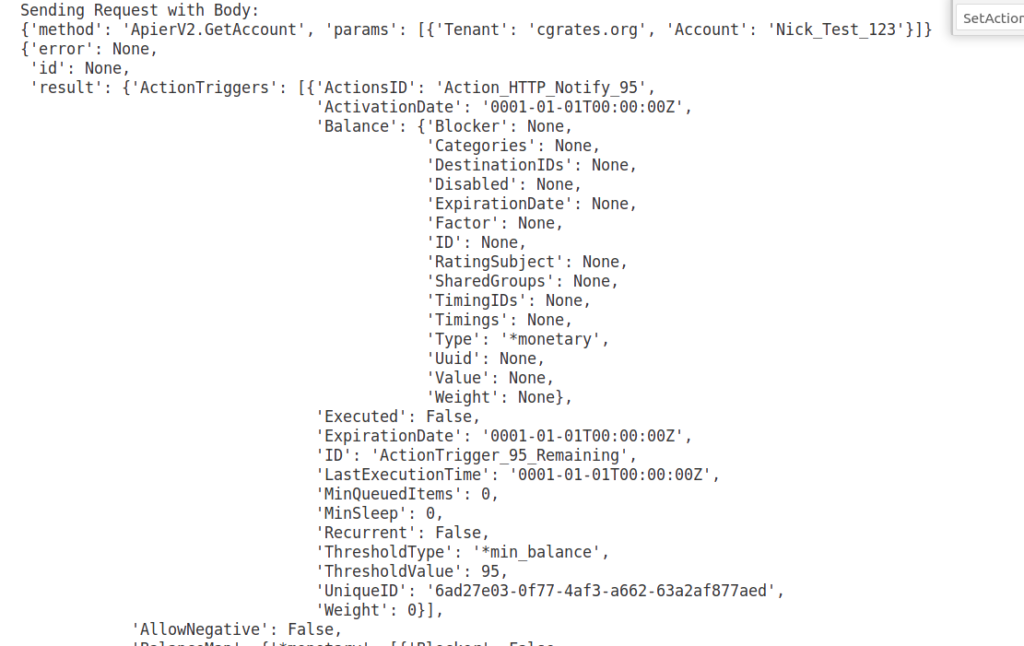
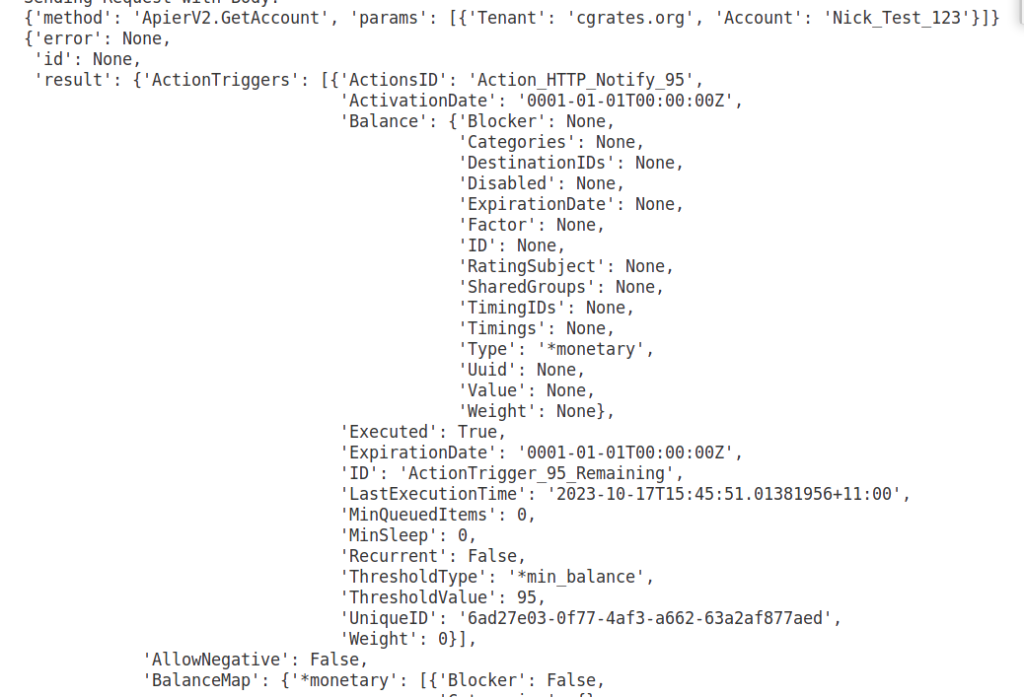
We can check on this using the ApierV2.GetAccount method, where we’ll see the ActionTrigger we just defined.
Checking out the LastExecutionTime we can see if the ActionTrigger been triggered or not.
So using this technique, we can notify a customer when they’ve used a certain amount of their balance, but we can lock out Accounts who have spent more than their allocated spend limit by setting an Action that suspends the Account once it reaches a certain level. We notify customers when balance expires, or if a certain number of counters has been triggered.
The Binding Support Function is used in 4G and 5G networks to allow applications to authenticate against the network, it’s what we use to authenticate for XCAP and for an Entitlement Server.
Rather irritatingly, there are two BSF addresses in use:
If the ISIM is used for bootstrapping the FQDN to use is:
bsf.ims.mncXXX.mccYYY.pub.3gppnetwork.org
But if the USIM is used for bootstrapping the FQDN is
bsf.mncXXX.mccYYY.pub.3gppnetwork.org
You can override this by setting the 6FDA EF_GBANL (GBA NAF List) on the USIM or equivalent on the ISIM, however not all devices honour this from my testing.
Yes, this is a lazy post. As the year draws to a close I was asked to put together a list of the most popular posts of the year.
Of the posts written this, year, there’s been a lot for people who build and work on networks to make their lives easier and their workflows more efficient.
The most popular posts this year weren’t actually from this year, this time last year I posted the Evolved Packet Core Analysis Challenge – The Skill-tester / Claw Machine of the Telecom world, test your EPC knowhow and skills!
As more and more readers are starting to work with 5GC this past year, My first 5G Core: Open5Gs and UERANSIM has been very popular as folks dip a toe in the water with 5GC.
On a personal notes, it looks like I finished every book in my reading list (Except Girdle Round the Earth that’s still on my bedside table), I did take a break from writing around the middle of the year, but weekly ish posts are coming back.
If you have a problem, if no one else can help, and if you can find me, drop me a line – [email protected] / LinkedIn / Twitter.
Long after humans reduce this planet to an inhospitable wasteland, cockroaches and my Lenovo ThinkPad will continue to survive.
My only gripe with my almost decade old laptop, is the charger. It has a standalone charger, and I can’t charge it on USB-C.
Way back in when Lenovo took over from IBM, the barrel jack style charger that ThinkPads had used was replaced with a slimmer rectangular charger port, to allow for more slimmer laptops. You can get adapters to allow you to use your old chargers with the new(er) laptops, and luckily for us, this means we have a cheap and readily available source of male slimline charger plugs, without having to resort to cutting up a charger.
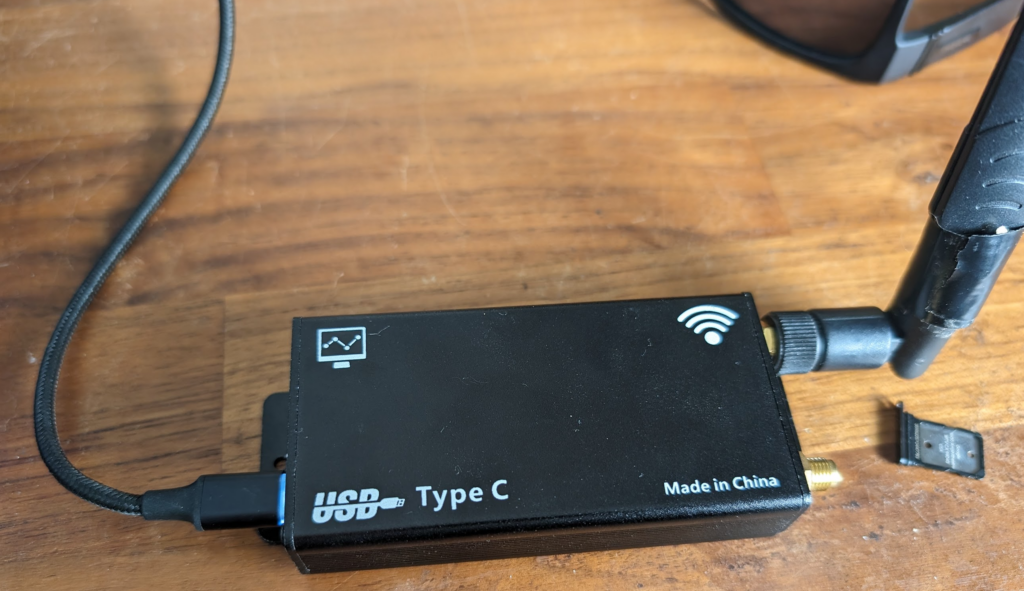
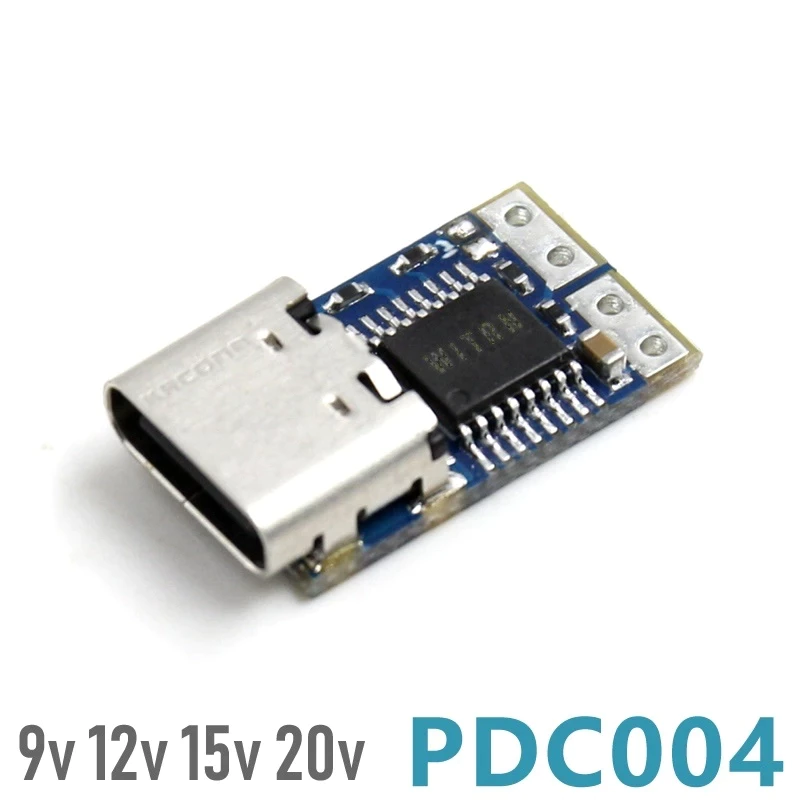
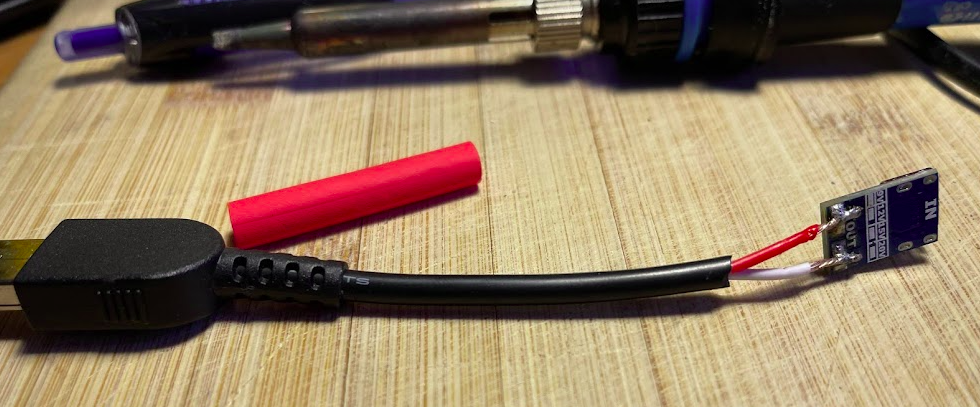
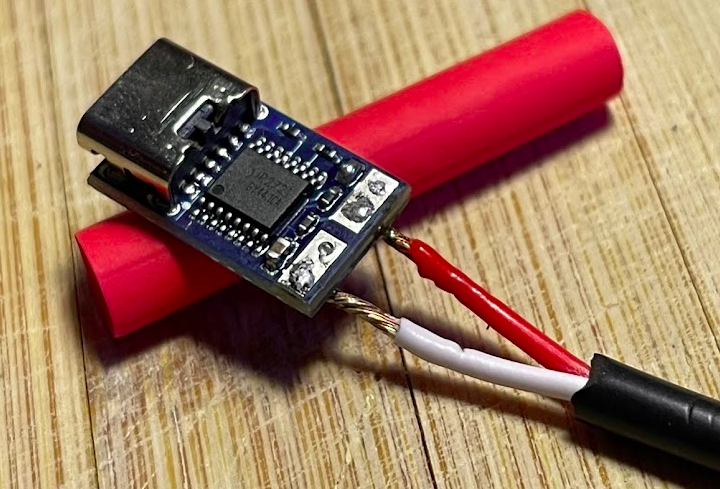
And for a few bucks online, you can buy USB-C Power Delivery converters that you plug USB-C into one end of, and get out 20v on the other side…
USB-C to 20v Power Delivery module
So I combined the two; USB-C to 20v adapter on one side, and a cut up barrel-charger to slimline charger adapter on the other using the male slimline charger plug.
And bingo, just like that I’ve got a USB-C charging capability for my Thinkpad.
After potting in silicone, I’ve got something that can go in my backpack and allow me to charge my laptop on the go with a USB-C charger, for under $5 of parts.
So I run a lot of VMs. It’s not unusual when I’m automating something with Ansible or setting up a complex lab to be running 20+ VMs at a time, and often I’ll create a base VM and clone it a dozen times.
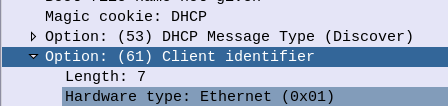
Alas, Ubuntu 20.04 has some very irritating default behaviour, where even if the MAC addresses of these cloned VMs differ they get the same IP Address from DHCP.
That’s because by default Netplan doesn’t use the MAC address as the identifier when requesting a DHCP lease. And if you’ve cloned a VM the identifier it does use doesn’t change even if you do change the MAC address…
Irritating, but easily fixed!
Editing the netplan config:
network:
  ethernets:
    eth0:
      dhcp4: true
      dhcp-identifier: mac
  version: 2
Run a netplan-apply and you’re done.
Now you can clone that VM as many times as you like and each will get it’s own unique IP address.
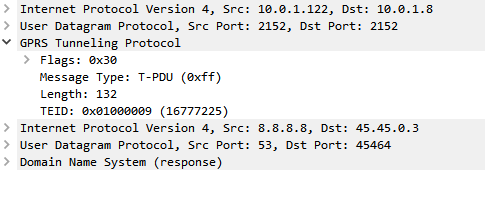
If you’re using an GSM / GPRS, UMTS, LTE or NR network, there’s a good chance all your data to and from the terminal is encapsulated in GTP.
GTP encapsulates user’s data into a GTP PDU / packet that can be redirected easily. This means as users of the network roam around from one part of the network to another, the destination IP of the GTP tunnel just needs to be updated, but the user’s IP address doesn’t change for the duration of their session as the user’s data is in the GTP payload.
One thing that’s a bit confusing is the TEID – Tunnel Endpoint Identifier.
Each tunnel has a sender TEID and transmitter TEID pair, as setup in the Create Session Request / Create Session Response, but in our GTP packet we only see one TEID.
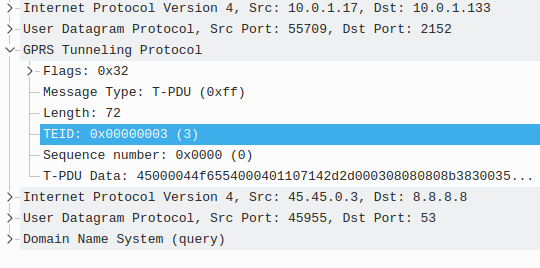
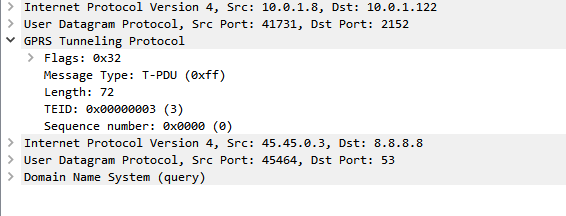
There’s not much to a GTP-U header; at 8 bytes in all it’s pretty lightweight. Flags, message type and length are all pretty self explanatory. There’s an optional sequence number, the TEID value and the payload itself.
So the TEID identifies the tunnel, but it’s worth keeping in mind that the TEID only identifies a data flow from one Network Element to another, for example eNB to S-GW would have one TEID, while S-GW to P-GW would have another TEID.
Each tunnel has two TEIDs, a sending TEID and a receiving TEID. For some reason (Minimize overhead on backhaul maybe?) only the sender TEID is included in the GTP header;
This means a packet that’s coming from a mobile / UE will have one TEID, while a packet that’s going to the same mobile / UE will have a different TEID.
Mapping out TIEDs is typically done by looking at the Create Session Request / Responses, the Create Session Request will have one TIED, while the Create Session Response will have a different TIED, thus giving you your TIED pair.