Tag Archives: GPRS

GSM with Osmocom: OsmoSGSN for Packet Data

In our last Osmocom post we talked about the basics of packet data, and configuring our BTSs to support it.

In this post we’ll take a look at using Osmocom’s Serving Gateway Support Node (SGSN) named OsmoSGSN.

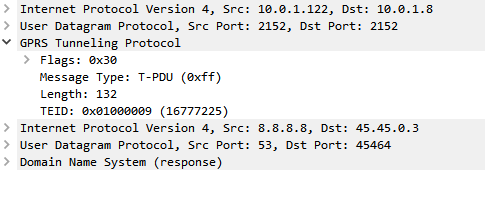
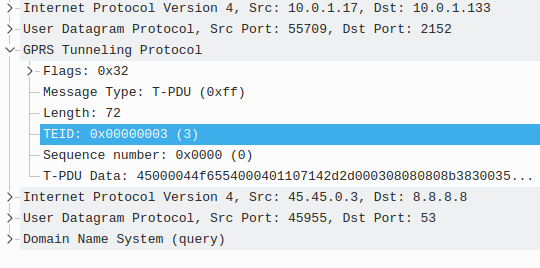
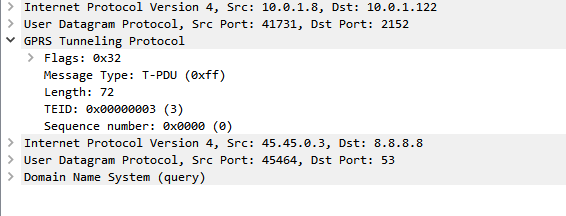
At the BSC traffic is divided into two categories, Circuit Switched (CS) traffic (Like voice calls & SMS) which is handed by the MSC, and Packet Switched (PS) traffic (Mobile data) is handled by the SGSN.

The SGSN acts as an anchor point for our packet data, it connects our BSC (that handles our RAN) to the GGSN (that handles the connection to external data networks).

Although it’s not technically possible to run a data only 2G/3G network (you require the MSC) it almost could be.
The SGSN handles authentication of subscribers, and runs the PS network completely standalone from the CS network. The SGSN does it’s own handover management, authentication, etc, without any connection to the MSC.

Basic SGSN Config

Like the previous Osmocom network elements we’ve covered, we’ll access the SGSN via Telnet on localhost (the server running the Osmocom stack) on port 4254.

Once we’ve accessed the terminal we’ll escalate our privileges using the enable command, and run configure terminal to start configuring,

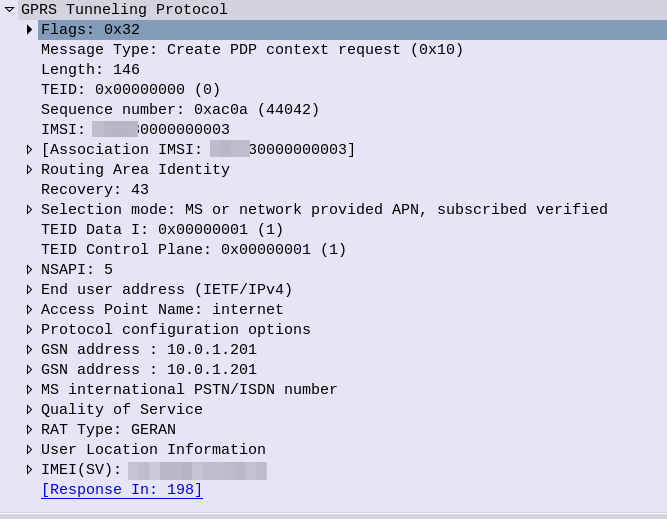
We’ll begin by setting the local IP our SGSN will listen on, the gtp local-ip, we’ll need this to be externally accessible for our BTSs, so set it to the IP of the server.

sgsn
  gtp local-ip 10.0.1.201

Next we’ll need to configure the IP of our GGSN. It gets a bit messy if we’re running everything on one box, as we’re going to have the SGSN and the GGSN trying to communicate on the same ports for GTP, so best to assign an IP in the loopback range, like 127.0.0.2 in my case, for the GGSN:

sgsn
   gtp local-ip 10.0.1.201
   ggsn 0 remote-ip 127.0.0.2
   ggsn 0 gtp-version 1
   ggsn 0 no echo-interval
   apn * ggsn 0

We can also steer GGSN selection based on the APN, for example an APN for a corporate network, you may want to have a dedicated GGSN for, for example, we could create a second GGSN – GGSN 1 and route any traffic on our “special.access.net” APN to that GGSN, and everything else to GGSN0:

sgsn
   gtp local-ip 10.0.1.201
   ggsn 0 remote-ip 127.0.0.2
   ggsn 0 gtp-version 1
   ggsn 0 no echo-interval
   ggsn 1 remote-ip 10.0.1.99
   ggsn 1 gtp-version 1
   ggsn 1 no echo-interval
   apn special.access.net ggsn 1
   apn * ggsn 0

You may notice that APNs look like domain names – that’s because they can be,

If we owned the domain special.access.net we could set it to resolve to the GGSN IP we’re using for the special.access.net GGSN at 10.0.1.99, and instead of hardcoding the IP in our config use a DNS server (like 8.8.8.8) to resolve these.

sgsn
   gtp local-ip 10.0.1.201
   ggsn dynamic
   grx-dns-add 8.8.8.8

But for now, in order to keep our config simple we’ll just configure the one GGSN (GGSN 0) and route all APNs to it:

sgsn
   gtp local-ip 10.0.1.201
   ggsn 0 remote-ip 127.0.0.2
   ggsn 0 gtp-version 1
   ggsn 0 no echo-interval
   apn * ggsn 0

Authentication

So the SGSN has it’s own connection to the HSS in order to authenticate subscribers.

Because GSM doesn’t employ Mutual Network Authentication on the SIM we can set the authentication policy on the SGSN to just allow anyone in with any SIM card and they’ll be able to attach and access packet data.

We can easily set this through the VTY:

sgsn
    auth-policy accept-all

To enable authentication we’d need to setup the Subscriber in the HLR, like we did for CS only connections, and change the access mode to cs+ps in the HLR.

Then we can change our config to use a remote HLR for authentication,

sgsn
auth-policy remote

A Word on Compression & Encryption

As the demand for traffic on GPRS & EDGE grew, there were still limitations on the bandwidth of the system.

To try and make the best of what’s available, header compression is available, similar to what we’ve seen with ROHC in VoLTE.

To learn more about setting up compression and encryption of the data, take a look in the Osmo-SGSN Manual.

Charging

Charging in mobile networks is a topic we could spend weeks on, but we’re not going to!

OsmoSGSN implements a simple CDR based charging mechanism that writes to a text file a simple CSV file with most importantly the IMSI and bytes in / out for each subscriber, that can be used to implement offline charging (Post paid) if required, and with some hacky scripts can even cut off sessions after reaching a certain amount of throughput (online charging aka pre-paid).

By adding the below to our config OsmoSGSN will write CDRs into /home/nick/sgsn.cdr every 60 seconds.

sgsn
  cdr filename /home/nick/sgsn.cdr
  cdr interval 30

The complete Setup

Here’s a complete copy of my running config, you’ll obviously need to change the 10.0.1.201 IP that I’m using to the IP you’re using for your server.

osmo-sgsn.cfg

Getting TEID up with GTP Tunnels

If you’re using an GSM / GPRS, UMTS, LTE or NR network, there’s a good chance all your data to and from the terminal is encapsulated in GTP.

GTP encapsulates user’s data into a GTP PDU / packet that can be redirected easily. This means as users of the network roam around from one part of the network to another, the destination IP of the GTP tunnel just needs to be updated, but the user’s IP address doesn’t change for the duration of their session as the user’s data is in the GTP payload.

One thing that’s a bit confusing is the TEID – Tunnel Endpoint Identifier.

Each tunnel has a sender TEID and transmitter TEID pair, as setup in the Create Session Request / Create Session Response, but in our GTP packet we only see one TEID.

There’s not much to a GTP-U header; at 8 bytes in all it’s pretty lightweight. Flags, message type and length are all pretty self explanatory. There’s an optional sequence number, the TEID value and the payload itself.

So the TEID identifies the tunnel, but it’s worth keeping in mind that the TEID only identifies a data flow from one Network Element to another, for example eNB to S-GW would have one TEID, while S-GW to P-GW would have another TEID.

Each tunnel has two TEIDs, a sending TEID and a receiving TEID. For some reason (Minimize overhead on backhaul maybe?) only the sender TEID is included in the GTP header;

This means a packet that’s coming from a mobile / UE will have one TEID, while a packet that’s going to the same mobile / UE will have a different TEID.

Mapping out TIEDs is typically done by looking at the Create Session Request / Responses, the Create Session Request will have one TIED, while the Create Session Response will have a different TIED, thus giving you your TIED pair.

Osmocom Logo

GSM with Osmocom: Channel Types

When setting up the timeslots on the TRX for each BTS on your BSC, you’ll notice you have to set a channel type.

So what do these acronyms mean, and how do they affect the performance of the network?

GSM channels break down into one of to categories, control channels – used for signalling, and traffic channels, used for carrying information to/from a user.

A network with only control channels wouldn’t allow a call to be made, as there would be no traffic channels to carry the audio of the call,

Conversely a network with only traffic channels would have plenty of capacity for calls, but without a control channel would have no way of setting them up.

Traffic Channels

Traffic channels break down into a further two categories, voice channels for carrying call audio, and data channels for carrying GPRS data.

Traffic Channels for Voice

There’s a few variants of voice channel based on the codec used for encoding the voice data, the more compressed / small the audio signal is, the more you can cram in per channel, at the sacrifice of voice quality.

Common options are Traffic Channel – Full Rate (TCH/F), & Traffic Channel – Half Rate (TCH/F) channels.

Traffic Channels for Data

When GPRS was introduced it needed to be transported on a traffic channel, but unlike a voice channel, the resources weren’t going to be used 100% of the time (like in a voice call) and could be shared on an as-needed basis.

Data channels are also also broken down into full rate and half rate channels, like Traffic Channel – Full Rate (TCH/F), & Traffic Channel – Half Rate (TCH/F) channels.

Control Channels

Control channels carry the out of band signalling between the Phone and the BTS.

Broadcast Channels

Broadcast Channels are by their very nature – Broadcasted, this means every phone on the BTS gets these messages.

There are 3 broadcast channels, the FCCH for frequency corrections, SCH for synchronisation and BCCH for a common channel that transmits information to all phones, containing info on the network such as the PLMN, neighbouring cells, etc.

Common Channels

The PCH – Paging Channel, is used to page phones in idle mode. All phones will listen on the paging channel, and if they hear their identifier will establish a connection back to the network.

RACH the Random Access Control Channel is used for when the phone wants to establish a connection with the network, by picking a random timeslot to transmit it’s data on the RACH.

The ACGC is the Access Grant Channel, containing information about dedicated channels to be assigned to phones.

Dedicated Control Channels

Like dedicated traffic channels, dedicated channels are only in use by one phone at a time.

The SDCCH is the standalone dedicated control channel, over which location updates, SMS, authentication & call setup / teardown signalling is transferred.

The SACCH – slow Associated Control Channel is used for timing advance (when users are further from the BTS timing advances are needed to ensure propogation time is taken into account), power control information, signaling data and radio measurements.

Finally the FACCH – Fast Associated Control is used for transferring larger messages such as for handover information,

GSM with Osmocom: GPRS & Packet Data

So far we’ve focused on building a plain “2G” (voice and SMS only) network, which was all consumers expected twenty years ago.

As the number of users accessing the internet through DSL, Dial Up & ISDN grew, the idea of getting this data “on the go” became more appealing. TCP/IP was becoming the dominant standard for networking, the first 802.11 WiFi spec had recently been published and demand for mobile data was growing.

There’s a catch however – TCP/IP was never designed to be mobile.

An IP address exists in a single location.

(Disclaimer: While you can “move” a subnet by advertising itself out in a different location via BGP peering relationships with other operators, it’s cumbersome, can only be done per /24 or larger, and most importantly it’s painfully slow. IPv6 has MIPv6 which attempts to fix some of these points, but that’s outside of this scope.)

GPRS addressed the mobility issue by having a single fixed point the IP Address is assigned to (the Gateway GPRS Support Node), which encapsulates IP traffic to/from a mobile user into GTP Packet (GPRS Tunnelling Protocol), like GRE or any of the other common routing encapsulation protocols, allowing the traffic to be rerouted to different destinations as the users move from being served by one BTS to another BTS.

I’ve written about GTP here if you’d like to learn more.

So now we’ve got a method of encapsulating our data we’ve got to work out how to get that data out over the air.

BTS Time Slots

Way back when we were first setting up our BSC and adding our BTS(s) you will have configured timeslots for each BTS configured on your BSC.

Chances are if you’ve been following along with this tutorial, that you configured the first time slot (timeslot 0) as a CCCH+SDCCH4, meaning Common Control Channel and 4 standalone dedicated control channels, and all the subsequent timeslots (timeslot 1 – 7) as Traffic Channels (full rate) – TCH/F.

This works well if we’re only carrying voice, but to carry data we need timeslots to put the data traffic on.

For this we’ll re assign a timeslot we were using on our BSC as a voice traffic channel (TCH/F) as a PDCH – a Packet Data Channel.

This means that on the BSC your timeslot config will look something like this:

   timeslot 6
    phys_chan_config PDCH
    hopping enabled 0
   timeslot 7
    phys_chan_config PDCH
    hopping enabled 0

In the above example I’ve assigned two timeslots for Packet Data Channels,

The more timeslots you allocate for data, the more bandwidth available, but the fewer voice resources available.

(Most GSM networks today have few data timeslots as more recent RATs like 3G/4G are taking the data traffic, and GSM is used primarily for voice and low bandwidth M2M communications)

GPRS and EDGE

GPRS comes in two flavors, GPRS and EDGE.

GPRS (General Packet Radio Services) was the first of the two, standardised in R97, and allowed users to reach a downlink speeds of up to 171Kbps using GMSK on the air interface to encode the data.

Users quickly expected more speed, so EDGE (Enhanced Data rates for Global Evolution) was standardised, from a core perspective it was the same, but from a BTS / Air interface perspective it relied on 8PSK instead of GMSK allowed users to reach a blistering 384Kbps on the downlink.

These speeds are the theoretical maximums.

As the difference between GPRS and EDGE is encoding on the air interface, from a core perspective it’s treated the same way, however as our BTS gets all it’s brains from the BSC, we’ll need to specify if the BTS should use EDGE or GPRS it in the BSC’s BTS config.

BSC Config

On the BSC for each BTS we want to enable for packet data, we’ll need to define the parameters.

There’s two other values we’ll introduce when setting this up,

The first is NSEI – the Network Service Entity Identifier, which is the identifier of the BTS’s Packet Control Unit, like the cell identity.

The second value we’ll touch on is the BVCI – the BSSGP Virtual Connections Identifier, which is used for addressing between the BTS PCU and the SGSN.

bts 0
  gprs mode egprs
  gprs 11bit_rach_support_for_egprs 0
  gprs routing area 0
  gprs network-control-order nc0
  gprs cell bvci 2
  gprs cell timer blocking-timer 3
  gprs cell timer blocking-retries 3
  gprs cell timer unblocking-retries 3
  gprs cell timer reset-timer 3
  gprs cell timer reset-retries 3
  gprs cell timer suspend-timer 10
  gprs cell timer suspend-retries 3
  gprs cell timer resume-timer 10
  gprs cell timer resume-retries 3
  gprs cell timer capability-update-timer 10
  gprs cell timer capability-update-retries 3
  gprs nsei 101
  gprs ns timer tns-block 3
  gprs ns timer tns-block-retries 3
  gprs ns timer tns-reset 3
  gprs ns timer tns-reset-retries 3
  gprs ns timer tns-test 30
  gprs ns timer tns-alive 3
  gprs ns timer tns-alive-retries 10
  gprs nsvc 0 nsvci 101
  gprs nsvc 0 local udp port 23001
  gprs nsvc 0 remote udp port 23000
  gprs nsvc 0 remote ip 10.0.1.201

The OsmoBSC docs cover each of these values, they’re essentially defaults.

There are quite a few changes required on the BSC for each BTS we’re setting this up for. Instead of giving you info on what fields to change, here’s the diffs.

In the next post we’ll cover the GGSN and the SGSN and then getting a device on “the net”.

Configuring YateBTS for Software Defined GSM/GPRS

I did a post yesterday on setting up YateBTS, I thought I’d cover the basic setup I had to do to get everything humming;

Subscribers

In order to actually accept subscribers on the network you’ll need to set a Regex pattern to match the prefix of the IMSI of the subscribers you want to connect to the network,

In my case I’m using programmable SIMs with MCC / MNC 00101 so I’ve put the regex pattern matching starting with 00101.

BTS Configuration

Next up you need to set the operating frequency (radio band), MNC and MCC of the network. I’m using GSM850,

Next up we’ll need to set the device we’re going to use for the TX/RX, I’m using a BladeRF Software Defined Radio, so I’ve selected that from the path.

Optional Steps

I’ve connected Yate to a SIP trunk so I can make and receive calls,

I’ve also put a tap on the GSM signaling, so I can see what’s going on, to access it just spin up Wireshark and filter for GSMMAP

Compiling YateBTS NIPC for Software Defined GSM / GPRS

A lot of the Yate tutorials are a few years old, so I thought I’d put together the steps I used on Ubuntu 18.04:

Installing Yate

apt-get install subversion autoconf build-essential
cd /usr/src svn checkout http://voip.null.ro/svn/yate/trunk yate 
cd yate
./autogen.sh
./configure
make
make install-noapi

Installing YateBTS

cd /usr/src 
svn checkout http://voip.null.ro/svn/yatebts/trunk yatebts
cd yatebts/ 
./autogen.sh 
./configure
make install

Defining location of libyate

On Ubuntu I found I had to add the library location in ldconf:

echo "include /usr/local/lib/" > /etc/ld.so.conf
ldconfig

Installing Web Interface for NIB / NIPC

apt-get install apache2 php
cd /usr/src/yatebts/nipc
make install
cd /var/www/html
ln -s /usr/local/share/yate/nipc_web nipc
chmod a+rw /usr/local/etc/yate/