Category Archives: IMS / VoLTE

DNS’ role in S8-Home Routing Roaming

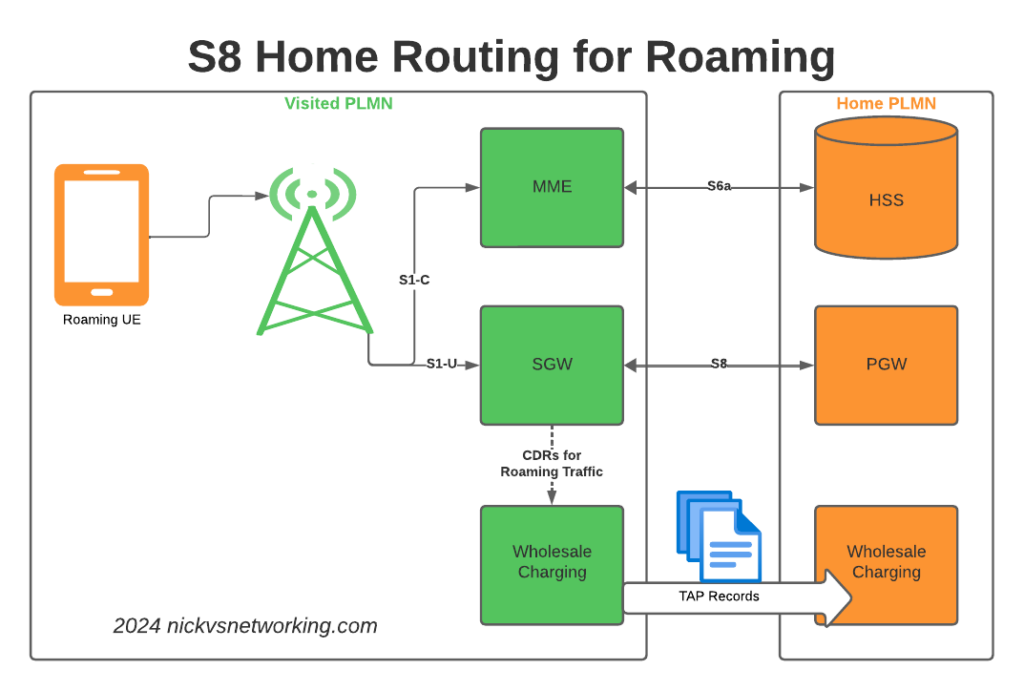
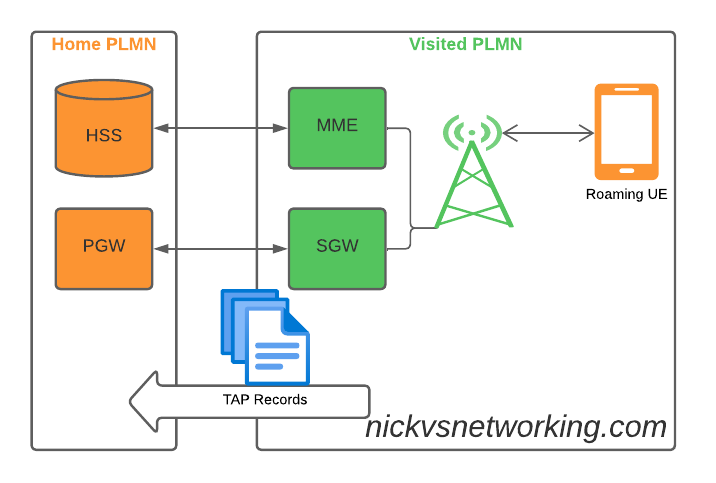
S8 Home Routing is a really simple concept, the traffic goes from the SGW in the visited PLMN to the PGW in the home PLMN, so the PCRF, OCS/OFCS, IMS, IP Addresses, etc, etc, are all in the home network, and this avoids huge amounts of complexity.

But in order for this to work, the visited network MME needs to find the PGW of the home network, and with over 700 roaming networks in commercial use, each one with potentially hundreds of unique APNs each routing to a different PGW, this is a tricky proposition.

If you’ve configured your PGW peers statically on your MME, that’s fine, but it doesn’t scale very well – And if you add an MVNO who wants their own PGW for serving their APN, well you’ll be adding some complexity there to, so what to do?

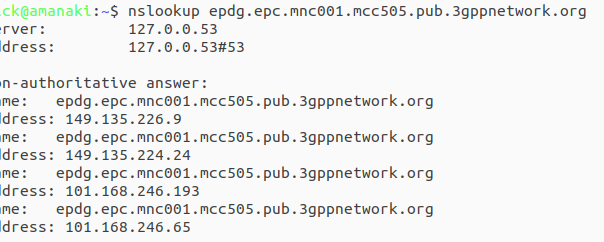
Well, the answer is DNS.

By taking the APN to be served, the home PLMN and the interface type desired, with some funky DNS queries, our MME can determine which PGW should be selected for a request.

Let’s take a look, for a UE from MNC XXX MCC YYY roaming into our network, trying to access the “IMS” APN.

Our MME knows the network code of the roaming subscriber from the IMSI is MNC XXX, MCC YYY, and that the UE is requesting the IMS APN.

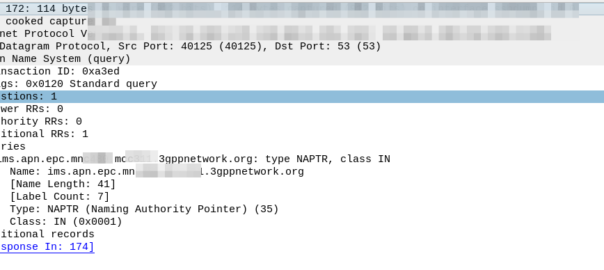
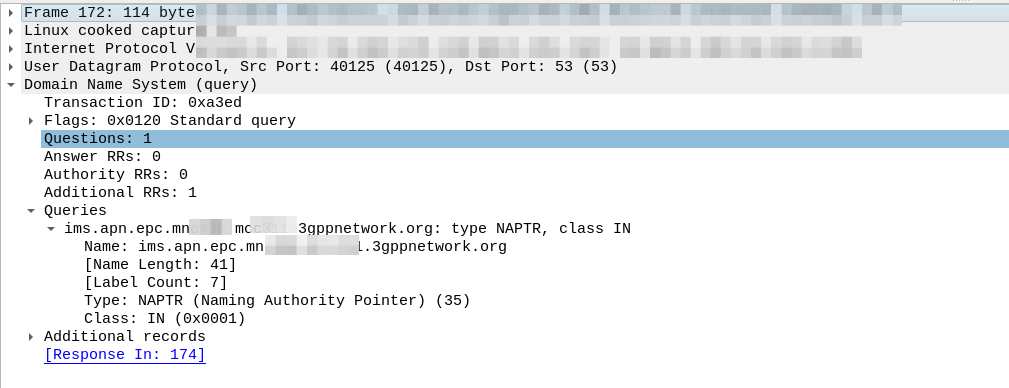
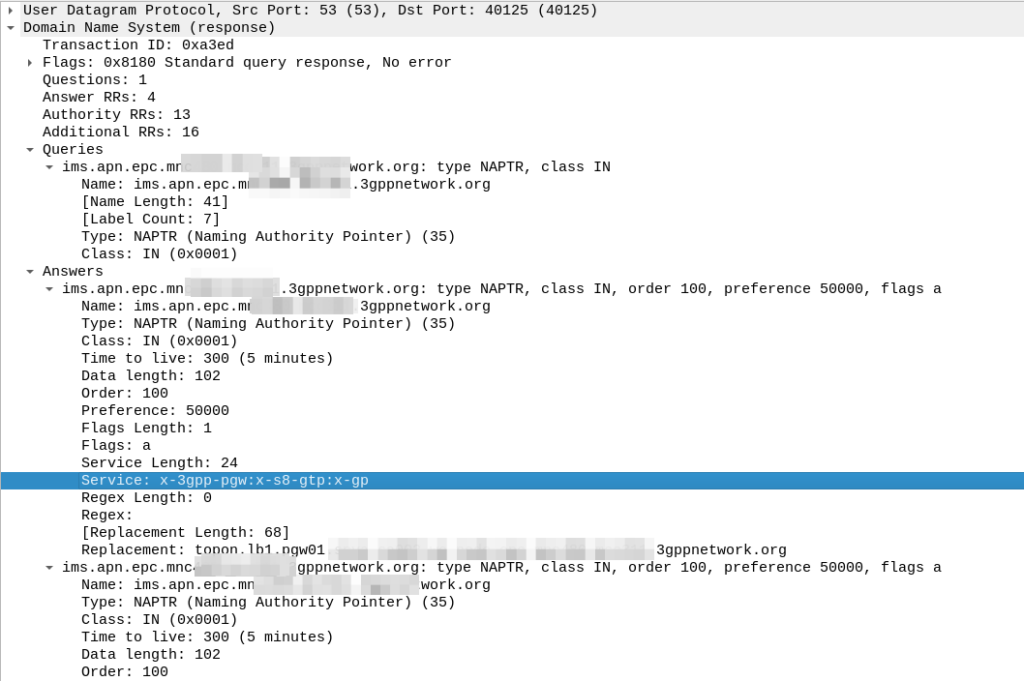
So our MME crafts a DNS request for the NAPTR query for ims.apn.epc.mncXXX.mccYYY.3gppnetwork.org:

Because the domain is epc.mncXXX.mccYYY.3gppnetwork.org it’s routed to the authoritative DNS server in the home network, which sends back the response:

We’ve got a few peers to pick from, so we need to filter this list of Answers to only those that are relevant to us.

First we filter by the Service tag, whihc for each listed peer shows what services that peer supports.

But since we’re looking for S8, we need to find a peer who’s “Service” tag string contains:

x-3gpp-pgw:x-s8-gtp

We’re looking for two bits of info here, the presence of x-3gpp-pgw in the Service to indicate that this peer is a PGW and x-s8-gtp to indicate that this peer supports the S8 interface.

A service string like this:

x-3gpp-pgw:x-s5-gtp

Would be excluded as it only supports S5 not S8 (Even though they are largely the same interface, S8 is used in roaming).

It’s also not uncommon to see both services indicated as supported, in which case that peer could be selected too:

x-3gpp-pgw:x-s5-gtp:x-s8-gtp

(The answers in the screenshot include :x-gp which means the PGWs advertised are also co-located with a GGSN)

So with our answers whittled down to only those that meet our needs, we next use the Order and the Preference to pick our best candidate, this is the same as regular DNS selection logic.

From our candidate, we’ve also got the Regex Replacement, which allows our original DNS request to be re-written, which allows us to point at a single peer.

In our answer, we see the original request ims.apn.epc.mncXXX.mccYYY.3gppnetwork.org is to be re-written to topon.lb1.pgw01.epc.mncXXX.mccYYY.3gppnetwork.org.

This is the FQDN of the PGW we should use.

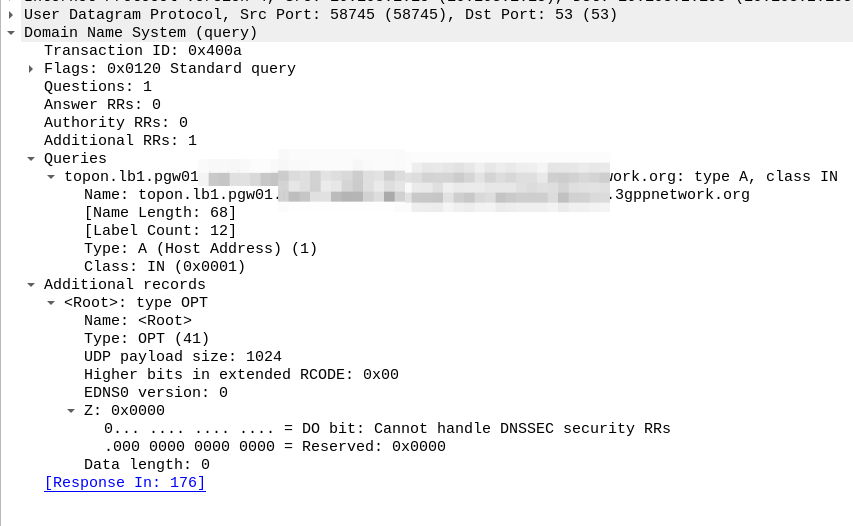
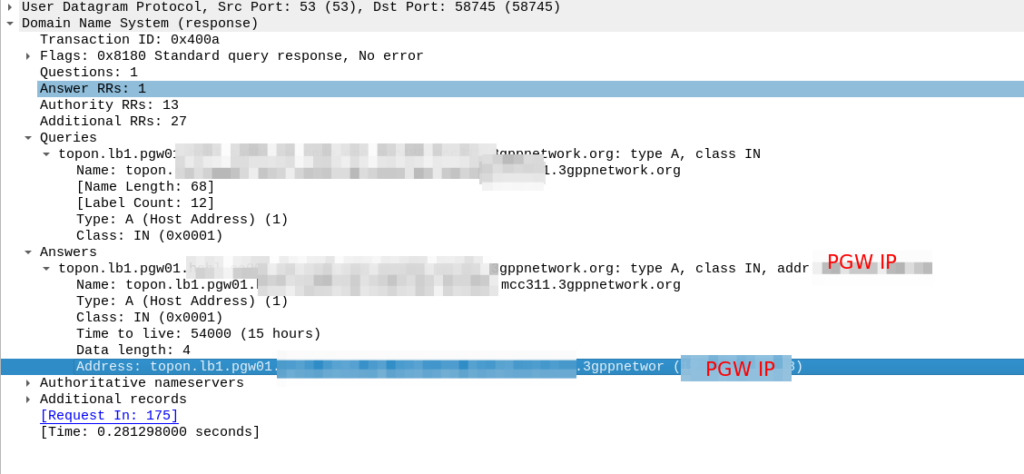
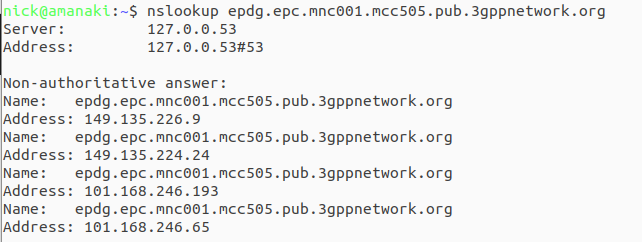
Now we know the FQND we should use, we just do an A-Record lookup (Or AAAA record lookup if it is IPv6) for that peer we are targeting, to turn that FQDN into an IP address we can use.

And then in comes the response:

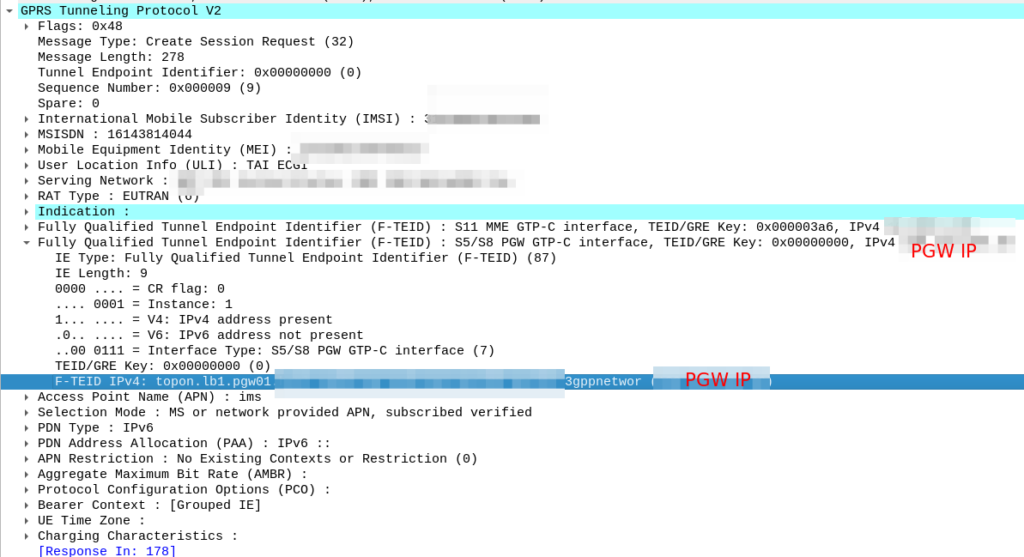
So now our MME knows the IP of the PGW, it can craft a Create Session request where the F-TEID for the S8 interface has the PGW IP set on it that we selected.

For more info on this TS 129.303 (Domain Name System Procedures) is the definitive doc, but the GSMA’s IR.88 “LTE and EPC Roaming Guidelines” provides a handy reference.

Best Practices for SGW & PGW Deployment Architectures for Roaming

The S8 Home Routing approach for LTE Roaming works really well, as more and more operators are switching off their legacy circuit switched 2G/3G networks and shifting to LTE & VoLTE for roaming, we’re seeing more an more S8-HR deployments.

When LTE was being standardised in 2008, Local Breakout (LBO) and S8 Home Routing were both considered options for how roaming may look. Fast forward to today, and S8 Home routing is the only way roaming is done for modern deployments.

In light of this, there are some “best practices” in an “all S8 Home Routed” world, we’ve developed, that I thought I’d share.

The Basics

When roaming, the SGW in the Visited Network, sends user traffic back to the PGW in the Home Network.

This means Online/Offline charging, IMS, PCRF, etc, is all done in the Home PLMN. As long as data packets can get from the SGW in the Visited PLMN to the PGW in the Home PLMN, and authentication flows from the Visited MME to the HSS in the Home PLMN, you’re golden.

The Constraints

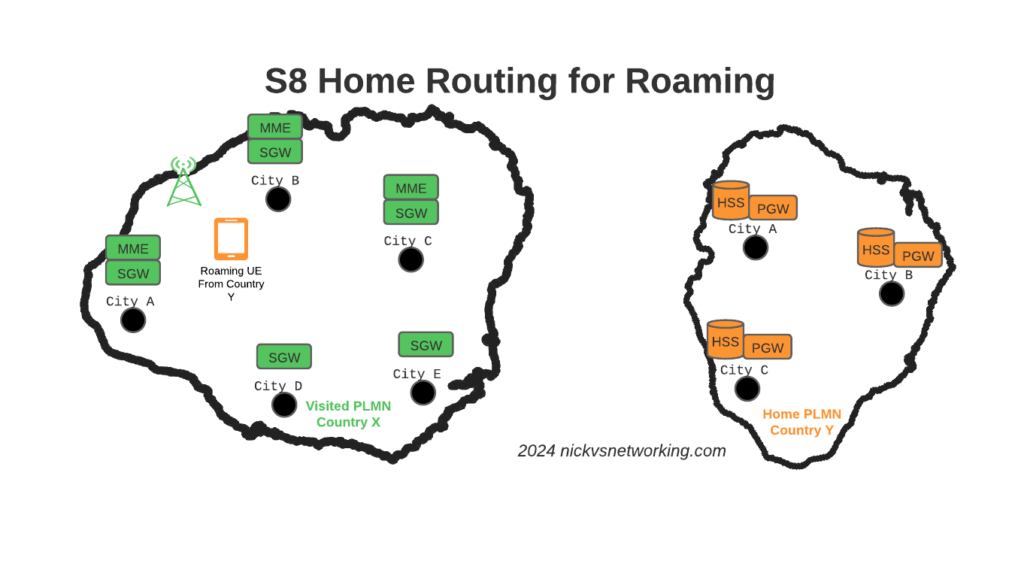
Of course real networks don’t look as simple as this, in reality a roaming scenario for a visited network has a lot more nodes, which need to be

Building Distributed Packet Core & IMS

Virtualization (VNF / CNF) has led operators away from “big iron” hardware for Packet Core & IMS nodes, towards software based solutions, which in turn offer a lot more flexibility.

Best practice for design of User Plane is to keep the the latency down, by bringing the user plane closer to the user (the idea of “Edge” UPFs in 5GC is a great example of this), and the move away from “big iron” in central locations for SGW and PGW nodes has been the trend for the past decade.

So to achieve these goals in the networks we build, we geographically distribute the core network.

This means we’ve got quite a few S-GW, P-GW, MME & HSS instances across the network.
There’s some real advantages to this approach:

From a redundancy perspective this allows us to “spread the load” and build far more resilient networks. A network with 20 smaller HSS instances spread around the country, is far more resilient than 2 massive ones, regardless of how many power feeds or redundant disks it may have.

This allows us to be more resource efficient. MNOs have always provisioned excess capacity to cater for the loss of a node. If we have 2 MMEs serving a country, then each node has to have at least 50% capacity free, so if one MME were to fail, the other MME could handle the additional load it from it’s dead friend. This is costly for resources. Having 20 MMEs means each MME has to have 5% capacity free, to handle the loss of one MME in the pool.

It also forces our infrastructure teams to manage infrastructure “as cattle” rather than pets. These boxes don’t get names or lovingly crafted, they’re automatically spun up and destroyed without thinking about it.

For security, we only use internal IP addresses for the nodes in our packet core, this provides another layer of protection for the “crown jewels” of our network, so no one messing with BGP filtering can accidentally open the flood gates to our core, as one US operator learned leaving a GGSN open to the world leading to the private information for 100 million customers being leaked.

What this all adds to, is of course, the end user experience.
For the end subscriber / customer, they get a better experience thanks to the reduced latency the connection provides, better uptime and faster call setup / SMS delivery, and less cost to deliver services.

I love this approach and could prothletise about it all day, but in a roaming context this presents some challenges.

The distributed networks we build are in a constant state of flux, new capacity is being provisioned in some areas, nodes things decommissioned in others, and our our core nodes are only reachable on internal IPs, so wouldn’t be reachable by roaming networks.

Our Distributed-Core Roaming Solution

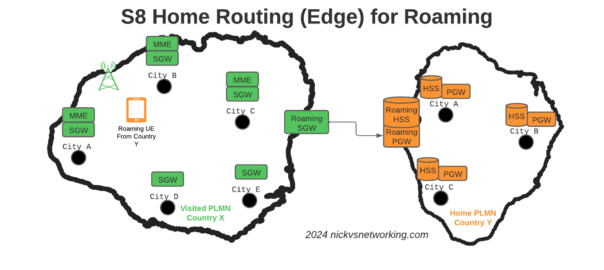
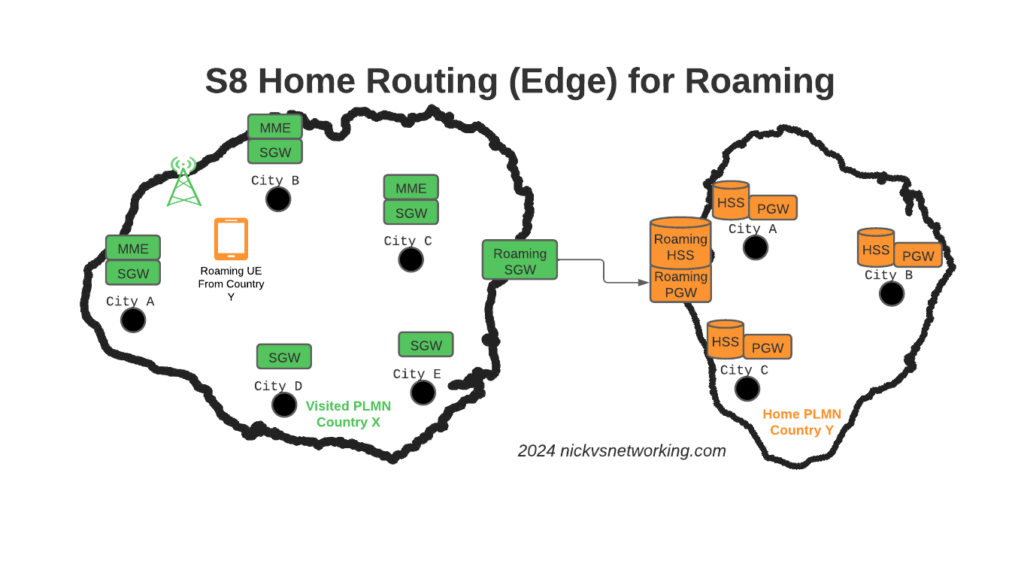
To resolve this we’ve taken a novel approach, we’ve deployed a pair of S-GWs we call the “Roaming SGWs”, and a pair of P-GWs we call the “Roaming PGWs”, these do have public IPs, and are dedicated for use only by roaming traffic.

We really like this approach for a few reasons:

It allows us to be really flexible do what we want inside the network, without impacting roaming customers or operators who use our network for roaming. All the benefits I described from the distributed architectures can still be realised.

From a security standpoint, only these SGW/PGW pairs have public IPs, all the others are on internal IPs. This good for security – Our core network is the ‘crown jewels’ of the network and we only expose an edge to other providers. Even though IPX networks are supposed to be secure, one of the largest IPX providers had their systems breached for 5 years before it was detected, so being almost as distrustful of IPX traffic as Internet traffic is a good thing.
This allows us to put these PGWs / SGWs at the “edge” of our network, and keep all our MMEs, as well as our on-net PGW and SGWs, on internal IPs, safe and secure inside our network.

For charging on the SGWs, we only need to worry about collecting CDRs from one set of SGWs (to go into the TAP files we use to bill the other operators), rather than running around hoovering up SGW CDRs from large numbers of Serving Gateways, which may get blown away and replaced without warning.

Of course, there is a latency angle to this, for international roaming, the traffic has to cross the sea / international borders to get to us. By putting it at the edge we’re seeing increased MOS on our calls, as the traffic is as close to the edge of the network as can be.

Caveat: Increased S11 Latency on Core Network sites over Satellite

This is probably not relevant to most operators, but some of our core network sites are fed only by satellite, and the move to this architecture shifted something: Rather than having latency on the S8 interface from the SGW to the PGW due to the satellite hop, we’ve got latency between the MME and the SGW due to the satellite hop.

It just shifts where in the chain the latency lies, but it did lead to us having to boost some timers in the MME and out of sequence deliver detection, on what had always been an internal interface previously.

Evolution to 5G Standalone Roaming

This approach aligns to the Home Routed options for 5G-SA roaming; UPF chaining means that the roaming traffic can still be routed, as seems to be the way the industry is going.

SA roaming is in its infancy, without widely deployed SA networks, we’re not going to see common roaming using SA for a good long while, but I’ll be curious to see if this approach becomes the de facto standard going forward.

Where to from here?

We’re pretty happy with this approach in the networks we’ve been building.

So far it’s made IREG testing easier as we’ve got two fixed points the IPX needs to hit (The DRAs and the SGWs) rather than a wide range of networks.

Operators with a vast number of APNs they need to drop into different VRFs may have to do some traffic engineering here – Our operations are generally pretty flat, but I can see where this may present some challenges for established operators shifting their traffic.

I’d be keen to hear if other operators are taking this approach and if they’ve run into any issues, or any issues others can see in this, feel free to drop a comment below.

CGrateS – Exporting CDRs

Having rated CDRs in CGrateS is great, but in reality, you probably want to get them into a billing system, CSV file, S3 bucket, CRM, invoice, Grafana, SQL table, etc, etc.

The Event Exporter Service (EES (previously called CDRe)) handles exporting CDRs from CGrateS.

Like everything in CGrateS, it’s highly configurable, and, again, like everything in CGrateS, supports every combination of services you can think of, plus a stack you haven’t thought of.

CDRs can be exported one of two ways, in real time, as the CDR is generated (online), or after the fact, exporting from the database containing the CDRs (offline).

Exporting in realtime (online) is a great option if you don’t want (or need) to store the CDRs in CGrateS; if you’re just using CGrateS to rate calls and spit them into a seperate system, this is a fantastic option, as it allows your CGrateS instances to remain light and not get clogged up with lots of old CDRs – That said, of course you can export the CDRs in realtime and still store them in CGrateS, that’s also a totally valid approach as well.

The more traditional approach is offline CDR export, where periodically or when an event is triggered, you scrape up a pile of CDRs and send them to your external systems.

For both options, we’ll need to define at least one exporter in our cgrates.json config file. For this example we’ll define a HTTP POST that we will trigger for realtime (online) CDR exporting, and a CSV file we dump to periodically when called from the API.

So first things first, we enable the EES module in the config:

"ees": {
		"enabled": true,
		"exporters": [
		]
	}

We’ll start with defining one exporter, named CSVExporter, that will output files to a folder named “testCSV” in the /tmp/ directory, but you can plonk these files wherever you like:

"ees": {
		"enabled": true,
		"synchronous": true,
		"exporters": [
			{
				"id": "CSVExporter",
				"type": "*file_csv",
				"export_path": "/tmp/testCSV",
				"flags": ["*log"],
				"attempts": 1,
				"synchronous": true,
				"field_separator": ",",
			},
		]
	}

We’ve got a lot of different types of export available to us, but type *file_csv is the easiest, so that’s where we’ll start.

Setting synchronous to true will mean we’ll only run one export job at a time, but it also means we’ll get back the result via the API, which will allow us to keep track of the ID of the last record we updated, so we don’t export the same record multiple times, more on this later.

Flags allows us to, if we wanted, bounce the event through AttributeS, for example, by adding *attributes to the flags, but in this case, it’s just logging to syslog.

Of course, just enabling ees won’t actually send calls to it, we’ll need to add “ees_conns“: [“*localhost”], to “apiers”: and “cdrs” so they know to bounce the events through it:

	"apiers": {
		"enabled": true,
                ...
		"ees_conns": ["*localhost"],
	},

	"cdrs": {
		"enabled": true,
		...
		"ees_conns": ["*localhost"],
	},

Okay, enough talk, let’s get exporting some CDRs!

If you’ve already got CDRs on your system from our previous tutorial, fantastic, but if not, let’s get up and running with a quick and dirty script to define some destinations, a charger, an account balance and then use some of the balance to generate a CDR:

import cgrateshttpapi
import pprint
import uuid
import datetime
now = datetime.datetime.now()
CGRateS_Obj = cgrateshttpapi.CGRateS('localhost', 2080)

#Define Destinations
CGRateS_Obj.SendData({'method':'ApierV2.SetTPDestination','params':[{"TPid":'cgrates.org',"ID":"Dest_AU_Mobile","Prefixes":["614"]}]})

#Load TariffPlan we just defined from StorDB to DataDB
CGRateS_Obj.SendData({"method":"APIerSv1.LoadTariffPlanFromStorDb","params":[{"TPid":'cgrates.org',"DryRun":False,"Validate":True,"APIOpts":None,"Caching":None}],"id":0})

#Define default Charger
print(CGRateS_Obj.SendData({"method": "APIerSv1.SetChargerProfile","params": [{"Tenant": "cgrates.org","ID": "DEFAULT",'FilterIDs': [],'AttributeIDs' : ['*none'],'Weight': 0,}]}))

account = "Nick_Test_123"

#Add a balance to the account with type *sms with 100 sms events
pprint.pprint(CGRateS_Obj.SendData({"method": "ApierV1.SetBalance","params": [{"Tenant": "cgrates.org","Account": account,"BalanceType": "*sms","DestinationIDs": 'Dest_NZ_Mobile;Dest_AU_Mobile',"Categories": "*any","Balance": {"ID": "100_SMS_Bundle_AU_NZ_Mobile","Value": 100,"Weight": 25}}]}))

#Process CDR Event for a single SMS
pprint.pprint(CGRateS_Obj.SendData({"method": "CDRsV2.ProcessExternalCDR","params": [{"OriginID": str(uuid.uuid1()),"ToR": "*sms","RequestType": "*pseudoprepaid","AnswerTime": now.strftime("%Y-%m-%d %H:%M:%S"),"SetupTime": now.strftime("%Y-%m-%d %H:%M:%S"),"Tenant": "cgrates.org","Account": account,"Destination" : "61412345678","Usage": "1",}]}))

Right, with that out of the way, we should now have something in our CDRs table, a quick SQL query confirms this is the case:

Bingo, there we go.

So let’s try an offline export via the API:

result = CGRateS_Obj.SendData({
	"method": "APIerSv1.ExportCDRs",
	"params": [
		{
			"ExporterIDs": [
				"CSVExporter"
			],
			"Verbose": True,
			"Accounts": [account
			]
		}
	]
})
pprint.pprint(result)

So, as you may have guessed, we’ve called the ExportCDRs API endpoint, we’ve specified which ExporterIDs we want to reference (these link back to the objects in the config, and the one we have defined currently is named CSVExporter).

Setting Verbose: True means that CGrateS gives us back a lot of info from the API call, here’s what we get back:

{"error": None,
 "id": None,
 "result": {"CSVExporter": {"ExportPath": "/tmp/testCSV/CSVExporter_21e9bc2.csv",
                            "FirstEventATime": "2024-01-02T18: 09: 29+11: 00",
                            "FirstExpOrderID": 14,
                            "LastEventATime": "2024-01-02T18: 40: 53+11: 00",
                            "LastExpOrderID": 25,
                            "NegativeExports": [],
                            "NumberOfEvents": 12,
                            "PositiveExports": ["f45dd29",
                                                ...
                                                "6163255"
            ],
                            "TimeNow": "2024-01-02T18: 40: 53.791517662+11: 00",
                            "TotalCost": 0,
                            "TotalSMSUsage": 12
        }
    }
}

Now that looks pretty positive, we got 12 events of SMS usage exported, which we can see in the file /tmp/testCSV/CSVExporter_21e9bc2.csv – and if we cat out the file, yeap, there’s all the CDRs.

But it’s a bit of a mess, there’s a lot of fields in there, so let’s adjust what goes into the CSV.

Let’s start by filtering what goes into the exporter, to only give us SMS events, of course you could adjust the filters here to target exporting only the records you want, based on anything you can define with Filters (and there’s a lot you can define with filters).

	"ees": {
		"enabled": true,
		"exporters": [
			{
				"id": "CSVExporter",
				"type": "*file_csv",
				"export_path": "/tmp/testCSV",
				"flags": ["*log"],
				"attempts": 1,
				"filters": ["*string:~*req.ToR:*sms"],
				"synchronous": true,
				"field_separator": ",",
				...

Now we’re only exporting SMS records, so let’s clean up the output of the CSV to just give us the data we want, which is the CDR ID, time, account, destination and usage.

	"ees": {
		"enabled": true,
		"exporters": [
			{
				"id": "CSVExporter",
				"type": "*file_csv",
				"export_path": "/tmp/testCSV",
				"flags": ["*log"],
				"attempts": 1,
				"filters": ["*string:~*req.ToR:*sms"],
				"synchronous": true,
				"field_separator": ",",
				"fields":[
					//Headers
					{"tag": "CGRID", "path": "*hdr.CGRID", "type": "*constant", "value": "CGRID"},
					{"tag": "AnswerTime", "path": "*hdr.AnswerTime", "type": "*constant", "value": "AnswerTime"},
					{"tag": "Account", "path": "*hdr.Account", "type": "*constant", "value": "Account"},
					{"tag": "Destination", "path": "*hdr.Destination", "type": "*constant", "value": "Destination"},
					{"tag": "Usage", "path": "*hdr.Usage", "type": "*constant", "value": "Usage"},
					//Values
					{"tag": "CGRID", "path": "*exp.CGRID", "type": "*variable", "value": "~*req.CGRID"},
					{"tag": "AnswerTime", "path": "*exp.AnswerTime", "type": "*variable", "value": "~*req.AnswerTime{*time_string:2006-01-02T15:04:05Z}"},
					{"tag": "Account", "path": "*exp.Account", "type": "*variable", "value": "~*req.Account"},
					{"tag": "Destination", "path": "*exp.Destination", "type": "*variable", "value": "~*req.Destination"},
					{"tag": "Usage", "path": "*exp.Usage", "type": "*variable", "value": "~*req.Usage"},

				],
			},
...

Now after a restart of CGrateS, our exports look like this:

Stunning, truly beautiful, look at that output!

Right, well you may at this point have noticed a problem if you’ve run this more than once. The problem is that is every time we run this, we get all the CDRs since the beginning of time.

Now there’s a few ways we can handle this, if we only want CDRs generated in the past day for example, we can filter that as an input on the ExportCDRs API call, using the multitude of filters available to us as documented in the API docs.

But where filtering by date/time falls down, is that if an offline CDR of a call on Monday, only got ingested on Tuesday, it would be missed by the export.

But, setting Verbose: True on the ExportCDRs API call gives us a handy trick, we’ve been told what the highest ID in the CDRs table we just exported in the response from the API in LastExpOrderID field.

If we jump over to the SQL database we use for StorDB, we can see that 33 is the ID of the highest CDR in the system.

So let’s try something, let’s run the exporter again, but this time let’s get all the CDRs where the ID is higher than 33:

#Process CDR Event for a single SMS
pprint.pprint(CGRateS_Obj.SendData({"method": "CDRsV2.ProcessExternalCDR","params": [{"OriginID": str(uuid.uuid1()),"ToR": "*sms","RequestType": "*pseudoprepaid","AnswerTime": now.strftime("%Y-%m-%d %H:%M:%S"),"SetupTime": now.strftime("%Y-%m-%d %H:%M:%S"),"Tenant": "cgrates.org","Account": account,"Destination" : "61412345678","Usage": "1",}]}))

#Trigger export where the OrderID is above 33
result = CGRateS_Obj.SendData({"method":"APIerSv1.ExportCDRs","params":[
    {"ExporterIDs": ["CSVExporter"],
     "Verbose" : True,
     "ExtraArgs" : {
        "OrderIDStart" : int(33),
     },
     "Accounts" : [account]}
]})
pprint.pprint(result)

Boom, now if we have a look at the output we can see the export covered two records, and the last ID was 35.

{'method': 'APIerSv1.ExportCDRs', 'params': [{'ExporterIDs': ['CSVExporter'], 'Verbose': True, 'ExtraArgs': {'OrderIDStart': 33}, 'run_id': 'carrier_interconnect', 'Accounts': ['Nick_Test_123']}]}
{'error': None,
 'id': None,
 'result': {'CSVExporter': {'ExportPath': '/tmp/testCSV/CSVExporter_c444cd9.csv',
                            'FirstEventATime': '2024-01-02T19:19:59+11:00',
                            'FirstExpOrderID': 34,
                            'LastEventATime': '2024-01-02T19:20:08+11:00',
                            'LastExpOrderID': 35,
                            'NegativeExports': [],
                            'NumberOfEvents': 2,
                            'PositiveExports': ['034aba2', '22e4fa7'],
                            'TimeNow': '2024-01-02T19:20:08.355664133+11:00',
                            'TotalCost': 0,
                            'TotalSMSUsage': 2}}}

So as long as we keep track of the LastExpOrderID value, and feed that as in input every time we run ExportCDRs, we can ensure we never miss a CDR, and never get the same CDR twice.

How do you know if they’re roaming? Charging challenges in IMS for Roamers

I got an email the other day asking a simple question:

How do I know if a subscriber is VoLTE roaming or not when they send an SMS to charge for it?

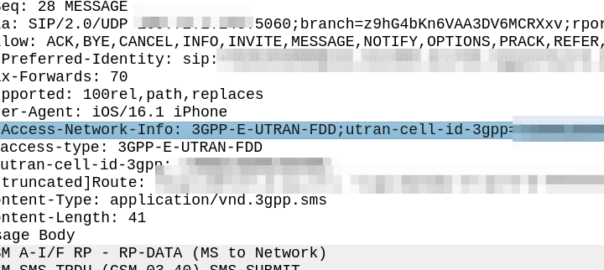
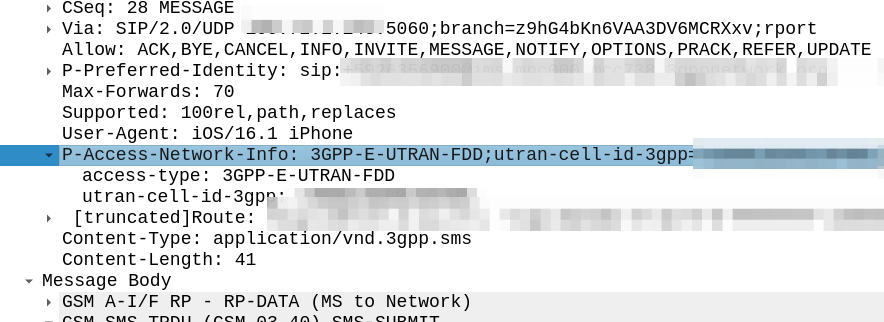
My immediate reaction was to look at the SIP headers, P-Access-Network-Info will tell you where the subscriber is located, end of.

Right?

Well not quite, this will tell the SMSc the location of the subscriber sending the SMS. If the PLMN in the P-Access-Network-Info != the home PLMN, the sub is roaming.

But does this information get passed to the OCS / OFCS?

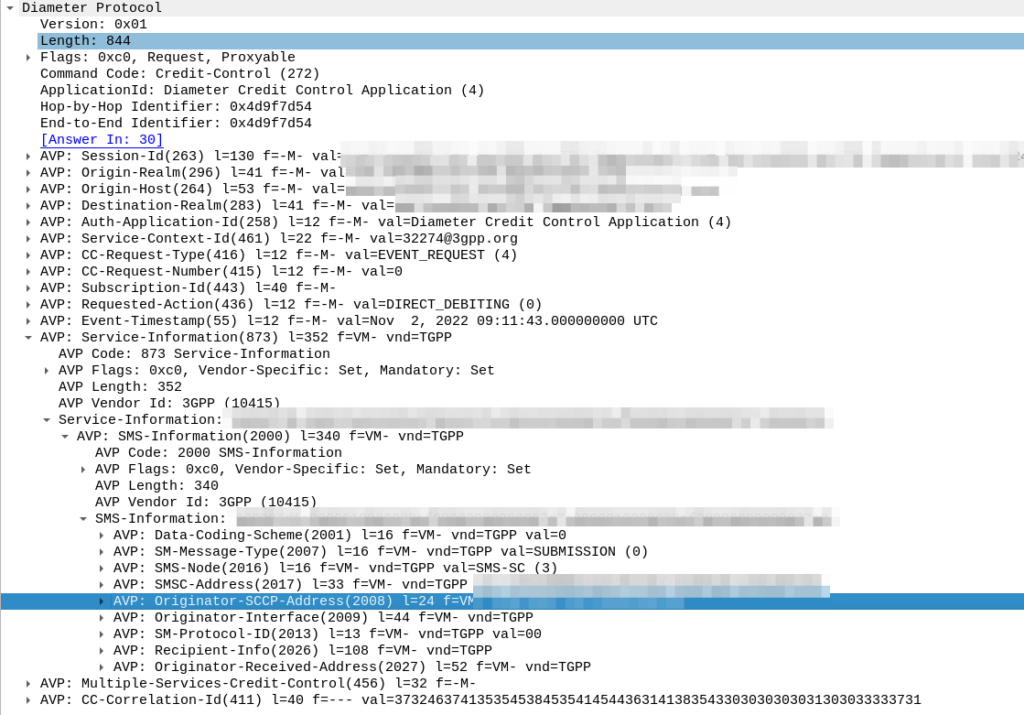
The SMSc uses “Event based charging” to perform credit control, so let’s have a look at what AVPs are present in the Credit Control Request from the SMSc:

Hmm, the SMS-Information AVP (2000) contains a bunch of information about the SMS being sent, but I don’t see anything about the location of the sender in there.

Originator-Interface is just set to “SIP”, of course in a 2G/3G roaming scenario the Originator-SCCP-Address would be that of the Visited PLMN, but for us it is our SCCP address.

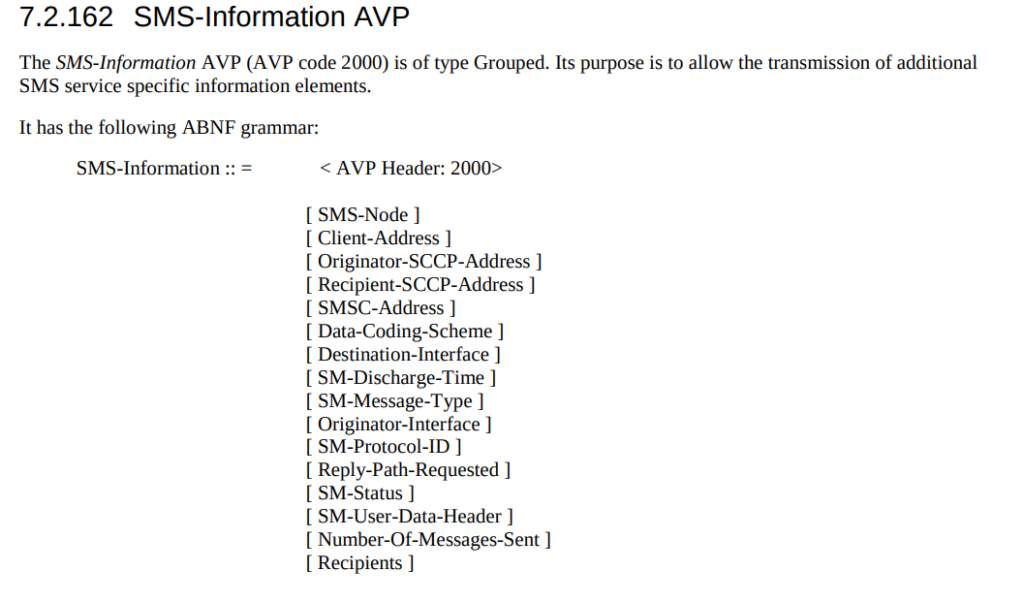
Maybe the standard allows for an additional optional AVP in the SMS-Information-AVP we’re missing? Let’s check TS 32.299:

Nope.

So how to deal with this?

While the standards aren’t totally clear on this, we added an IMS-Info AVP and inside that populated the Access-Network-Information directly from the SIP header, and then picked that off inside our OCS in order to apply the correct rules.

Kamailio Bytes: Stripping SIP Multipart Bodies

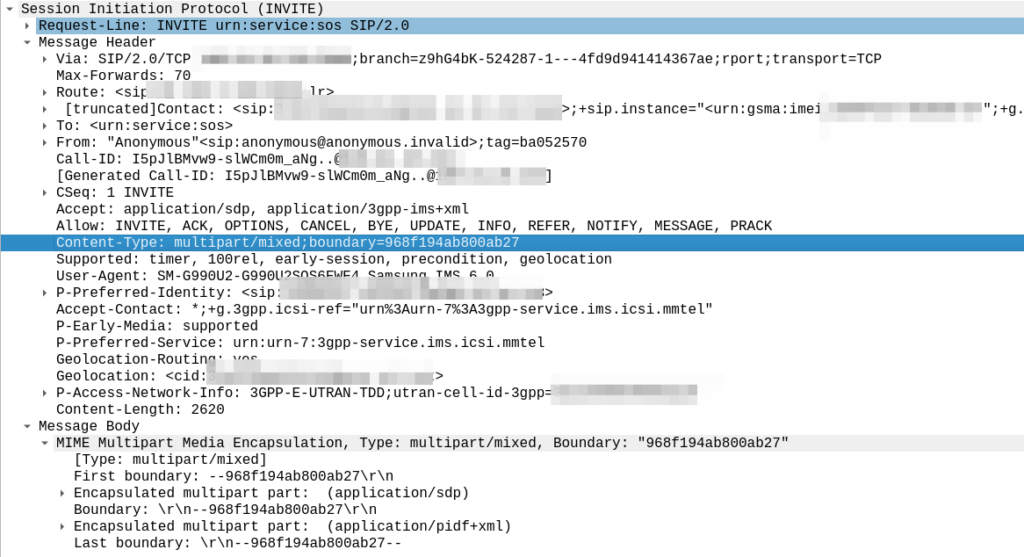
For some calls in (such as some IMS emergency calls) you’ll get MIME Multipart Media Encapsulation as the SIP body, as the content-type set to:

Content-Type: multipart/mixed;boundary=968f194ab800ab27

If you’re used to dealing with SIP, you’d expect to see:

Content-Type: application/sdp

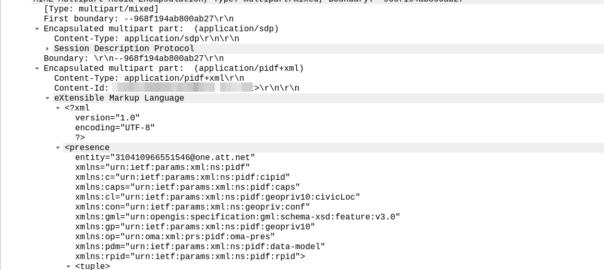
This Content-Type multipart/mixed;boundary is totally valid in SIP, in fact RFC 5261 (Message Body Handling in the Session Initiation Protocol (SIP)) details the use of MIME in SIP, and the Geolocation extension uses this, as we see below from a 911 call example.

But while this extension is standardised, and having your SIP Body containing multipart MIME is legal, not everything supports this, including the FreeSWITCH bridge module, which just appends a new SDP body into the Mime Multipart

Site note: I noticed FreeSWITCH Bridge function just appends the new SIP body in the multipart MIME, leaving the original, SDP:

Okay, so how do we replace the MIME Multipart SIP body with a standard SDP?

Well, with Kamalio’s SDP Ops Module, it’s fairly easy:

#If the body is multipart then strip it and replace with a single part
if (has_body("multipart/mixed")) {
	xlog("This has a multipart body");
	if (filter_body("application/sdp")) {
		remove_hf("Content-Type");
		append_hf("Content-Type: application/sdp\r\n");
	} else {
		xlog("Body part application/sdp not found\n");
		}
}

I’ve written about using SDPops to modify SDP before.

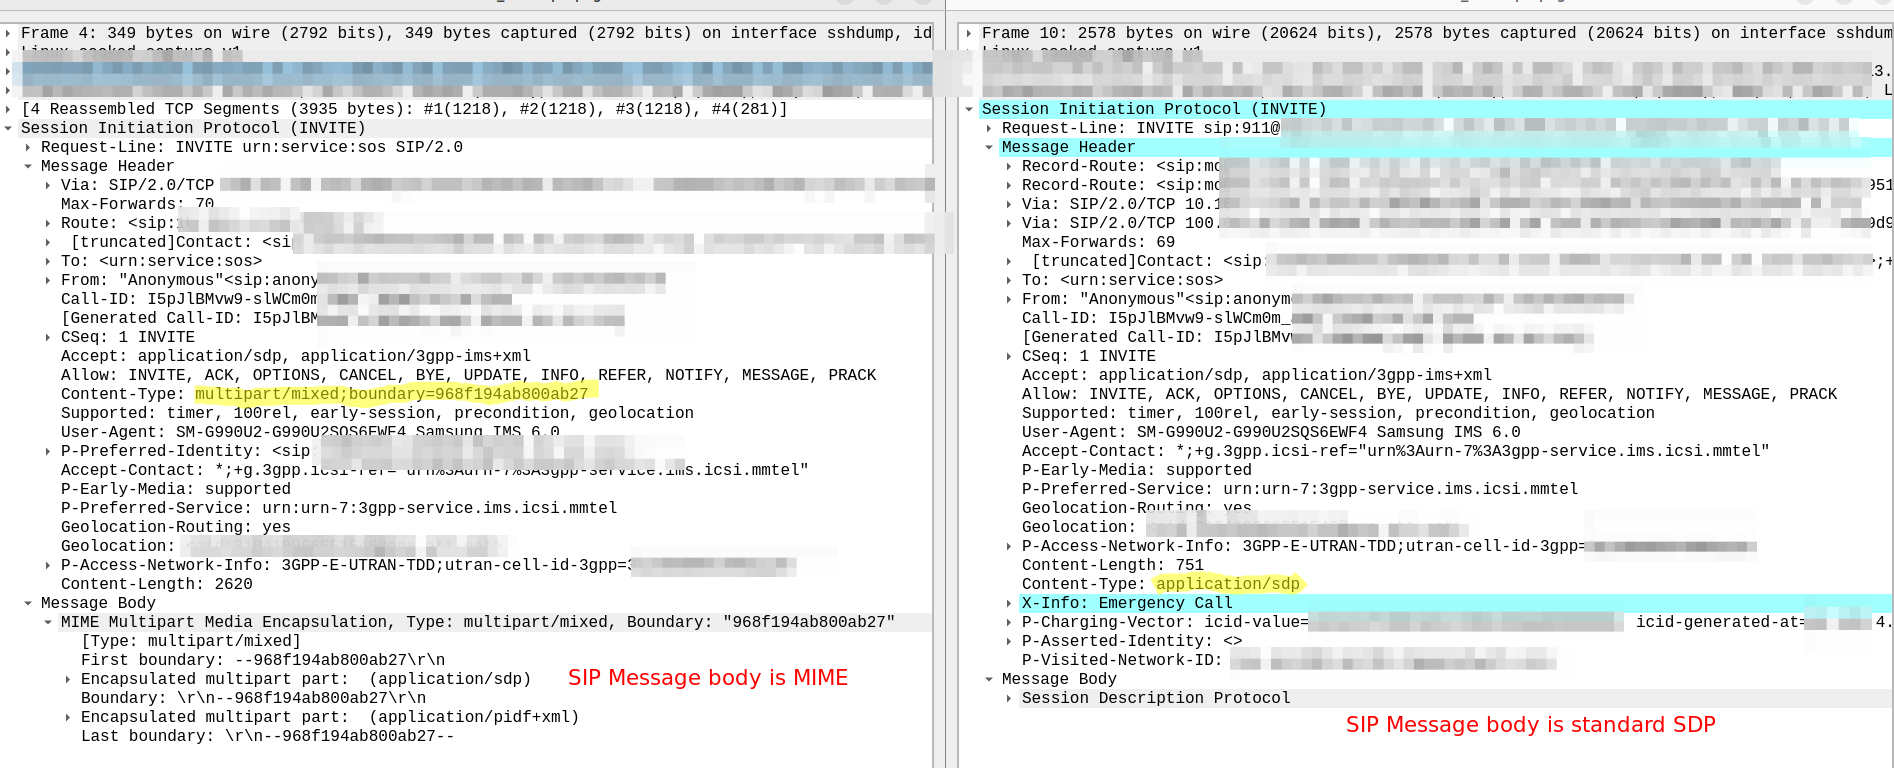
And with that we’ll take an SIP message like the one shown on the left, and when relayed, end up with the message on the right:

Simple fix, but saved me having to fix the fault in FreeSWITCH.

Android and Emergency Calling

In the last post we looked at emergency calling when roaming, and I mentioned that there are databases on the handsets for emergency numbers, to allow for example, calling 999 from a US phone, with a US SIM, roaming into the UK.

Android, being open source, allows us to see how this logic works, and it’s important for operators to understand this logic, as it’s what dictates the behavior in many scenarios.

It’s important to note that I’m not covering Apple here, this information is not publicly available to share for iOS devices, so I won’t be sharing anything on this – Apple has their own ecosystem to handle emergency calling, if you’re from an operator and reading this, I’d suggest getting in touch with your Apple account manager to discuss it, they’re always great to work with.

The Android Open Source Project has an “emergency number database”. This database has each of the emergency phone numbers and the corresponding service, for each country.

This file can be read at packages/services/Telephony/ecc/input/eccdata.txt on a phone with engineering mode.

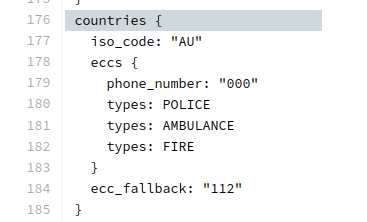
Let’s take a look what’s in mainline Android for Australia:

You can check ECC for countries from the database on the AOSP repo.

This is one of the ways handsets know what codes represent emergency calling codes in different countries, alongside the values set in the SIM and provided by the visited network.

CGrateS – ActionTriggers

In our last post we looked at Actions and ActionPlans, and one of the really funky things we can do is setting ActionPlans to trigger on a time schedule or setting ActionTriggers to trigger on an event.

We’re going to build on the examples we had on the last post, so we’ll assume your code is up to the point where we’ve added a Signup Bonus to an account, using an ActionPlan we assigned when creating the account.

In this post, we’re going to create an action that charges $6, called “Action_Monthly_Charge“, and tie it to an ActionPlan called “ActionPlan_Monthly_Charge“, but to demo how this works rather than charging this Monthly, we’re going to charge it every minute.

Then with our balances ticking down, we’ll set up an ActionTrigger to trigger when the balance drops below $95, and alert us.

Defining the Monthly Charge Action

The Action for the Monthly charge will look much like the other actions we’ve defined, except the Identifier is *debit so we know we’re deducting from the balance, and we’ll log to the CDRs table too:

# Action to add a Monthly charge of $6
Action_Monthly_Charge = {
    "id": "0",
    "method": "ApierV1.SetActions",
    "params": [
        {
          "ActionsId": "Action_Monthly_Charge",
          "Actions": [
              {
                'Identifier': '*debit',
                'BalanceType': '*monetary',
               'Units': 6,
               'Id': 'Action_Monthly_Charge_Debit',
               'Weight': 70},
              {
                  "Identifier": "*log",
                  "Weight": 60,
                  'Id' : "Action_Monthly_Charge_Log"
              },
              {
                  "Identifier": "*cdrlog",
                  "BalanceId": "",
                  "BalanceUuid": "",
                  "BalanceType": "*monetary",
                  "Directions": "*out",
                  "Units": 0,
                  "ExpiryTime": "",
                  "Filter": "",
                  "TimingTags": "",
                  "DestinationIds": "",
                  "RatingSubject": "",
                  "Categories": "",
                  "SharedGroups": "",
                  "BalanceWeight": 0,
                  "ExtraParameters": "{\"Category\":\"^activation\",\"Destination\":\"Recurring Charge\"}",
                  "BalanceBlocker": "false",
                  "BalanceDisabled": "false",
                  "Weight": 80
              },
          ]}]}
pprint.pprint(CGRateS_Obj.SendData(Action_Monthly_Charge))

Next we’ll need to wrap this up into an ActionPlan, this is where some of the magic happens. Inside the action plan we can set a once off time, or a recurring time, kinda like Cron.

We’re setting the time to *every_minute so things will happen quickly while we watch, this action will get triggered every 60 seconds. In real life of course, for a Monthly charge, we’d want to trigger this Action monthly, so we’d set this value to *monthly. If we wanted this to charge on the 2nd of the month we’d set the MonthDays to “2”, etc, etc.

# # Create ActionPlan using SetActionPlan to trigger the Action_Monthly_Charge
SetActionPlan_Daily_Action_Monthly_Charge_JSON = {
    "method": "ApierV1.SetActionPlan",
    "params": [{
        "Id": "ActionPlan_Monthly_Charge",
        "ActionPlan": [{
            "ActionsId": "Action_Monthly_Charge",
            "Years": "*any",
            "Months": "*any",
            "MonthDays": "*any",
            "WeekDays": "*any",
            "Time": "*every_minute",
            "Weight": 10
        }],
        "Overwrite": True,
        "ReloadScheduler": True
    }]
}
pprint.pprint(CGRateS_Obj.SendData(
    SetActionPlan_Daily_Action_Monthly_Charge_JSON))

Alright, but now what’s going to happen?

If you think the accounts will start getting debited every 60 seconds after applying this, you’d be wrong, we need to associate this ActionPlan with an Account first, this is how we control which accounts get which ActionPlans tied to them, to do this we’ll use the SetAccout API again we’ve been using to create accounts:

# Create the Account object inside CGrateS & assign ActionPlan_Signup_Bonus and ActionPlan_Monthly_Charge
Create_Account_JSON = {
    "method": "ApierV2.SetAccount",
    "params": [
        {
            "Tenant": "cgrates.org",
            "Account": str(Account),
            "ActionPlanIds": ["ActionPlan_Signup_Bonus", "ActionPlan_Monthly_Charge"],
            "ActionPlansOverwrite": True,
            "ReloadScheduler":True
        }
    ]
}
print(CGRateS_Obj.SendData(Create_Account_JSON))

So what’s going to happen if we run this?

Well, for starters the ActionPlan named “ActionPlan_Signup_Bonus” is going to be triggered, as in the ActionPlan it’s Timing is set to *asap, so CGrateS will apply the corresponding Action (“Action_Add_Signup_Bonus“) right away, which will credit the account $99.

But a minute after that, we’ll trigger the ActionPlan named “ActionPlan_Monthly_Charge”, as the timing for this is set to *every_minute, when the Action “Action_Monthly_Charge” is triggered, it’s going to be deducting $6 from the balance.

We can check this by using the GetAccount API:

# Get Account Info
pprint.pprint(CGRateS_Obj.SendData({'method': 'ApierV2.GetAccount', 'params': [
              {"Tenant": "cgrates.org", "Account": str(Account)}]}))

You should see a balance of $99 to start with, and then after 60 seconds, it should be down to $93, and so on.

{'error': None,
 'id': None,
 'result': {'ActionTriggers': None,
            'AllowNegative': False,
            'BalanceMap': {'*monetary': [{'Blocker': False,
                                          'Categories': {},
                                          'DestinationIDs': {},
                                          'Disabled': False,
                                          'ExpirationDate': '2023-11-17T14:57:20.71493633+11:00',
                                          'Factor': None,
                                          'ID': 'Balance_Signup_Bonus',
                                          'RatingSubject': '',
                                          'SharedGroups': {},
                                          'TimingIDs': {},
                                          'Timings': None,
                                          'Uuid': '3a896369-8107-4e32-bcef-2d078c981b8a',
                                          'Value': 99,
                                          'Weight': 1200}]},
            'Disabled': False,
            'ID': 'cgrates.org:Nick_Test_123',
            'UnitCounters': None,
            'UpdateTime': '2023-10-17T14:57:21.802521707+11:00'}}

Triggering Actions based on Balances with ActionTriggers

Okay, so we’ve set up recurring charges, now let’s get notified if the balance drops below $95, we’ll start, like we have before, with defining an Action, this will log to the CDRs table, HTTP post and write to syslog:


#Define a new Action to send an HTTP POST
Action_HTTP_Notify_95 = {
    "id": "0",
    "method": "ApierV1.SetActions",
    "params": [
        {
          "ActionsId": "Action_HTTP_Notify_95",
          "Actions": [
              {
                  "Identifier": "*cdrlog",
                  "BalanceId": "",
                  "BalanceUuid": "",
                  "BalanceType": "*monetary",
                  "Directions": "*out",
                  "Units": 0,
                  "ExpiryTime": "",
                  "Filter": "",
                  "TimingTags": "",
                  "DestinationIds": "",
                  "RatingSubject": "",
                  "Categories": "",
                  "SharedGroups": "",
                  "BalanceWeight": 0,
                  "ExtraParameters": "{\"Category\":\"^activation\",\"Destination\":\"Balance dipped below $95\"}",
                  "BalanceBlocker": "false",
                  "BalanceDisabled": "false",
                  "Weight": 80
              },
              {
                  "Identifier": "*http_post_async",
                  "ExtraParameters": "http://10.177.2.135/95_remaining",
                  "ExpiryTime": "*unlimited",
                  "Weight": 700
              },
              {
                  "Identifier": "*log",
                  "Weight": 1200
              }
          ]}]}
pprint.pprint(CGRateS_Obj.SendData(Action_HTTP_Notify_95))

Now we’ll define an ActionTrigger to check if the balance is below $95 and trigger our newly created Action (“Action_HTTP_Notify_95“) when that condition is met:


#Define ActionTrigger
ActionTrigger_95_Remaining_JSON = {
    "method": "APIerSv1.SetActionTrigger",
    "params": [
        {
            "GroupID" : "ActionTrigger_95_Remaining",
            "ActionTrigger": 
                {
                    "BalanceType": "*monetary",
                    "Balance" : {
                        'BalanceType': '*monetary',
                        'ID' : "*default",
                        'BalanceID' : "*default",
                        'Value' : 95,
                        },
                    "ThresholdType": "*min_balance",
                    "ThresholdValue": 95,
                    "Weight": 10,
                    "ActionsID" : "Action_HTTP_Notify_95",
                },
            "Overwrite": True
        }
    ]
}
pprint.pprint(CGRateS_Obj.SendData(ActionTrigger_95_Remaining_JSON))

We’ve defined the ThresholdType of *min_balance, but we could equally set this to ThresholdType to *max_balance, *balance_expired or trigger when a certain Counter has been triggered enough times.

Adding an ActionTrigger to an Account

Again, like the ActionPlan we created before, before the ActionTrigger we just created will be used, we need to associate it with an Account, for this we’ll use the AddAccountActionTriggers API, specify the Account and the ActionTriggerID for the ActionTrigger we just created.


#Add ActionTrigger to Account 
Add_ActionTrigger_to_Account_JSON = {
    "method": "APIerSv1.AddAccountActionTriggers",
    "params": [
        {
            "Tenant": "cgrates.org",
            "Account": str(Account),
            "ActionTriggerIDs": ["ActionTrigger_95_Remaining"],
            "ActionTriggersOverwrite": True
        }
    ]
}
pprint.pprint(CGRateS_Obj.SendData(Add_ActionTrigger_to_Account_JSON))

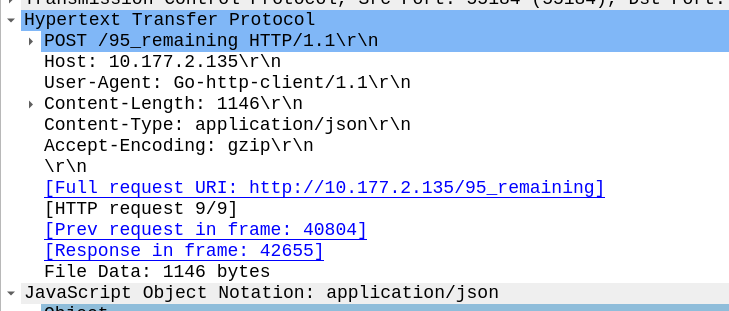
If we run this all together, creating the account with the “ActionPlan_Signup_Bonus” will give the account a $99 Balance. But after 60 seconds, “ActionPlan_Monthly_Charge” will kick in, and every 60 seconds after that, at which point the balance will get to below $95 when CGrateS will trigger the ActionTriggerActionTrigger_95_Remaining” and get the HTTP POST to the HTTP endpoint and log entry:

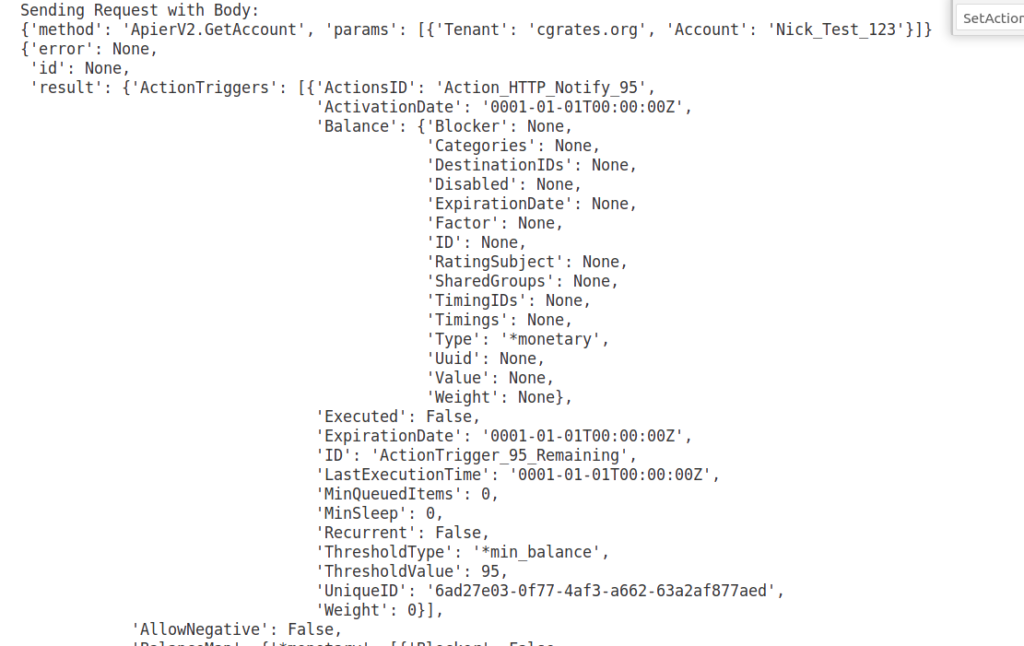
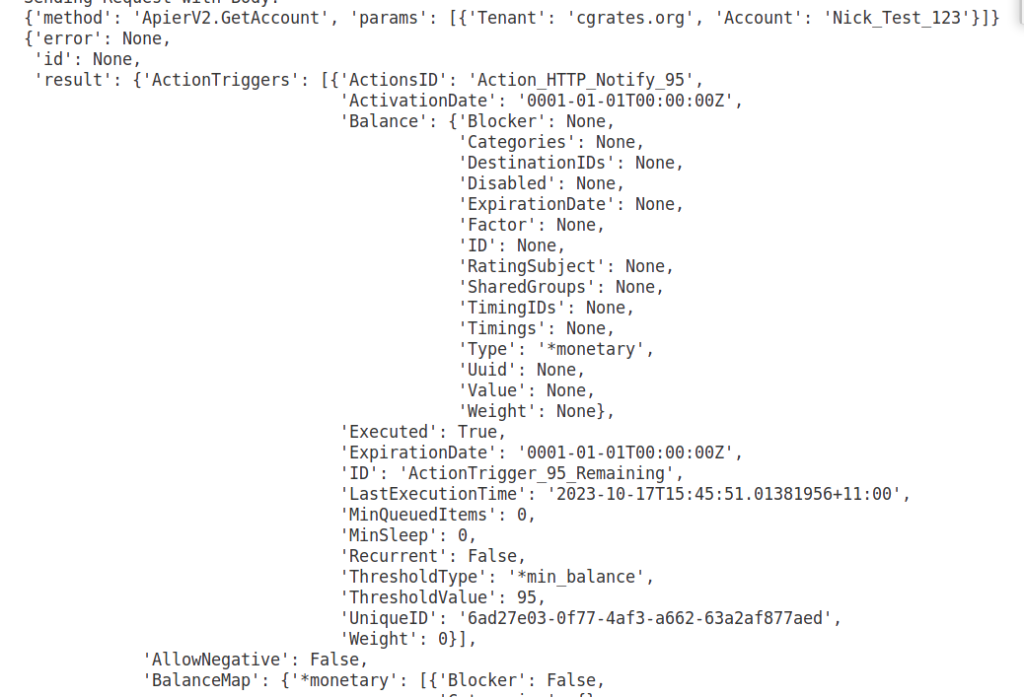
We can check on this using the ApierV2.GetAccount method, where we’ll see the ActionTrigger we just defined.

Checking out the LastExecutionTime we can see if the ActionTrigger been triggered or not.

So using this technique, we can notify a customer when they’ve used a certain amount of their balance, but we can lock out Accounts who have spent more than their allocated spend limit by setting an Action that suspends the Account once it reaches a certain level. We notify customers when balance expires, or if a certain number of counters has been triggered.

As always I’ve put all the code used in this example, from start to finish, up on GitHub.

CGrateS – Accounts & Balances

So far we’ve used CGrateS to rate a basic CDR and get a cost for it, but in the real world, we’d usually associate the cost with an account, which would represent a business or a person, who will ultimately be charged for using the service.

Note: I’ve put the code for all this in Github, if you’ve got issues following along, or don’t want to copy and paste the code from the website, you can grab the code here.

Creating an Account

Let’s start off by creating an account inside CGrateS – This is kinda pointless, but we’ll talk more about that later:

#Create the Account object inside CGrateS 
Create_Account_JSON = {
    "method": "ApierV2.SetAccount",
    "params": [
        {
            "Tenant": "cgrates.org",
            "Account": "Nick_Test_123"
        }
    ]
}
print(CGRateS_Obj.SendData(Create_Account_JSON))

Running this onto the API should create an account named “Nick_Test_123”, but let’s confirm that’s the case:

#Print the Account Information
pprint.pprint(CGRateS_Obj.SendData({'method':'ApierV2.GetAccount','params':[{"Tenant":"cgrates.org","Account": "Nick_Test_123"}]}))

Running this will give us the information about the account we just created:

{'method': 'ApierV2.GetAccount', 'params': [{'Tenant': 'cgrates.org', 'Account': 'Nick_Test_123'}]}
OrderedDict([('id', None),
             ('result',
              OrderedDict([('ID', 'cgrates.org:Nick_Test_123'),
                           ('BalanceMap', None),
                           ('UnitCounters', None),
                           ('ActionTriggers', None),
                           ('AllowNegative', False),
                           ('Disabled', False),
                           ('UpdateTime',
                            '2023-10-09T16:53:37.524466041+11:00')])),
             ('error', None)])

That was easy!

There’s not really much to see on our account at this stage, other than the UpdateTime, there’s nothing really going on, we don’t have any Balances.

Adding Balance for Voice

Accounts exist for spending, so let’s add a balance to this account to send from.

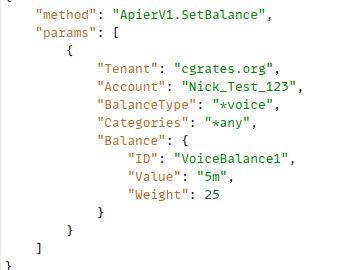
We’ll use the SetBalance API to create a new balance with 5 minutes of talk time, that we can use for making a call, and talking, for (you guessed it) – 5 minutes, so and we’ll use the balance “5_minute_voice_balance” that we’ll create:

#Add a balance to the account with type *voice with 5 minutes of Talk Time
Create_Voice_Balance_JSON = {
    "method": "ApierV1.SetBalance",
    "params": [
        {
            "Tenant": "cgrates.org",
            "Account": "Nick_Test_123",
            "BalanceType": "*voice",
            "Categories": "*any",
            "Balance": {
                "ID": "5_minute_voice_balance",
                "Value": "5m",
                "Weight": 25
            }
        }
    ]
}
print(CGRateS_Obj.SendData(Create_Voice_Balance_JSON))

Now if we run the GetAccount API command again, we should see the new balance we just created:

#Print the Account Information
pprint.pprint(CGRateS_Obj.SendData({'method':'ApierV2.GetAccount','params':[{"Tenant":"cgrates.org","Account": "Nick_Test_123"}]}))
{'method': 'ApierV2.GetAccount', 'params': [{'Tenant': 'cgrates.org', 'Account': 'Nick_Test_123'}]}
{'error': None,
 'id': None,
 'result': {'ActionTriggers': None,
            'AllowNegative': False,
            'BalanceMap': {'*voice': [{'Blocker': False,
                                       'Categories': None,
                                       'DestinationIDs': None,
                                       'Disabled': False,
                                       'ExpirationDate': '0001-01-01T00:00:00Z',
                                       'Factor': None,
                                       'ID': '5_minute_voice_balance',
                                       'RatingSubject': '',
                                       'SharedGroups': None,
                                       'TimingIDs': None,
                                       'Timings': None,
                                       'Uuid': '37423d07-d99a-40b1-851a-981c3df02cb3',
                                       'Value': 300000000000,
                                       'Weight': 25}]},
            'Disabled': False,
            'ID': 'cgrates.org:Nick_Test_123',
            'UnitCounters': None,
            'UpdateTime': '2023-10-14T17:58:23.801531205+11:00'}}

So now we’ve got a new balance named ‘5_minute_voice_balance‘:

  • The type is *voice, because this balance is storing talk time
  • The weight of this balance is 25, this means this balance should take priority over any balances with a lower value than 25 (that’s right, we can (and will) do tiered balances)
  • The value is 300000000000 nanoseconds, which equates to 5 minutes (yes, that’s the correct number of zeros)

Okay, but Nick_Test_123 probably wants to make some calls, so let’s generate a 2.5 minute call event and check out what happens.


#Generate a new call event for a 2.5 minute (150 second) call
Process_External_CDR_JSON = {
    "method": "CDRsV2.ProcessExternalCDR",
    "params": [
        {
            "OriginID": str(uuid.uuid1()),
            "ToR": "*voice",
            "RequestType": "*pseudoprepaid",
            "AnswerTime": now.strftime("%Y-%m-%d %H:%M:%S"),
            "SetupTime": now.strftime("%Y-%m-%d %H:%M:%S"),
            "Tenant": "cgrates.org",
            "Account": "Nick_Test_123",
            "Usage": "150s",
        }
    ]
}
print(CGRateS_Obj.SendData(Process_External_CDR_JSON))

Alright, now we’ve got a call event, let’s call the GetAccount API again to check the balance:

#Print the Account Information
pprint.pprint(CGRateS_Obj.SendData({'method':'ApierV2.GetAccount','params':[{"Tenant":"cgrates.org","Account": "Nick_Test_123"}]}))
{'method': 'ApierV2.GetAccount', 'params': [{'Tenant': 'cgrates.org', 'Account': 'Nick_Test_123'}]}
{'error': None,
 'id': None,
 'result': {'ActionTriggers': None,
            'AllowNegative': False,
            'BalanceMap': {'*voice': [{'Blocker': False,
                                       'Categories': None,
                                       'DestinationIDs': None,
                                       'Disabled': False,
                                       'ExpirationDate': '0001-01-01T00:00:00Z',
                                       'Factor': None,
                                       'ID': '5_minute_voice_balance',
                                       'RatingSubject': '',
                                       'SharedGroups': None,
                                       'TimingIDs': None,
                                       'Timings': None,
                                       'Uuid': '37423d07-d99a-40b1-851a-981c3df02cb3',
                                       'Value': 150000000000,
                                       'Weight': 25}]},
            'Disabled': False,
            'ID': 'cgrates.org:Nick_Test_123',
            'UnitCounters': None,
            'UpdateTime': '2023-10-14T17:58:23.80925546+11:00'}}

And there you have it, we’ve used 150 seconds of our 300 second (5 minutes) of talk time in this balance, leaving with us 150000000000 nanoseconds (150 seconds) remaining!

And with that progress, now is a great time to pause and talk about some theory that’s really important to grasp!

Balance Types

But *voice is just one balance type – We can support multiple balance types; we’ve just given a balance of *voice for talk time, but we could also give a credit to the balance for *sms or *data, you name it (*generic) and cash (*monetary) and we can have multiple separate balances for each.

This means we can have one account with something like:

  • 100 minutes of Local / National Calls (Expires at the end of the month)
  • 40 minutes of Mobile Calls (Expires 24 hours after it’s been created)
  • 80 minutes of Mobile Calls (During “Happy Hour” from 6 to 7pm)
  • 50 minutes of International Calls (Expires in 30 days)

And not just voice balance, the same account could also have:

  • 1GB of Data usage
  • 50 SMS to on-net destinations
  • $200 of Cash (expiring never)

Phew! That’s a lot of balances, but we can do it all through CGrateS!

What Balance to Use

So if we’ve got a stack of balances defined, how does CGrateS know what balance to use?

Firstly CGrateS is going to evaluate the BalanceType, this is set on events, so if we get an event for *data CGrateS will check out the balances available for *data, and evaluate the balances by Weight, with the highest weight evaluated first.
If we get to the end of all the available balances for that BalanceType, CGrateS then evaluates *generic and then *monetary balances, again, ordered by Weight.

We can set what balance gets used based on the Destination; using DestinationIDs we can filter the Balance to only apply for calls to Local/National numbers, so a call to an International destination won’t use that balance.

We can also set an Expiry on the Balance, for example we can give a customer 30 days to use the balance, after which it expires and can’t be used, likewise we can set Timings so enable scenarios like a “Happy hour” with extra calls between 6pm and 7pm.

When we define a balance we can also set the Blocker flag to True, if this is set, it means CGrateS will not look evaluate any balances after reaching that balance.

Adding a Balance for Local / National & Mobile Calls

Let’s jump back into the practice, and define two new Balances; one for Local/National calls, and another for Mobile calls.
But first we’ll need to know what destinations are mobiles and what are local/national (fixed). We’ve covered setting Destinations previously, so let’s set up the Destinations:


CGRateS_Obj.SendData({'method':'ApierV2.SetTPDestination','params':[{"TPid":"cgrates.org","ID":"Dest_AU_Fixed","Prefixes":["612", "613", "617", "618"]}]})
CGRateS_Obj.SendData({'method':'ApierV2.SetTPDestination','params':[{"TPid":"cgrates.org","ID":"Dest_AU_Mobile","Prefixes":["614"]}]})
CGRateS_Obj.SendData({'method':'ApierV2.SetTPDestination','params':[{"TPid":"cgrates.org","ID":"Dest_AU_TollFree","Prefixes":["6113", "6118"]}]})
#Load TariffPlan we just defiend from StorDB to DataDB
print(CGRateS_Obj.SendData({"method":"APIerSv1.LoadTariffPlanFromStorDb","params":[{"TPid":"cgrates.org","DryRun":False,"Validate":True,"APIOpts":None,"Caching":None}],"id":0}))

Alright, now let’s add a balance for our local/national (fixed) calls.

To do this, we’ll add two new balances, but we’ll need to differentiate this from the 5_minute_voice_balance we created earlier, and to achieve this we weill:

  • Set a higher Weight value than we have set on 5_minute_voice_balance (25) so this balance will get consumed before 5_minute_voice_balance does
  • Set the DestinationIDs to match the destinations (Dest_AU_Mobile for Mobile and Dest_AU_Fixed for Local/National) we want the balance to apply to

ProTip: When you we create our Balance we can set what Destinations we want to use this balance for, if you want to specify multiple balances, we can do it by setting the Balance names as a string delimited by semicolons, like “DestinationIDs”: “Dest_AU_Fixed;Dest_AU_Mobile;Dest_AU_TollFree”

We’ll also set a balance expiry, which we’ll cover shortly, but now let’s define out 100 minutes for Local/National expiring at the end of the month:

#Add a balance to the account with type *voice with 100 minutes of talk time to Local / National Destinations expiring at the end of the month
Create_Local_National_Voice_Balance_JSON = {
    "method": "ApierV1.SetBalance",
    "params": [
        {
            "Tenant": "cgrates.org",
            "Account": "Nick_Test_123",
            "BalanceType": "*voice",
            "Categories": "*any",
            "Balance": {
                "ID": "Local_National_100_minutes_voice_balance",
                "Value": "100m",
                "ExpiryTime": "*month_end",
                "Weight": 60,
                "DestinationIDs": "Dest_AU_Fixed",
            }
        }
    ]
}
print(CGRateS_Obj.SendData(Create_Local_National_Voice_Balance_JSON))

We’ll also add our 24 hours to use to use 40 minutes of talk to mobiles, and a GetAccount to check the result:

#Add a balance to the account with type *voice with 40 minutes of talk time to Mobile Destinations expiring in 24 hours
Create_Mobile_Voice_Balance_JSON = {
    "method": "ApierV1.SetBalance",
    "params": [
        {
            "Tenant": "cgrates.org",
            "Account": "Nick_Test_123",
            "BalanceType": "*voice",
            "Categories": "*any",
            "Balance": {
                "ID": "Mobile_40_minutes_voice_balance",
                "Value": "40m",
                "ExpiryTime": "*daily",
                "Weight": 60,
                "DestinationIDs": "Dest_AU_Mobile",
            }
        }
    ]
}
print(CGRateS_Obj.SendData(Create_Mobile_Voice_Balance_JSON))

# Get Account Info Again
pprint.pprint(CGRateS_Obj.SendData({"method": "ApierV2.GetAccount", "params": [
              {"Tenant": "cgrates.org", "Account": "Nick_Test_123"}]}))

Alright, let’s try running that:

{'method': 'ApierV2.GetAccount', 'params': [{'Tenant': 'cgrates.org', 'Account': 'Nick_Test_123'}]}
{'error': None,
 'id': None,
 'result': {'ActionTriggers': None,
            'AllowNegative': False,
            'BalanceMap': {'*voice': [{'Blocker': False,
                                       'Categories': None,
                                       'DestinationIDs': None,
                                       'Disabled': False,
                                       'ExpirationDate': '0001-01-01T00:00:00Z',
                                       'Factor': None,
                                       'ID': '5_minute_voice_balance',
                                       'RatingSubject': '',
                                       'SharedGroups': None,
                                       'TimingIDs': None,
                                       'Timings': None,
                                       'Uuid': 'ad9d8bdd-64df-430f-af9d-3fc0410fd16b',
                                       'Value': 150000000000,
                                       'Weight': 25},
                                      {'Blocker': False,
                                       'Categories': None,
                                       'DestinationIDs': {'Dest_AU_Fixed': True},
                                       'Disabled': False,
                                       'ExpirationDate': '2023-10-31T23:59:59+11:00',
                                       'Factor': None,
                                       'ID': 'Local_National_100_minutes_voice_balance',
                                       'RatingSubject': '',
                                       'SharedGroups': None,
                                       'TimingIDs': None,
                                       'Timings': None,
                                       'Uuid': 'e4a2c211-8112-4e40-b3e6-250863404cc9',
                                       'Value': 6000000000000,
                                       'Weight': 60},
                                      {'Blocker': False,
                                       'Categories': None,
                                       'DestinationIDs': {'Dest_AU_Mobile': True},
                                       'Disabled': False,
                                       'ExpirationDate': '2023-10-15T18:15:11.521636734+11:00',
                                       'Factor': None,
                                       'ID': 'Mobile_40_minutes_voice_balance',
                                       'RatingSubject': '',
                                       'SharedGroups': None,
                                       'TimingIDs': None,
                                       'Timings': None,
                                       'Uuid': 'd4cbf6d8-50a5-4c97-82c2-dfe9936ae8d1',
                                       'Value': 2400000000000,
                                       'Weight': 60}]},
            'Disabled': False,
            'ID': 'cgrates.org:Nick_Test_123',
            'UnitCounters': None,
            'UpdateTime': '2023-10-14T18:15:11.524242437+11:00'}}

Alright! We now have 3 balances defined!

Notice in the API in the expiry I put *daily and *month_end, but in the output it’s got a real date and time (I wrote this 14/10/23 around 07:00 UTC, hence why those dates are what they are).
I could have specified the date and time in the API of a specific time I wanted the balance to expire (You can too, just replace “*daily” with “2024-01-01T00:00:00Z” for example), but that’s a pain in the butt, especially considering most of the time these values will be something common.
The *month_end is a special “meta” value, there’s a heap of these that allow us to do things like “current time + 20 minutes” (+20m), this time next month (*monthly), “this time tomorrow” (*daily), or “this time next week” (+168h) – You can find the full list of special dates here.

From a product perspective, setting an expiry on balances means we can set credit to expire 2 years after the subscriber tops up, but the same logic can be used so a subscriber could purchase a 7 day addon pack, that expires in 7 days, or a monthly plan can automatically expire in 30 days.

Now if we call the ProcessExternalCDR API again with a call to a Mobile and a Fixed number, we’ll see the respective balances get deducted.


#Generate a new call event for a 2.5 minute (150 second) call to a mobile number
Process_External_CDR_JSON = {
    "method": "CDRsV2.ProcessExternalCDR",
    "params": [
        {
            "OriginID": str(uuid.uuid1()),
            "ToR": "*voice",
            "RequestType": "*pseudoprepaid",
            "AnswerTime": now.strftime("%Y-%m-%d %H:%M:%S"),
            "SetupTime": now.strftime("%Y-%m-%d %H:%M:%S"),
            "Subject": "61412341234",
            "Destination": "61412341234",
            "Tenant": "cgrates.org",
            "Account": "Nick_Test_123",
            "Usage": "30s",
        }
    ]
}
print(CGRateS_Obj.SendData(Process_External_CDR_JSON))

#Generate a new call event for a 2.5 minute (150 second) call to a fixed line local/national number
Process_External_CDR_JSON = {
    "method": "CDRsV2.ProcessExternalCDR",
    "params": [
        {
            "OriginID": str(uuid.uuid1()),
            "ToR": "*voice",
            "RequestType": "*pseudoprepaid",
            "AnswerTime": now.strftime("%Y-%m-%d %H:%M:%S"),
            "SetupTime": now.strftime("%Y-%m-%d %H:%M:%S"),
            "Subject": "61212341234",
            "Destination": "61212341234",
            "Tenant": "cgrates.org",
            "Account": "Nick_Test_123",
            "Usage": "30s",
        }
    ]
}
print(CGRateS_Obj.SendData(Process_External_CDR_JSON))

# Get Account Info Again
pprint.pprint(CGRateS_Obj.SendData({"method": "ApierV2.GetAccount", "params": [
              {"Tenant": "cgrates.org", "Account": "Nick_Test_123"}]}))

We should see the minutes reduced by 30 seconds for our Local_National_100_minutes_voice_balance and Mobile_40_minutes_voice_balance balances, while our 5_minute_voice_balance hasn’t been touched.

{
   "Blocker":false,
   "Categories":"None",
   "DestinationIDs":"None",
   "Disabled":false,
   "ExpirationDate":"0001-01-01T00:00:00Z",
   "Factor":"None",
   "ID":"5_minute_voice_balance",
   "RatingSubject":"",
   "SharedGroups":"None",
   "TimingIDs":"None",
   "Timings":"None",
   "Uuid":"29f21735-1d62-49b1-9c53-80eab6f7b005",
   "Value":150000000000,
   "Weight":25
},
{
   "Blocker":false,
   "Categories":"None",
   "DestinationIDs":{
      "Dest_AU_Fixed":true
   },
   "Disabled":false,
   "ExpirationDate":"2023-10-31T23:59:59+11:00",
   "Factor":"None",
   "ID":"Local_National_100_minutes_voice_balance",
   "RatingSubject":"",
   "SharedGroups":"None",
   "TimingIDs":"None",
   "Timings":"None",
   "Uuid":"54db4f60-342e-4738-aaf1-a1304badc41d",
   "Value":5970000000000,
   "Weight":60
},
{
   "Blocker":false,
   "Categories":"None",
   "DestinationIDs":{
      "Dest_AU_Mobile":true
   },
   "Disabled":false,
   "ExpirationDate":"2023-10-15T18:32:34.888821482+11:00",
   "Factor":"None",
   "ID":"Mobile_40_minutes_voice_balance",
   "RatingSubject":"",
   "SharedGroups":"None",
   "TimingIDs":"None",
   "Timings":"None",
   "Uuid":"501eb00e-e947-4675-926f-080911e66897",
   "Value":2370000000000,
   "Weight":60
}

One last thing we’ll try before we end, our Mobile_40_minutes_voice_balance has still got 39.5 minutes left, and our 5_minute_voice_balance has still got minutes remaining, so if we try and make a call that’s 2450 seconds (~41 minutes), we should consume all the remaining minutes in Mobile_40_minutes_voice_balance and the go onto consume the remaining 1 minute out of 5_minute_voice_balance.

Let’s test this theory!

#Generate a new call event for a 42 minute call to a mobile to use all of our Mobile_40_minutes_voice_balance and start consuming 5_minute_voice_balance
Process_External_CDR_JSON = {
    "method": "CDRsV2.ProcessExternalCDR",
    "params": [
        {
            "OriginID": str(uuid.uuid1()),
            "ToR": "*voice",
            "RequestType": "*pseudoprepaid",
            "AnswerTime": now.strftime("%Y-%m-%d %H:%M:%S"),
            "SetupTime": now.strftime("%Y-%m-%d %H:%M:%S"),
            "Subject": "61412341234",
            "Destination": "61412341234",
            "Tenant": "cgrates.org",
            "Account": "Nick_Test_123",
            "Usage": "2450s",
        }
    ]
}
print(CGRateS_Obj.SendData(Process_External_CDR_JSON))

# Get Account Info Again
pprint.pprint(CGRateS_Obj.SendData({"method": "ApierV2.GetAccount", "params": [
              {"Tenant": "cgrates.org", "Account": "Nick_Test_123"}]}))

Let’s check the output:

{
   "Blocker":false,
   "Categories":"None",
   "DestinationIDs":"None",
   "Disabled":false,
   "ExpirationDate":"0001-01-01T00:00:00Z",
   "Factor":"None",
   "ID":"5_minute_voice_balance",
   "RatingSubject":"",
   "SharedGroups":"None",
   "TimingIDs":"None",
   "Timings":"None",
   "Uuid":"29f21735-1d62-49b1-9c53-80eab6f7b005",
   "Value":70000000000,
   "Weight":25
},
...
{
   "Blocker":false,
   "Categories":"None",
   "DestinationIDs":{
      "Dest_AU_Mobile":true
   },
   "Disabled":false,
   "ExpirationDate":"2023-10-15T18:44:18.161474861+11:00",
   "Factor":"None",
   "ID":"Mobile_40_minutes_voice_balance",
   "RatingSubject":"",
   "SharedGroups":"None",
   "TimingIDs":"None",
   "Timings":"None",
   "Uuid":"501eb00e-e947-4675-926f-080911e66897",
   "Value":0.0161939859,
   "Weight":60
}

Boom, there we have it! Used all of the minutes in Mobile_40_minutes_voice_balance and started eating into the 5_minute_voice_balance.

Alright, that was a long post! Sorry about that, and props for making it to the end, still so much to learn about CGrateS.
Tales from the Trenches: mode-set in AMR

This one was a bit of a head scratcher for me, but I’m always glad to learn something new.

The handset made a VoLTE call, and it’s SDP offer shows it can support AMR and AMR-WB:

        Media Attribute (a): rtpmap:116 AMR-WB/16000/1
        Media Attribute (a): fmtp:116 mode-set=0,1,2,3,4,5,6,7,8;mode-change-capability=2;max-red=220
        Media Attribute (a): rtpmap:118 AMR/8000/1
        Media Attribute (a): fmtp:118 mode-set=0,1,2,3,4,5,6,7;mode-change-capability=2;max-red=220
        Media Attribute (a): rtpmap:111 telephone-event/16000
        Media Attribute (a): fmtp:111 0-15

Okay, that’s pretty normal, I can see we have the mode-set parameter defined, which indicates what modes the handset supports for each codec.

In our problem scenario, the Media Gateway that the call was sent to responded with this SDP answer:

        Media Description, name and address (m): audio 24504 RTP/AVP 118 110
        Media Attribute (a): rtpmap:118 AMR/8000
        Media Attribute (a): fmtp:118 mode-set=7
        Media Attribute (a): rtpmap:110 telephone-event/8000
        Media Attribute (a): fmtp:110 0-15
        Media Attribute (a): ptime:20
        Media Attribute (a): sendrecv
        [Generated Call-ID: FA163E564B37-f4d-98f56700-735d25-65357ee0-9c488]

But we got an error about not available codecs and the call drops, what gives?

Both sides support AMR (Only the phone supports AMR-WB), and the Media Gateway, as the answerer, supports mode-set 7, which is supported by the UE, so we should be good?

Well, not quite:

If mode-set is specified, it MUST be abided, and frames encoded with modes outside of the subset MUST NOT be sent in any RTP payload or used in codec mode requests. If not present, all codec modes are allowed for the payload type.

RFC 4867 – RTP Payload Format for AMR and AMR-WB

Okay, I get it, the answerer (media gateway) only supports mode 7, but the UE supports all the modes, so we should be fine right?

Well, no.

Section 8.3.1 in the RFC goes on to say in the Offer-Answer Model Considerations:

The parameter [mode-set] is bi-directional, i.e., the restricted set applies to media both to be received and sent by the declaring entity. If a mode set was supplied in the offer, the answerer SHALL return the mode-set unmodified or reject the payload type. However, the answerer is free to choose a mode-set in the answer only if no mode-set was supplied in the offer for a unicast two-peer session.

And there is our problem, and why the call is getting rejected.

The Media Gateway (the answerer in this scenario) is sending back the mode-set it supports (7) but as the UE / handset (offerer) included the mode-set, the Media Gateway should either respond with the same mode set (if it supported all the requested modes) or reject it.

Instead we’re seeing the Media Gateway repond with the mode set, which it supports, which it should not do: The Media Gateway should either return the same mode-set (unmodified / unchanged) or reject it.

And boom, another ticket to another vendor…

Tales from the Trenches – Emergency Calling when Roaming

In my last post talking about the Emergency Calling Codes, I had a few comments asking about what about in roaming scenarios?

For example, an American visiting the UK, would have 911 on the Emergency Calling Codes list on their SIM card, but in the UK they dial 999 to reach emergency services.

There’s two angles to this, the first is if a roamer dials the emergency calling code of their home country, the other is if they dial the emergency calling code of the country they are in.

Let’s look at the first scenario, where the roamer dials the emergency calling code of their home country.

If our American in the UK abroad dials 911, that number is on the ECC list on the SIM, it’s still flagged as an emergency call, and just goes out with the standard urn:service:sos URN – The network never sees 911 or 999, just that it’s an SOS call that goes to the PSAP.

In this scenario, the fact the dialled number is not passed to the network is actually a positive, we get the intent that the user wants to reach emergency services, and route based on this.

But what if our American friend in need dials 999?
That’s the correct number for the end user to dial in the UK after all, but if that’s not in their ECC list on the SIM / device, it’d go through as a regular call right?

If the call does not get flagged as an emergency call on the UE this has its own set of complications and considerations:

S8-Home Routing for VoLTE means that as the UE doesn’t know this is an emergency call, the call will get routed back to the home network. This means the call doesn’t go to the E-CSCF in the visited network, and would probably just get a message saying the number they’ve dialed is unavailable, this would be exactly as if they dialed 999 at home in the US.
But we have a fix for this!
On each MME we can set a list of emergency numbers, which would allow our Britt’s phone to know on this network, what the emergency calling codes are, and route the 999 call to the local PSAP, rather than home routing it.
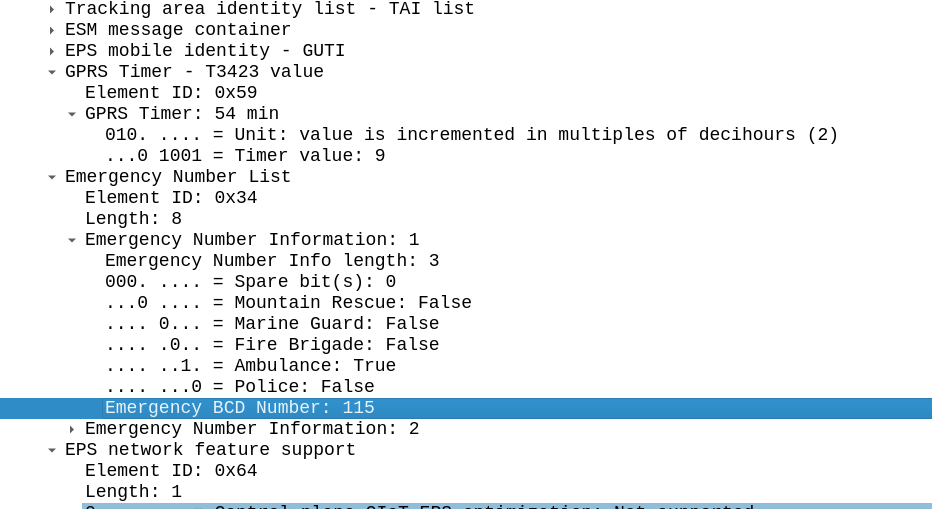
MME Emergency Number list Config

This information is jammed into the Emergency Number List IE in the NAS Attach Accept body.

This means our American visitor in the UK, would know about 999 from the ECC list configured in the roaming operator’s MME.

The purpose of this information element is to encode emergency number(s) for use within the country where the IE is received.

3GPP TS 24.008: 10.5.3.13 – Emergency Number List

Where this becomes more problematic is unauthenticated emergency calling.

For example, a our American visiting the UK, that is not roaming dials 999.

We’ll assume the UK and US operator don’t have a VoLTE roaming agreement because they’ve been kicking the can down the road when it comes to VoLTE roaming… This is super common scenario – last numbers I saw on this were last year with ~50 bilateral VoLTE agreements in place worldwide.

Because the phone is not attached to a local MME, the handset does not know that 999 is an emergency calling code (because it’s not on the SIM), after all, the only way it can get the Emergency Number List is from an MME, and not having been attached to an MME, means the phone does not have the ECC list for the country, so the the handset does not begin the emergency attach procedure to make the call.

Common sense prevails here, on the majority of phones and the majority of SIM profiles, codes like 112 or 911 are treated as emergency calls, but more obscure numbers, such as dialing 999 in the UK or 10111 for South African Police on a handset with US firmware, are not guaranteed to work. Generally dialing the Emergency Calling code in the home network would get you through to some emergency services (although as we talked about in the last post, this might get you routed to the wrong agency in countries where each agency has their own number).

A better way forward?

These days I don’t dial much (apart from if I’m making adjustments on the Step-by-Step exchange), when I call people I do it from contacts, hyperlinks, etc.

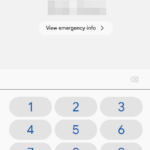
Emergency Dialler page in Android

There is mountains of research to suggest that asking people to remember codes and phone numbers, is a struggle. A tourist who finds themselves in Tunisia in need of assistance, is unlikely to remember that it’s 190 for an Ambulance, and 198 for Fire.

Perhaps the ECC list on a phone should populate a page of icons from the emergency page on the phone, with the universal icon for each agency, that sends to the URN for that service type?

Countries with a single PSAP could have the URNs for each service type routed to the same place, while countries with seperated PSAPs for each service type, can route accordingly.

Likewise if a country does have a centralised PSAP for all call types, knowing the type that is selected would be useful, for example if the user has pressed fire and is not responsive when the call is answered, the best unit to dispatch would probably be a fire engine.

Tales from the Trenches: The issue with Emergency Calling URNs in IMS Networks

A lot of countries have a single point of contact for emergency services; in Europe you’d call 112 in an emergency, 000 in Australia or 911 in the US. Calling this number in the country will get you the emergency services.

This means a caller can order an ambulance for smoke inhalation, and the fire brigade, in one call.

But that’s not the case in every country; many countries don’t have one number for the emergency services, they’ve got multiple; a phone number for police, a different number for fire brigade and a different number for an ambulance.

For example, in Brazil if you need the police, you call 190, while a for example, uses 193 as the emergency number for the fire department, the police can be reached at 190 or 191 depending on if it’s road policing or general, and medical emergencies are covered by 192. Other countries have similar setups.

This is all well and good if you’re in Brazil, and you call 192 for an ambulance, the phone sends a SIP INVITE with a Request URI of sip:[email protected], because we can put a rule into our E-CSCF to say if the number is 192 to route it to the answer point for ambulances – But that’s not often the case on emergency calls.

In IMS, handsets generally detect the number dialed is on the Emergency Calling Code (ECC) list from the USIM Card.

The use of the ECC list means the phone knows this is an emergency call, and this is really important. For countries that use AML this can trigger sending of the AML SMS that process, and Emergency Calls should always be allowed to be made, even without credit, a valid SIM card, or even a SIM in the phone at all.

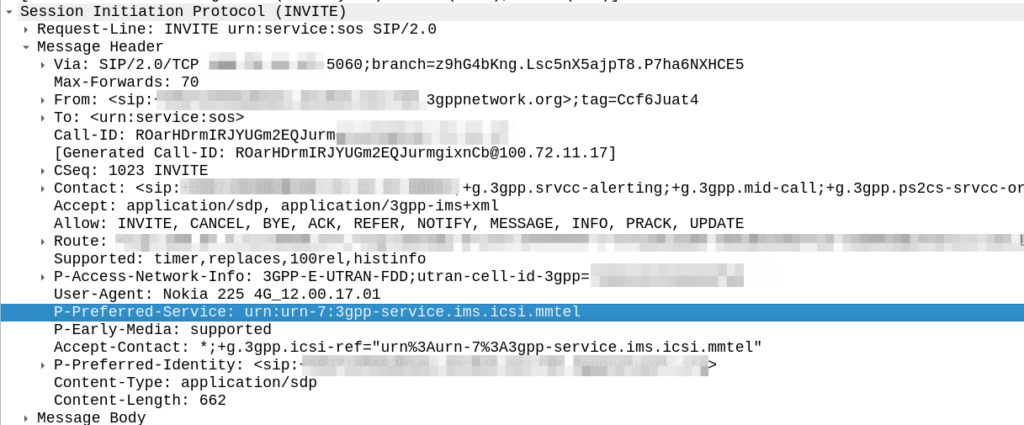
But this comes with a cost; when a user dials 911, the phones doesn’t (generally) send a call to sip:[email protected] like it would with any other dialled number, but rather the SIP INVITE is sent to urn:service:sos which will be routed to the PSAP by the E-CSCF. When a call comes through to these URNs they’re given top priority in the network

This is all well and good in a country where it doesn’t matter which emergency service you called, because all emergency calls route to a single PSAP, but in a country with multiple numbers, it’s really important when you call and ambulance, your call doesn’t get routed to animal control.

That means the phone has to look at what emergency number you’ve dialed, and map the URN it sends the call to to match what you’ve actually requested.

Recently we’ve been helping an operator in a country with a numbering plan like this, and we’ve been finding the limits of the standards here.
So let’s start by looking at what the standards state:

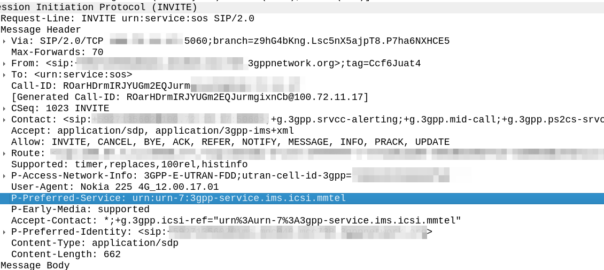
IMS Emergency Calling is governed by TS 103.479 which in turn delegates to IETF RFC 5031, but for the calling number to URN translation, it’s pretty quiet.

Let’s look at what RFC 5031 allows for URNs:

  • urn:service:sos.ambulance
  • urn:service:sos.animal-control
  • urn:service:sos.fire
  • urn:service:sos.gas
  • urn:service:sos.marine
  • urn:service:sos.mountain
  • urn:service:sos.physician
  • urn:service:sos.poison
  • urn:service:sos.police

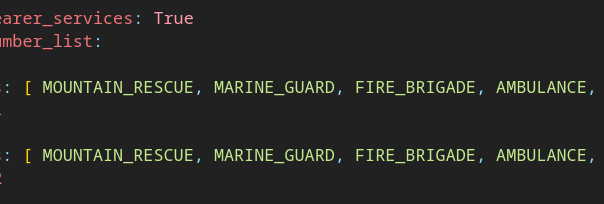
The USIM’s Emergency Calling Codes EF would be the perfect source of this data; for each emergency calling code defined, you’ve got a flag to indicate what it’s for, here’s what we’ve got available on the SIM Card:

  • Bit 1 Police
  • Bit 2 Ambulance
  • Bit 3 Fire Brigade
  • Bit 4 Marine Guard
  • Bit 5 Mountain Rescue
  • Bit 6 manually initiated eCall
  • Bit 7 automatically initiated eCall
  • Bit 8 is spare and set to “0”

So these could be mapped pretty easily you’d think, so if the call is made to an Emergency Calling Code flagged with Bit 4, the URN would go to urn:service:sos.mountain.

Alas from our research, we’ve found most OEMs send calls to the generic urn:service:sos, regardless of the dialled number and the ECC flags that are set on the SIM for that number.

One of the big chip vendors sends calls to an ECC flagged as Ambulance to urn:service:sos.fire, which is totally infuriating, and we’ve had to put a rule in our E-CSCF to handle this if the User Agent is set to one of their phones.

Is there room for improvement here? For sure! Emergency calling is super important, and time is of the essence, while animal control can probably transfer you to an ambulance, an emergency is by very nature time sensitive, and any time wasted can lead to worse outcomes.

While carrier bundles from the OEMs can handle this, the global ability to take any phone, from any country and call an emergency number is so important, that relying on a country-by-country approach here won’t suffice.

What could we do as an industry to address this?

Acknowledging that not all countries have a single point of contact for emergency service, introducing a simple mechanism in the UE SIP message to indicate what number (Emergency Calling Code) the user actually dialled would be invaluable here.

URNs are important, but knowing the dialed number when it comes to PSAP routing, is so important – This wouldn’t even need to be its own SIP header, it could just be thrown into the Contact header as another parameter.

Highly developed markets are often the first to embrace new tech (for us this means VoLTE and VoNR), but this means that these issues seen by less developed markets won’t appear until long after the standard has been set in stone, and often countries like this aren’t at the table of the standards bodies to discuss such requirements.

This easy, reasonable update to the standard, has the potential to save lives, and next time this comes up in a working group I’ll be advocating for a change.

Playing back AMR streams from Packet Captures

The other day I found myself banging my head on the table to diagnose an issue with Ringback tone on an SS7 link and the IMS.

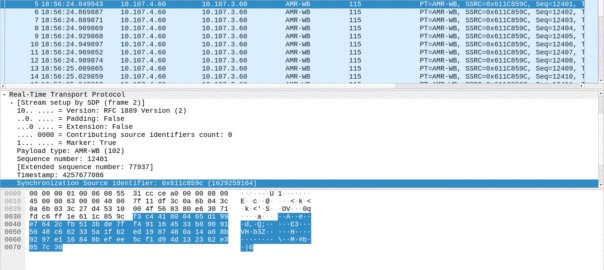
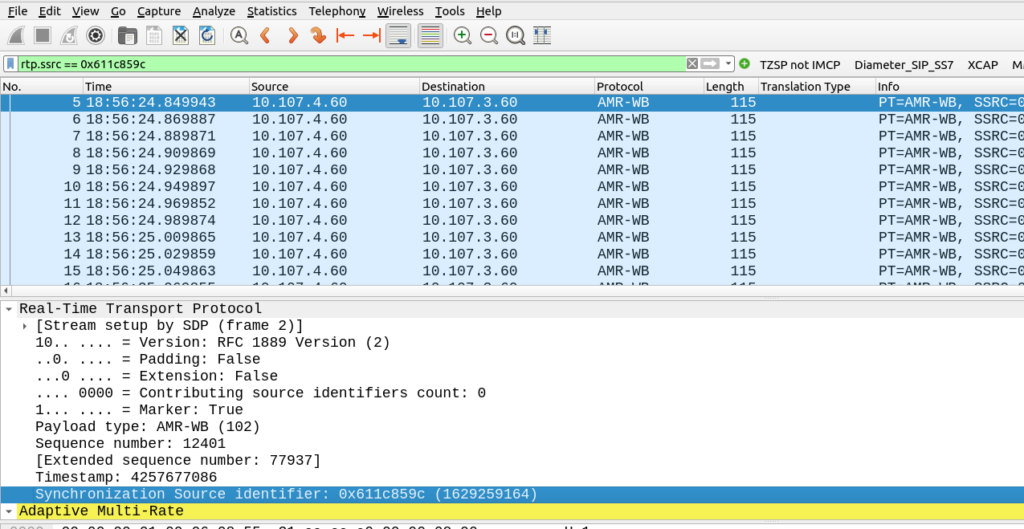
On the IMS side, no RBT was heard, but I could see the Media Gateway was sending RTP packets to the TAS, and the TAS was sending it to the UE, but was there actual content in the RTP packets or was it just silence?

If this was PCM / G711 we’d be able to just playback in Wireshark, but alas we can’t do this for the AMR codec.

Filter the RTP stream out in Wireshark

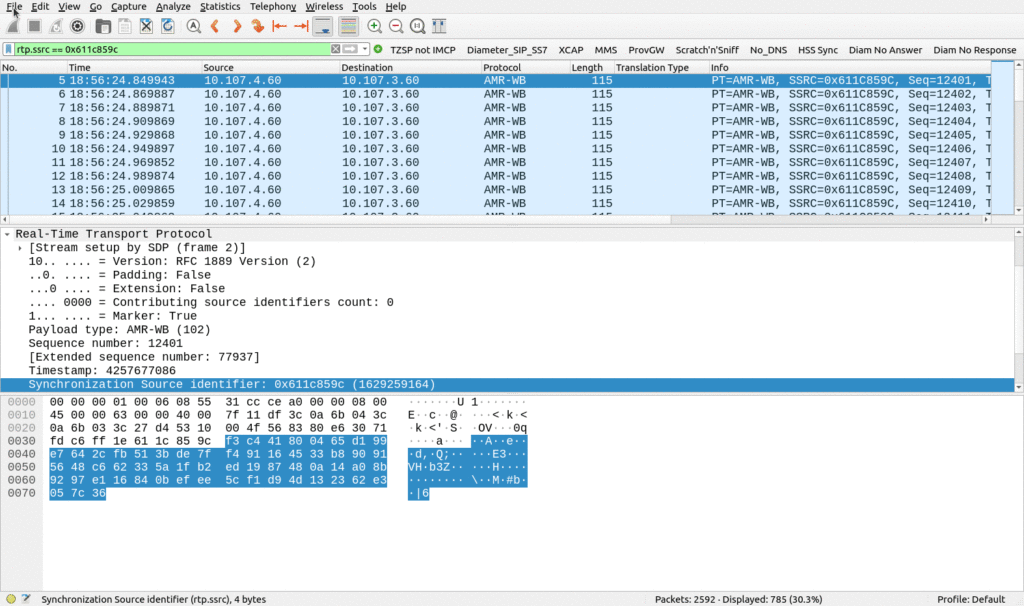
Inside Wireshark I filtered each of the audio streams in one direction (one for the A-Party audio and one for the B-Party audio)

Then I needed to save each of the streams as a separate PCAP file (Not PCAPng).

Turn into AMR File

With the audio stream for one direction saved, we can turn it into an AMR file, using Juan Noguera (Spinlogic)’s AMR Extractor tool.

Clone the Repo from git, and then in the same directory run:

python3 pcap_parser.py -i AMR_B_Leg.pcap -o AMR_B_Leg.3ga

Playback with VLC / Audacity

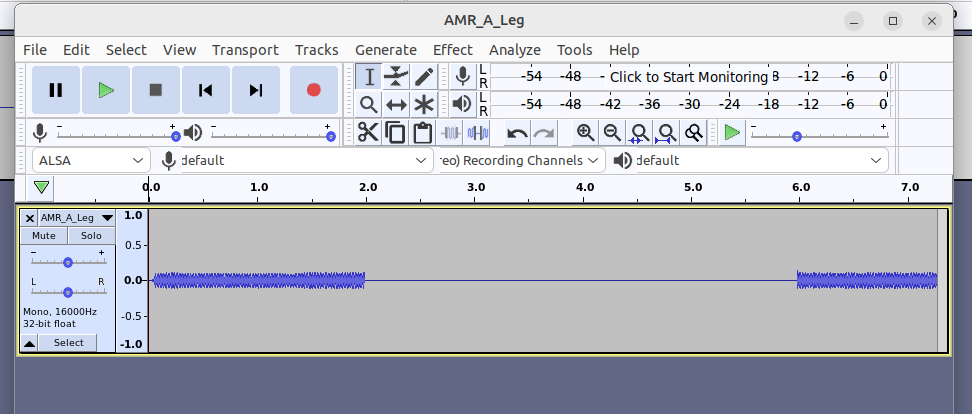
I was able to play the file with VLC, and load it into Audacity to easily see that yes, the Ringback Tone was present in the AMR stream!

A look at Advanced Mobile Location SMS for Emergency Calls

Advanced Mobile Location (AML) is being rolled out by a large number of mobile network operators to provide accurate caller location to emergency services, so how does it work, what’s going on and what do you need to know?

Recently we’ve been doing a lot of work on emergency calling in IMS, and meeting requirements for NG-112 / e911, etc.

This led me to seeing my first Advanced Mobile Location (AML) SMS in the wild.

For those unfamiliar, AML is a fancy text message that contains the callers location, accuracy, etc, that is passed to emergency services when you make a call to emergency services in some countries.

It’s sent automatically by your handset (if enabled) when making a call to an emergency number, and it provides the dispatch operator with your location information, including extra metadata like the accuracy of the location information, height / floor if known, and level of confidence.

The standard is primarily driven by EENA, and, being backed by the European Union, it’s got almost universal handset support.

Google has their own version of AML called ELS, which they claim is supported on more than 99% of Android phones (I’m unclear on what this means for Harmony OS or other non-Google backed forks of Android), and Apple support for AML starts from iOS 11 onwards, meaning it’s supported on iPhones from the iPhone 5S onards,.

Call Flow

When a call is made to the PSAP based on the Emergency Calling Codes set on the SIM card or set in the OS, the handset starts collecting location information. The phone can pull this from a variety of sources, such as WiFi SSIDs visible, but the best is going to be GPS or one of it’s siblings (GLONASS / Galileo).

Once the handset has a good “lock” of a location (or if 20 seconds has passed since the call started) it bundles up all of this information the phone has, into an SMS and sends it to the PSAP as a regular old SMS.

The routing from the operator’s SMSc to the PSAP, and the routing from the PSAP to the dispatcher screen of the operator taking the call, is all up to implementation. For the most part the SMS destination is the emergency number (911 / 112) but again, this is dependent on the country.

Inside the SMS

To the user, the AML SMS is not seen, in fact, it’s actually forbidden by the standard to show in the “sent” items list in the SMS client.

On the wire, the SMS looks like any regular SMS, it can use GSM7 bit encoding as it doesn’t require any special characters.

Each attribute is a key / value pair, with semicolons (;) delineating the individual attributes, and = separating the key and the value.

Below is an example of an AML SMS body:

A"ML=1;lt=+54.76397;lg=-
0.18305;rd=50;top=20130717141935;lc=90;pm=W;si=123456789012345;ei=1234567890123456;mcc=234;mnc=30; ml=128

If you’ve got a few years of staring at Wireshark traces in Hex under your belt, then this will probably be pretty easy to get the gist of what’s going on, we’ve got the header (A”ML=1″) which denotes this is AML and the version is 1.

After that we have the latitude (lt=), longitude (lg=), radius (rd=), time of positioning (top=), level of confidence (lc=), positioning method (pm=) with G for GNSS, W for Wifi signal, C for Cell
or N for a position was not available, and so on.

AML outside the ordinary

Roaming Scenarios

If an emergency occurs inside my house, there’s a good chance I know the address, and even if I don’t know my own address, it’s probably linked to the account holder information from my telco anyway.

AML and location reporting for emergency calls is primarily relied upon in scenarios where the caller doesn’t know where they’re calling from, and a good example of this would be a call made while roaming.

If I were in a different country, there’s a much higher likelihood that I wouldn’t know my exact address, however AML does not currently work across borders.

The standard suggests disabling SMS when roaming, which is not that surprising considering the current state of SMS transport.

Without a SIM?

Without a SIM in the phone, calls can still be made to emergency services, however SMS cannot be sent.

That’s because the emergency calling standards for unauthenticated emergency calls, only cater for

This is a limitation however this could be addressed by 3GPP in future releases if there is sufficient need.

HTTPS Delivery

The standard was revised to allow HTTPS as the delivery method for AML, for example, the below POST contains the same data encoded for use in a HTTP transaction:

v=3&device_number=%2B447477593102&location_latitude=55.85732&location_longitude=-
4.26325&location_time=1476189444435&location_accuracy=10.4&location_source=GPS&location_certainty=83
&location_altitude=0.0&location_floor=5&device_model=ABC+ABC+Detente+530&device_imei=354773072099116
&device_imsi=234159176307582&device_os=AOS&cell_carrier=&cell_home_mcc=234&cell_home_mnc=15&cell_net
work_mcc=234&cell_network_mnc=15&cell_id=0213454321 

Implementation of this approach is however more complex, and leads to little benefit.

The operator must zero-rate the DNS, to allow the FQDN for this to be resolved (it resolves to a different domain in each country), and allow traffic to this endpoint even if the customer has data disabled (see what happens when your handset has PS Data Off ), or has run out of data.

Due to the EU’s stance on Net Neutrality, “Zero Rating” is a controversial topic that means most operators have limited implementation of this, so most fall back to SMS.

Other methods for sharing location of emergency calls?

In some upcoming posts we’ll look at the GMLC used for E911 Phase 2, and how the network can request the location from the handset.

Further Reading

https://eena.org/knowledge-hub/documents/aml-specifications-requirements/

VoLTE / IMS – Analysis Challenge

It’s challenge time, this time we’re going to be looking at an IMS PCAP, and answering some questions to test your IMS analysis chops!

Here’s the packet capture:

Easy Questions

  • What QCI value is used for the IMS bearer?
  • What is the registration expiry?
  • What is the E-UTRAN Cell ID the Subscriber is served by?
  • What is the AMBR of the IMS APN?

Intermediate Questions

  • Is this the first or subsequent registration?
  • What is the Integrity-Key for the registration?
  • What is the FQDN of the S-CSCF?
  • What Nonce value is used and what does it do?
  • What P-CSCF Addresses are returned?
  • What time would the UE need to re-register by in order to stay active?
  • What is the AA-Request in #476 doing?
  • Who is the(opens in a new tab)(opens in a new tab)(opens in a new tab) OEM of the handset?
  • What is the MSISDN associated with this user?

Hard Questions

  • What port is used for the ESP data?
  • Which encryption algorithm and algorithm is used?
  • How many packets are sent over the ESP tunnel to the UE?
  • Where should SIP SUBSCRIBE requests get routed?
  • What’s the model of phone?

The answers for each question are on the next page, let me know in the comments how you went, and if there’s any tricky ones!

Improving WiFi Calling quality for WiFi Operators

I had a question recently on LinkedIn regarding how to preference Voice over WiFi traffic so that a network engineer operating the WiFi network can ensure the best quality of experience for Voice over WiFi.

Voice over WiFi is underpinned by the ePDG – Evolved Packet Data Gateway (this is a fancy IPsec tunnel we authenticate to using the SIM to drop our traffic into the P-CSCF over an unsecured connection). To someone operating a WiFi network, the question is how do we prioritise the traffic to the ePDGs and profile it?

ePDGs can be easily discovered through a simple DNS lookup, once you know the Mobile Network Code and Mobile Country code of the operators you want to prioritise, you can find the IPs really easily.

ePDG addresses take the form epdg.epc.mncXXX.mccYYY.pub.3gppnetwork.org so let’s look at finding the IPs for each of these for the operators in a country:

The first step is nailing down the mobile network code and mobile country codes of the operators you want to target, Wikipedia is a great source for this information.
Here in Australia we have the Mobile Country Code 505 and the big 3 operators all support Voice over WiFi, so let’s look at how we’d find the IPs for each.
Telstra has mobile network code (MNC) 01, in 3GPP DNS we always pad network codes to 3 digits, so that’ll be 001, and the mobile country code (MCC) for Australia is 505.
So to find the IPs for Telstra we’d run an nslookup for epdg.epc.mnc001.mcc505.pub.3gppnetwork.org – The list of IPs that are returned, are the IPs you’ll see Voice over WiFi traffic going to, and the IPs you should provide higher priority to:

For the other big operators in Australia epdg.epc.mnc002.mcc505.pub.3gppnetwork.org will get you Optus and epdg.epc.mnc003.mcc505.pub.3gppnetwork.org will get you VHA.

The same rules apply in other countries, you’d just need to update the MNC/MCC to match the operators in your country, do an nslookup and prioritise those IPs.

Generally these IPs are pretty static, but there will need to be a certain level of maintenance required to keep this list up to date by rechecking.

Happy WiFi Calling!

SMS Transport Wars?

There’s old joke about standards that the great thing about standards there’s so many to choose from.

SMS wasn’t there from the start of GSM, but within a year of the inception of 2G we had SMS, and we’ve had SMS, almost totally unchanged, ever since.

In a recent Twitter exchange, I was asked, what’s the best way to transport SMS?
As always the answer is “it depends” so let’s take a look together at where we’ve come from, where we are now, and how we should move forward.

How we got Here

Between 2G and 3G SMS didn’t change at all, but the introduction of 4G (LTE) caused a bit of a rethink regarding SMS transport.

Early builders of LTE (4G) networks launched their 4G offerings without 4G Voice support (VoLTE), with the idea that networks would “fall back” to using 2G/3G for voice calls.

This meant users got fast data, but to make or receive a call they relied on falling back to the circuit switched (2G/3G) network – Hence the name Circuit Switched Fallback.

Falling back to the 2G/3G network for a call was one thing, but some smart minds realised that if a phone had to fall back to a 2G/3G network every time a subscriber sent a text (not just calls) – And keep in mind this was ~2010 when SMS traffic was crazy high; then that would put a huge amount of strain on the 2G/3G layers as subs constantly flip-flopped between them.

To address this the SGs-AP interface was introduced, linking the 4G core (MME) with the 2G/3G core (MSC) to support this stage where you had 4G/LTE but only for data, SMS and calls still relied on the 2G/3G core (MSC).

The SGs-AP interface has two purposes;
One, It can tell a phone on 4G to fallback to 2G/3G when it’s got an incoming call, and two; it can send and receive SMS.

SMS traffic over this interface is sometimes described as SMS-over-NAS, as it’s transported over a signaling channel to the UE.

This also worked when roaming, as the MSC from the 2G/3G network was still used, so SMS delivery worked the same when roaming as if you were in the home 2G/3G network.

Enter VoLTE & IMS

Of course when VoLTE entered the scene, it also came with it’s own option for delivering SMS to users, using IP, rather than the NAS signaling. This removed the reliance on a link to a 2G/3G core (MSC) to make calls and send texts.

This was great because it allowed operators to build networks without any 2G/3G network elements and build a fully standalone LTE only network, like Jio, Rakuten, etc.

VoLTE didn’t change anything about the GSM 2G/3G SMS PDU, it just bundled it up in an SIP message body, this is often referred to as SMS-over-IP.

SMS-over-IP doesn’t address any of the limitations from 2G/3G, including limiting multipart messages to send payloads above 160 characters, and carries all the same limitations in order to be backward compatible, but it is over IP, and it doesn’t need 2G or 3G.

In roaming scenarios, S8 Home Routing for VoLTE enabled SMS to be handled when roaming the same way as voice calls, which made SMS roaming a doddle.

4G SMS: SMS over IP vs SMS over NAS

So if you’re operating a 4G network, should you deliver your SMS traffic using SMS-over-IP or SMS-over-NAS?

Generally, if you’ve been evolving your network over the years, you’ve got an MSC and a 2G/3G network, you still may do CSFB so you’ve probably ended up using SMS over NAS using the SGs-AP interface.
This method still relies on “the old ways” to work, which is fine until a discussion starts around sunsetting the 2G/3G networks, when you’d need to move calling to VoLTE, and SMS over NAS is a bit of a mess when it comes to roaming.

Greenfield operators generally opt for SMS over IP from the start, but this has its own limitations; SMS over IP is has awful efficiency which makes it unsuitable for use with NB-IoT applications which are bandwidth constrained, support for SMS over IP is generally limited to more expensive chipsets, so the bargain basement chips used for IoT often don’t support SMS over IP either, and integration of VoLTE comes with its own set of challenges regarding VoLTE enablement.

5G enters the scene (Nsmsf_SMService)

5G rolled onto the scene with the opportunity to remove the SMS over NAS option, and rely purely on SMS over IP (IMS); forcing the industry to standardise on an option alas this did not happen.

Instead 5GC introduces another delivery mechanism for SMS, just for 5GC without VoNR, the SMSf which can still send messages over the 5G NAS messaging.

This added another option for SMS delivery dependent on the access network used, and the Nsmsf_SMService interface does not support roaming.

Of course if you are using Voice over NR (VoNR) then like VoLTE, SMS is carried in a SIP message to the IMS, so this negates the need for the Nsmsf_SMService.

2G/3G Shutdown – Diameter to replace SGs-AP (SGd)

With the 2G/3G shutdown in the US operators who had up until this point been relying on SMS-over-NAS using the SGs-AP interface back to their MSCs were forced to make a decision on how to route SMS traffic, after the MSCs were shut down.

This landed with SMS-over-Diameter, where the 4G core (MME) communicates over Diameter with the SMSc.

The advantage of this approach is the Diameter protocol stack is the backbone of 4G roaming, and it’s not a stretch to get existing Diameter Routing Agents to start flicking SMS over Diameter messages between operators.

This has adoption by all the US operators, but we’re not seeing it so widely deployed in the rest of the world.

State of Play

OptionConditionsNotes
MAP2G/3G OnlyRelies on SS7 signaling and is very old
Supports roaming
SGs-AP (SMS-over-NAS)4G only relies on 2G/3GNeeds an MSC to be present in the network (generally because you have a 2G/3G network and have not deployed VoLTE)
Supports limited roaming
SMS over IP (IMS)4G / 5GNot supported on 2G/3G networks
Relies on a IMS enabled handset and network
Supports roaming in all S8 Home Routed scenarios
Device support limited, especially for IoT devices
Diameter SGd4G only / 5G NSAOnly works on 4G or 5G NSA
Better device support than 4G/5G
Supports roaming in some scenarios
Nsmsf_SMService5G standalone onlyOnly works on 5GC
Doesn’t support roaming
The convoluted world of SMS delivery options

A Way Forward:

While the SMS payload hasn’t changed in the past 31 years, how it is transported has opened up a lot of potential options for operators to use, with no clear winner, while SMS revenues and traffic volumes have continued to fall.

For better or worse, the industry needs to accept that SMS over NAS is an option to use when there is no IMS, and that in order to decommission 2G/3G networks, IMS needs to be embraced, and so SMS over IP (IMS) supported in all future networks, seems like the simple logical answer to move forward.

And with that clear path forward, we add in another wildcard…

Direct to device Satellite messes everything up…

Remember way back in this post when I said SMS over IP using IMS is a really really inefficient way of getting data? Well that hasn’t been a problem as we progressed up the generations of cellular tech as with each “G” we had more and more bandwidth than the last.

To throw a spanner in the works, let’s introduce NB-IoT and Non-Terrestrial Networks which rely on Non-IP-Data-Delivery.

These offer the ability to cover the globe with a low bandwidth / high latency service, that would ensure a subscriber is always just a message away, we’re seeing real world examples of these networks getting deployed for messaging applications already.

But, when you’ve only got a finite resource of bandwidth, and massive latencies to contend with, the all-IP architecture of IMS (VoLTE / VoNR) and it’s woeful inefficiency starts to really sting.

Of course there are potential workarounds here, Robust Header Correction (ROHC) can shrink this down, but it’s still going to rely on the 3 way handshake of TCP, TCP keepalive timers and IMS registrations, which in turn can starve the radio resources of the satellite link.

For NTN (Satelite) networks the case is being heavily made to rely on Non-IP-Data-Delivery, so the logical answer for these applications is to move the traffic back to SMS over NAS.

End Note

Even with SMS over 30 years old, we can still expect it to be a part of networks for years to come, even as WhatsApp / iMessage, etc, offer enhanced services. As to how it’s transported and the myriad of options here, I’m expecting that we’ll keep seeing a multi-transport mix long into the future.

For simple, cut-and-dried 4G/5G only network, IMS and SMS over IP makes the most sense, but for anything outside of that, you’ve got a toolbox of options for use to make a solution that best meets your needs.

BSF Addresses

The Binding Support Function is used in 4G and 5G networks to allow applications to authenticate against the network, it’s what we use to authenticate for XCAP and for an Entitlement Server.

Rather irritatingly, there are two BSF addresses in use:

If the ISIM is used for bootstrapping the FQDN to use is:

bsf.ims.mncXXX.mccYYY.pub.3gppnetwork.org

But if the USIM is used for bootstrapping the FQDN is

bsf.mncXXX.mccYYY.pub.3gppnetwork.org

You can override this by setting the 6FDA EF_GBANL (GBA NAF List) on the USIM or equivalent on the ISIM, however not all devices honour this from my testing.

Authenticating Fixed Line Subscribers into IMS

We recently added support in PyHSS for fixed line SIP subscribers to attach to the IMS.

Traditional telecom operators are finding their fixed line network to be a bit of a money pit, something they’re required to keep operating to meet regulatory obligations, but the switches are sitting idle 99% of the time. As such we’re seeing more and more operators move fixed line subs onto their IMS.

This new feature means we can use PyHSS to serve as the brains for a fixed network, as well as for mobile, but there’s one catch – How we authenticate subscribers changes.

Most banks of line cards in a legacy telecom switches, or IP Phones, don’t have SIM slots to allow us to authenticate, so instead we’re forced to fallback to what they do support.

Unfortunately for the most part, what is supported by these IP phones or telecom switches is SIP MD5 Digest Authentication.

The Nonce is generated by the HSS and put into the Multimedia-Authentication-Answer, along with the subscriber’s password and sent in the clear to the S-CSCF.

Subscriber with Password made up of all 1's MAA response from HSS for Digest-MD5 Auth

The HSS then generates the the Multimedia-Auth Answer, it generates a nonce (in the 3GPP-SIP-Authenticate / 609 AVP) and sends the Subscriber’s password in the 3GPP-SIP-Authorization (610) AVP in response back to the S-CSCF.

I would have thought a better option would be for the HSS to generate the Nonce and Digest, and then the S-CSCF to just send the Nonce to the Sub and compare the returned Digest from the Sub against the expected Digest from the HSS, but it would limit flexibility (realm adaptation, etc) I guess.

The UE/UA (I guess it’s a UA in this context as it’s not a mobile) then generates its own Digest from the Nonce and sends it back to the S-CSCF via the P-CSCF.

The S-CSCF compares the received Digest response against the one it generated, and if the two match, the sub is authenticated and allowed to attach onto the network.

IMS iFC – SPT Session Cases

Mostly just reference material for me:

Possible values:

  • 0 (ORIGINATING_SESSION)
  • 1 TERMINATING_REGISTERED
  • 2 (TERMINATING_UNREGISTERED)
  • 3 (ORIGINATING_UNREGISTERED

In the past I had my iFCs setup to look for the P-Access-Network-Info header to know if the call was coming from the IMS, but it wasn’t foolproof – Fixed line IMS subs didn’t have this header.

            <TriggerPoint>
                <ConditionTypeCNF>1</ConditionTypeCNF>
                <SPT>
                    <ConditionNegated>0</ConditionNegated>
                    <Group>0</Group>
                    <Method>INVITE</Method>
                    <Extension></Extension>
                </SPT>
                <SPT>
                    <ConditionNegated>0</ConditionNegated>
                    <Group>1</Group>
                    <SIPHeader>
                      <Header>P-Access-Network-Info</Header>
                    </SIPHeader>
                </SPT>                
            </TriggerPoint>

But now I’m using the Session Cases to know if the call is coming from a registered IMS user:

        <!-- SIP INVITE Traffic from Registered Sub-->
        <InitialFilterCriteria>
            <Priority>30</Priority>
            <TriggerPoint>
                <ConditionTypeCNF>1</ConditionTypeCNF>
                <SPT>
                    <ConditionNegated>0</ConditionNegated>
                    <Group>0</Group>
                    <Method>INVITE</Method>
                    <Extension></Extension>
                </SPT>
                <SPT>
                    <Group>0</Group>
                    <SessionCase>0</SessionCase>
                </SPT>             
            </TriggerPoint>