We’ve got a web based front end in our CRM which triggers Ansible Playbooks for provisioning of customer services, this works really well, except I’d been facing a totally baffling issue of late.
Ansible Plays (Provisioning jobs) would have variables set that they inherited from other Ansible Plays, essentially if I set a variable in Play X and then ran Play Y, the variable would still be set.
I thought this was an issue with our database caching the play data showing the results from a previous play, that wasn’t the case.
Then I thought our API that triggers this might be passing extra variables in that it had cached, wasn’t the case.
In the end I ran the Ansible function call in it’s simplest possible form, with no API, no database, nothing but plain vanilla Ansible called from Python
    # Run the actual playbook
    r = ansible_runner.run(
        private_data_dir='/tmp/',
        playbook=playbook_path,
        extravars=extra_vars,
        inventory=inventory_path,
        event_handler=event_handler_obj.event_handler,
        quiet=False
    )
And I still I had the same issue of variables being inherited.
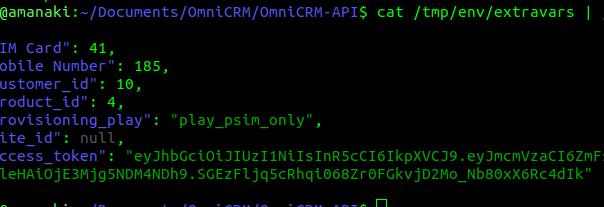
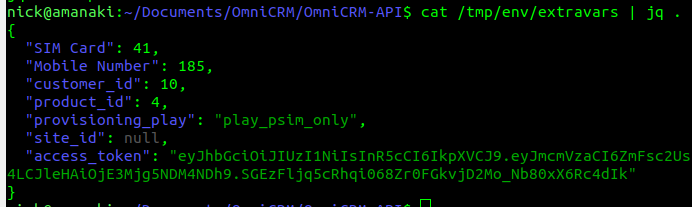
So what was the issue? Well the title gives it away, the private_data_dir parameter creates a folder in that directory, called env/extravars which a JSON file lives with all the vars from all the provisioning runs.
Removing the parameter from the Python function call resolved my issue, but did not give me back the half a day I spent debugging this…
I run Ubuntu on my desktop and I mess with Kamailio a lot.
Recently I was doing some work with KEMI using Python, but installing the latest versions of Kamailio from the Debian Repos for Kamailio wasn’t working.
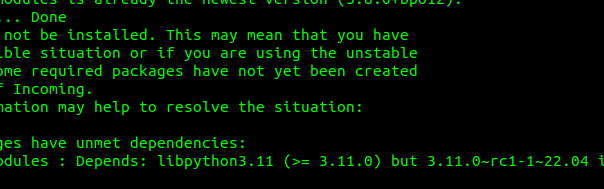
The following packages have unmet dependencies:
 kamailio-python3-modules : Depends: libpython3.11 (>= 3.11.0) but 3.11.0~rc1-1~22.04 is to be installed
Kamailio’s Python modules expect libpython3.11 or higher, but Ubuntu 22.04 repos only contain the release candidate – not the final version:
Next we’ll need to define our rt_pyform config, this is a super simple 3 line config file that specifies the path of what we’re doing:
DirectoryPath = "."        # Directory to search
ModuleName = "script"      # Name of python file. Note there is no .py extension
FunctionName = "transform" # Python function to call
The DirectoryPath directive specifies where we should search for the Python code, and ModuleName is the name of the Python script, lastly we have FunctionName which is the name of the Python function that does the rewriting.
Now let’s write our Python function for the transformation.
The Python function much have the correct number of parameters, must return a string, and must use the name specified in the config.
The following is an example of a function that prints out all the values it receives:
Note the order of the arguments and that return is of the same type as the AVP value (string).
We can expand upon this and add conditionals, let’s take a look at some more complex examples:
def transform(appId, flags, cmdCode, HBH_ID, E2E_ID, AVP_Code, vendorID, value):
    print('[PYTHON]')
    print(f'|-> appId: {appId}')
    print(f'|-> flags: {hex(flags)}')
    print(f'|-> cmdCode: {cmdCode}')
    print(f'|-> HBH_ID: {hex(HBH_ID)}')
    print(f'|-> E2E_ID: {hex(E2E_ID)}')
    print(f'|-> AVP_Code: {AVP_Code}')
    print(f'|-> vendorID: {vendorID}')
    print(f'|-> value: {value}')
    #IMSI Translation - if App ID = 16777251 and the AVP being evaluated is the Username
    if (int(appId) == 16777251) and int(AVP_Code) == 1:
        print("This is IMSI '" + str(value) + "' - Evaluating transformation")
        print("Original value: " + str(value))
        value = str(value[::-1]).zfill(15)
The above look at if the App ID is S6a, and the AVP being checked is AVP Code 1 (Username / IMSI ) and if so, reverses the username, so IMSI 1234567 becomes 7654321, the zfill is just to pad with leading 0s if required.
Now let’s do another one for a Realm Rewrite:
def transform(appId, flags, cmdCode, HBH_ID, E2E_ID, AVP_Code, vendorID, value):

    #Print Debug Info
    print('[PYTHON]')
    print(f'|-> appId: {appId}')
    print(f'|-> flags: {hex(flags)}')
    print(f'|-> cmdCode: {cmdCode}')
    print(f'|-> HBH_ID: {hex(HBH_ID)}')
    print(f'|-> E2E_ID: {hex(E2E_ID)}')
    print(f'|-> AVP_Code: {AVP_Code}')
    print(f'|-> vendorID: {vendorID}')
    print(f'|-> value: {value}')
    #Realm Translation
    if int(AVP_Code) == 283:
        print("This is Destination Realm '" + str(value) + "' - Evaluating transformation")
    if value == "epc.mnc001.mcc001.3gppnetwork.org":
        new_realm = "epc.mnc999.mcc999.3gppnetwork.org"
        print("translating from " + str(value) + " to " + str(new_realm))
        value = new_realm
    else:
        #If the Realm doesn't match the above conditions, then don't change anything
        print("No modification made to Realm as conditions not met")
    print("Updated Value: " + str(value))
In the above block if the Realm is set to epc.mnc001.mcc001.3gppnetwork.org it is rewritten to epc.mnc999.mcc999.3gppnetwork.org, hopefully you can get a handle on the sorts of transformations we can do with this – We can translate any string type AVPs, which allows for hostname, realm, IMSI, Sh-User-Data, Location-Info, etc, etc, to be rewritten.
Sometimes FreeSWITCH XML dialplan is a bit cumbersome to do more complex stuff, particularly to do with interacting with APIs, etc. But we have the option of using scripts written in Python3 to achieve our outcomes and pass variables to/from the dialplan and perform actions as if we were in the dialplan.
For starters we’ll need to install the module and enable it, here’s the StackOverflow thread that got me looking at it where I share the setup steps.
Here is a very simple example I’ve put together to show how we interact with Python3 in FreeSWITCH:
We’ll create a script in /usr/share/freeswitch/scripts/ and call it “CallerName.py”
from freeswitch import *
import sys
def handler(session,args):

    #Get Variables from FreeSWITCH
    user_name = str(session.getVariable("user_name"))
    session.execute("log", "Call from Username: " + str(user_name))

    #Check if Username is equal to Nick
    if user_name == "Nick":
        session.execute("log", "Username is Nick!")
        #Convert the Username to Uppercase
        session.execute("set", "user_name=" + str(user_name).upper())
        #And return to the dialplan
        return
    else:
        #If no matches then log the error
        session.execute("log", "CRIT Username is not Nick - Hanging up the call")
        #And reject the call
        session.execute("hangup", "CALL_REJECTED")
Once we’ve created and saved the file, we’ll need to ensure it is owned by and executable by service user:
After adding this to the dialplan, we’ll need to run a “reloadxml” to reload the dialplan, and now when these actions are hit, the Python script we created will be called, and if the user_name variable is set to “nick” it will be changed to “NICK”, and if it it isn’t, the call will be hung up with a “CALL_REJECTED” response.
Obviously this is a very basic scenario, but I’m using it for things like ACLs from an API, and dynamic call routing, using the familiar and easy to work with Python interpreter.
A lesson learned a long time ago in Net Eng, is that packet captures (seldom) lie, and the answers are almost always in the packets.
The issue is just getting those packets.
The Problem
But if you’re anything like me, you’re working on remote systems from your workstation, and trying to see what’s going on.
For me this goes like this:
SSH into machine in question
Start TCPdump
Hope that I have run it for long enough to capture the event of interest
Stop TCPdump
Change permissions on PCAP file created so I can copy it
SFTP into the machine in question
Transfer the PCAP to my local machine
View the PCAP in Wireshark
Discover I had not run the PCAP for long enough and repeat
Being a Mikrotik user I fell in love with the remote packet sniffer functionality built into them, where the switch/router will copy packets matching a filter and just stream them to the IP of my workstation.
If only there was something I could use to get this same functionality on remote machines – without named pipes, X11 forwarding or any of the other “hacky” solutions…
The Solution
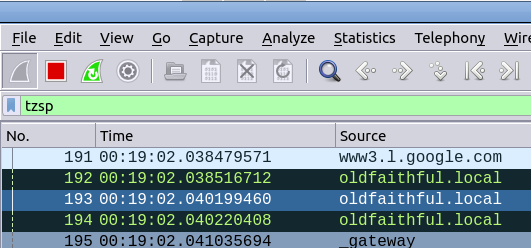
Introducing Scratch’n’Sniff, a simple tcpdump front end that encapsulates all the filtered traffic of interest in TZSP the same as Mikrotiks do, and stream it (in real time) to your local machine for real time viewing in Wireshark.
Using it is very simple:
Capture all traffic on port 5060 on interface enp0s25 and send it to 10.0.1.252 python3 scratchnsniff.py --dstip 10.0.1.252 --packetfilter 'port 5060' --interface enp0s25
Capture all sctp and icmp traffic on interface lo and send it to 10.98.1.2: python3 scratchnsniff.py --dstip 10.98.1.2 --packetfilter 'sctp or icmp' --interface lo
If you’re keen to try it out you can grab it from GitHub – Scratch’n’Sniff and start streaming packets remotely.
If you’re trying to wean yourself away from SQL for everything database related, NoSQL based options like CouchDB are fantastic, but require some rewiring of the brain.
Searching in these databases, without SQL, was a learning curve.
I’m interacting with CouchDB using Python, and while you can create views to help find data, sometimes I knew one of the keys in the document and the value, I wanted to find all documents matching that.
In SQL world I’d do a SELECT WHERE and find the data I wanted, but in CouchDB it’s a bit harder to find.
Using the db.find() function with the {selector} as an input you can filter for all records that have the key value pair you’re looking for.
for doc in db.find({'selector': {'keyyouwanttofind': 'valueofkeyyouwanttofind'}}):
     print(doc)
Through fs_cli you can orignate calls from FreeSWITCH.
At the CLI you can use the originate command to start a call, this can be used for everything from scheduled wake up calls, outbound call centers, to war dialing.
For example, what I’m using:
originate sofia/external/[email protected]:5061 61399999995 XML default
originate is the command on the FS_CLI
sofia/external/[email protected]:5061 is the call URL, with the application (I’m using mod_sofia, so sofia), the Sofia Profile (in my case external) and the SIP URI, or, if you have gateways configured, the to URI and the gateway to use.
6139999995 is the Application
XML is the Dialplan to reference
default is the Context to use
But running this on the CLI is only so useful, we can use an ESL socket to use software to connect to FreeSWITCH’s API (Through the same mechanism fs_cli uses) in order to programmatically start calls.
But to do that first we need to expose the ESL API for inbound connections (Clients connecting to FreeSWITCH’s ESL API, which is different to FreeSWITCH connecting to an external ESL Server where FreeSWITCH is the client).
We’ll need to edit the event_socket.conf.xml file to define how this can be accessed:
Obviously you’ll need to secure this appropriately, good long password, and tight ACLs.
You may notice after applying these changes in the config, you’re no longer able to run fs_cli and access FreeSWITCH, this is because FreeSWITCH’s fs_cli tool connects to FreeSWITCH over ESL, and we’ve just changed tha parameters. You should still be able to connect by specifying the IP Address, port and the secret password we set:
This also means we can run fs_cli from other hosts if permitted through the ACLs (kinda handy for managing larger clusters of FreeSWITCH instances).
But now we can also connect a remote ESL client to it to run commands like our Originate command to setup calls, I’m using GreenSwitch with ESL in Python:
import gevent
import greenswitch
import sys
#import Fonedex_TelephonyAPI
#sys.path.append('../WebUI/Flask/')
import uuid

import logging
logging.basicConfig(level=logging.DEBUG)


esl_server_host = "10.0.1.16"
logging.debug("Originating call to " + str(destination) + " from " + str(source))
logging.debug("Routing the call to " + str(dialplan_entry))
fs = greenswitch.InboundESL(host=str(esl_server_host), port=8021, password='yoursecretpassword')
  try:
      fs.connect()
      logging.debug("Connected to ESL server at " + str(esl_server_host))
  except:
      raise SystemError("Failed to connect to ESL Server at " + str(esl_server_host))

r = fs.send('bgapi originate {origination_caller_id_number=' + str(source) + '}sofia/external/' + str(destination) + '@10.0.1.252:5061 default XML')
I recently had a bunch of antennas profiles in .msi format, which is the Planet format for storing antenna radiation patterns, but I’m working in Forsk Atoll, so I needed to convert them,
To load these into Atoll, you need to create a .txt file with each of the MSI files in each of the directories, I could do this by hand, but instead I put together a simple Python script you point at the folder full of your MSI files, and it creates the index .txt file containing a list of files, with the directory name.txt, just replace path with the path to your folder full of MSI files,
#Atoll Index Generator
import os
path = "C:\Users\Nick\Desktop\Antennas\ODV-065R15E-G"
antenna_folder = path.split('\\')[-1]
f = open(path + '\\' + 'index_' + str(antenna_folder) + '.txt', 'w+')
files = os.listdir(path)
for individual_file in files:
    if individual_file[-4:] == ".msi":
        print(individual_file)
        f.write(individual_file + "\n")

f.close()
Chances are if you’re reading this, you’re trying to work out what Telephony Binary-Coded Decimal encoding is. I got you.
Again I found myself staring at encoding trying to guess how it worked, reading references that looped into other references, in this case I was encoding MSISDN AVPs in Diameter.
How to Encode a number using Telephony Binary-Coded Decimal encoding?
First, Group all the numbers into pairs, and reverse each pair.
So a phone number of 123456, becomes:
214365
Because 1 & 2 are swapped to become 21, 3 & 4 are swapped to become 34, 5 & 6 become 65, that’s how we get that result.
TBCD Encoding of numbers with an Odd Length?
If we’ve got an odd-number of digits, we add an F on the end and still flip the digits,
For example 789, we add the F to the end to pad it to an even length, and then flip each pair of digits, so it becomes:
87F9
That’s the abbreviated version of it. If you’re only encoding numbers that’s all you’ll need to know.
Detail Overload
Because the numbers 0-9 can be encoded using only 4 bits, the need for a whole 8 bit byte to store this information is considered excessive.
For example 1 represented as a binary 8-bit byte would be 00000001, while 9 would be 00001001, so even with our largest number, the first 4 bits would always going to be 0000 – we’d only use half the available space.
So TBCD encoding stores two numbers in each Byte (1 number in the first 4 bits, one number in the second 4 bits).
To go back to our previous example, 1 represented as a binary 4-bit word would be 0001, while 9 would be 1001. These are then swapped and concatenated, so the number 19 becomes 1001 0001 which is hex 0x91.
Let’s do another example, 82, so 8 represented as a 4-bit word is 1000 and 2 as a 4-bit word is 0010. We then swap the order and concatenate to get 00101000 which is hex 0x28 from our inputted 82.
Final example will be a 3 digit number, 123. As we saw earlier we’ll add an F to the end for padding, and then encode as we would any other number,
F is encoded as 1111.
1 becomes 0001, 2 becomes 0010, 3 becomes 0011 and F becomes 1111. Reverse each pair and concatenate 00100001 11110011 or hex 0x21 0xF3.
Special Symbols (#, * and friends)
Because TBCD Encoding was designed for use in Telephony networks, the # and * symbols are also present, as they are on a telephone keypad.
Astute readers may have noticed that so far we’ve covered 0-9 and F, which still doesn’t use all the available space in the 4 bit area.
The extended DTMF keys of A, B & C are also valid in TBCD (The D key was sacrificed to get the F in).
Symbol
4 Bit Word
*
1 0 1 0
#
1 0 1 1
a
1 1 0 0
b
1 1 0 1
c
1 1 1 0
So let’s run through some more examples,
*21 is an odd length, so we’ll slap an F on the end (*21F), and then encoded each pair of values into bytes, so * becomes 1010, 2 becomes 0010. Swap them and concatenate for our first byte of 00101010 (Hex 0x2A). F our second byte 1F, 1 becomes 0001 and F becomes 1111. Swap and concatenate to get 11110001 (Hex 0xF1). So *21 becomes 0x2A 0xF1.
And as promised, some Python code from PyHSS that does it for you:
    def TBCD_special_chars(self, input):
        if input == "*":
            return "1010"
        elif input == "#":
            return "1011"
        elif input == "a":
            return "1100"
        elif input == "b":
            return "1101"
        elif input == "c":
            return "1100"
        else:
            print("input " + str(input) + " is not a special char, converting to bin ")
            return ("{:04b}".format(int(input)))


    def TBCD_encode(self, input):
        print("TBCD_encode input value is " + str(input))
        offset = 0
        output = ''
        matches = ['*', '#', 'a', 'b', 'c']
        while offset < len(input):
            if len(input[offset:offset+2]) == 2:
                bit = input[offset:offset+2]    #Get two digits at a time
                bit = bit[::-1]                 #Reverse them
                #Check if *, #, a, b or c
                if any(x in bit for x in matches):
                    new_bit = ''
                    new_bit = new_bit + str(TBCD_special_chars(bit[0]))
                    new_bit = new_bit + str(TBCD_special_chars(bit[1]))
                    bit = str(int(new_bit, 2))
                output = output + bit
                offset = offset + 2
            else:
                bit = "f" + str(input[offset:offset+2])
                output = output + bit
                print("TBCD_encode output value is " + str(output))
                return output


    def TBCD_decode(self, input):
        print("TBCD_decode Input value is " + str(input))
        offset = 0
        output = ''
        while offset < len(input):
            if "f" not in input[offset:offset+2]:
                bit = input[offset:offset+2]    #Get two digits at a time
                bit = bit[::-1]                 #Reverse them
                output = output + bit
                offset = offset + 2
            else:   #If f in bit strip it
                bit = input[offset:offset+2]
                output = output + bit[1]
                print("TBCD_decode output value is " + str(output))
                return output
As Open5Gs has introduced network slicing, which led to a change in the database used,
Alas many users had subscribers provisioned in the old DB schema and no way to migrate the SDM data between the old and new schema,
If you’ve created subscribers on the old schema, and now after the updates your Subscriber Authentication is failing, check out this tool I put together, to migrate your data over.
One feature I’m pretty excited to share is the addition of a single config file for defining how PyHSS functions,
In the past you’d set variables in the code or comment out sections to change behaviour, which, let’s face it – isn’t great.
Instead the config.yaml file defines the PLMN, transport time (TCP or SCTP), the origin host and realm.
We can also set the logging parameters, SNMP info and the database backend to be used,
HSS Parameters
 hss:
   transport: "SCTP"
   #IP Addresses to bind on (List) - For TCP only the first IP is used, for SCTP all used for Transport (Multihomed).
   bind_ip: ["10.0.1.252"]
 #Port to listen on (Same for TCP & SCTP)
   bind_port: 3868
 #Value to populate as the OriginHost in Diameter responses
   OriginHost: "hss.localdomain"
 #Value to populate as the OriginRealm in Diameter responses
   OriginRealm: "localdomain"
 #Value to populate as the Product name in Diameter responses
   ProductName: "pyHSS"
 #Your Home Mobile Country Code (Used for PLMN calcluation)
   MCC: "999"
   #Your Home Mobile Network Code (Used for PLMN calcluation)
   MNC: "99"
 #Enable GMLC / SLh Interface
   SLh_enabled: True


 logging:
   level: DEBUG
   logfiles:
     hss_logging_file: log/hss.log
     diameter_logging_file: log/diameter.log
     database_logging_file: log/db.log
   log_to_terminal: true

 database:
   mongodb:
     mongodb_server: 127.0.0.1
     mongodb_username: root
     mongodb_password: password
     mongodb_port: 27017

 Stats Parameters
 redis:
   enabled: True
   clear_stats_on_boot: False
   host: localhost
   port: 6379
 snmp:
   port: 1161
   listen_address: 127.0.0.1
A seperate server (hss_sctp.py) is run to handle SCTP connections, and if you’re looking for Multihoming, we got you dawg – Just edit the config file and set the bind_ip list to include each of your IPs to multi home listen on.
This is part 3 of an n part tutorial series on working with SIM cards.
So in our last post we took a whirlwind tour of what an APDU does, is, and contains.
Interacting with a card involves sending the APDU data to the card as hex, which luckily isn’t as complicated as it seems.
While reading what the hex should look like on the screen is all well and good, actually interacting with cards is the name of the game, so that’s what we’ll be doing today, and we’ll start to abstract some of the complexity away.
Getting Started
To follow along you will need:
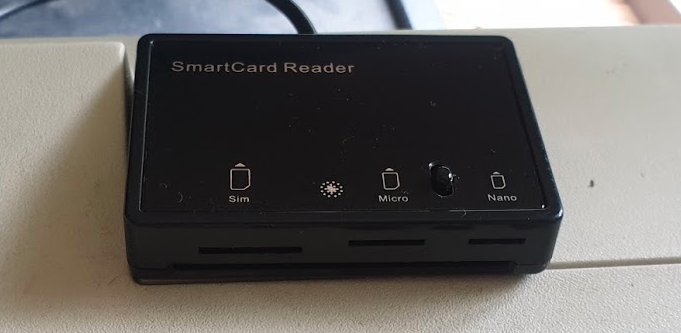
A Smart Card reader – SIM card / Smart Card readers are baked into some laptops, some of those multi-card readers that read flash/SD/CF cards, or if you don’t have either of these, they can be found online very cheaply ($2-3 USD).
A SIM card – No need to worry about ADM keys or anything fancy, one of those old SIM cards you kept in the draw because you didn’t know what to do with them is fine, or the SIM in our phone if you can find the pokey pin thing. We won’t go breaking anything, promise.
You may end up fiddling around with the plastic adapters to change the SIM form factor between regular smart card, SIM card (standard), micro and nano.
USB SIM / Smart Card reader supports all the standard form factors makes life a lot easier!
To keep it simple, we’re not going to concern ourselves too much with the physical layer side of things for interfacing with the card, so we’ll start with sending raw APDUs to the cards, and then we’ll use some handy libraries to make life easier.
PCSC Interface
To abstract away some complexity we’re going to use the industry-standard PCSC (PC – Smart Card) interface to communicate with our SIM card. Throughout this series we’ll be using a few Python libraries to interface with the Smart Cards, but under the hood all will be using PCSC to communicate.
pyscard
I’m going to use Python3 to interface with these cards, but keep in mind you can find similar smart card libraries in most common programming languages.
At this stage as we’re just interfacing with Smart Cards, our library won’t have anything SIM-specific (yet).
We’ll use pyscard to interface with the PCSC interface. pyscard supports Windows and Linux and you can install it using PIP with:
pip install pyscard
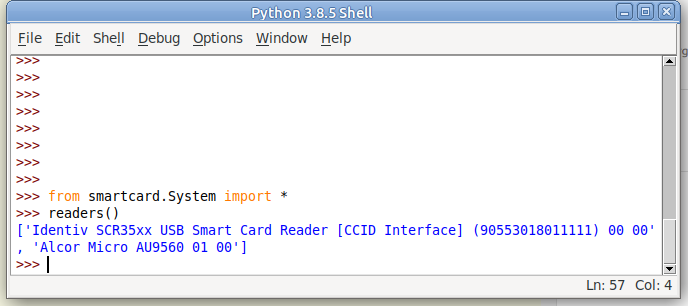
So let’s get started by getting pyscard to list the readers we have available on our system:
#!/usr/bin/env python3
from smartcard.System import *
print(readers())
Running this will output a list of the readers on the system:
Here we can see the two readers that are present on my system (To add some confusion I have two readers connected – One built in Smart Card reader and one USB SIM reader):
(If your device doesn’t show up in this list, double check it’s PCSC compatible, and you can see it in your OS.)
So we can see when we run readers() we’re returned a list of readers on the system.
I want to use my USB SIM reader (The one identified by Identiv SCR35xx USB Smart Card Reader CCID Interface 00 00), so the next step will be to start a connection with this reader, which is the first in the list.
So to make life a bit easier we’ll store the list of smart card readers and access the one we want from the list;
#!/usr/bin/env python3
from smartcard.System import *
r = readers()
connection = r[0].createConnection()
connection.connect()
So now we have an object for interfacing with our smart card reader, let’s try sending an APDU to it.
Actually Doing something Useful
Today we’ll select the EF that contains the ICCID of the card, and then we will read that file’s binary contents.
This means we’ll need to create two APDUs, one to SELECT the file, and the other to READ BINARY to get the file’s contents.
We’ll set the instruction byte to A4 to SELECT, and B0 to READ BINARY.
Table of Instruction bytes from TS 102 221
APDU to select EF ICCID
The APDU we’ll send will SELECT (using the INS byte value of A4 as per the above table) the file that contains the ICCID.
Each file on a smart card has been pre-created and in the case of SIM cards at least, is defined in a specification.
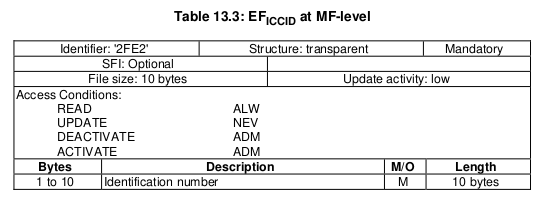
For this post we’ll be selecting the EF ICCID, which is defined in TS 102 221.
Information about EF-ICCID from TS 102 221
To select it we will need it’s identifier aka File ID (FID), for us the FID of the ICCID EF is 2FE2, so we’ll SELECT file 2FE2.
Parameter 1 – Selection Control (Limit search options)
00 (Select by File ID)
P2
Parameter 1 – More selection options
04 (No data returned)
Lc
Length of Data
02 (2 bytes of data to come)
Data
File ID of the file to Select
2FE2 (File ID of ICCID EF)
So that’s our APDU encoded, it’s final value will be A0 A4 00 04 02 2FE2
So let’s send that to the card, building on our code from before:
#!/usr/bin/env python3
from smartcard.System import *
from smartcard.util import *
r = readers()
connection = r[0].createConnection()
connection.connect()

print("Selecting ICCID File")
data, sw1, sw2 = connection.transmit(toBytes('00a40004022fe2'))
print("Returned data: " + str(data))
print("Returned Status Word 1: " + str(sw1))
print("Returned Status Word 2: " + str(sw2))
If we run this let’s have a look at the output we get,
We got back:
Selecting ICCID File
 Returned data: []
 Returned Status Word 1: 97
 Returned Status Word 2: 33
So what does this all mean?
Well for starters no data has been returned, and we’ve got two status words returned, with a value of 97 and 33.
We can lookup what these status words mean, but there’s a bit of a catch, the values we’re seeing are the integer format, and typically we work in Hex, so let’s change the code to render these values as Hex:
#!/usr/bin/env python3
from smartcard.System import *
from smartcard.util import *
r = readers()
connection = r[0].createConnection()
connection.connect()

print("Selecting ICCID File")
data, sw1, sw2 = connection.transmit(toBytes('00a40004022fe2'))
print("Returned data: " + str(data))
print("Returned Status Word 1: " + str(hex(sw1)))
print("Returned Status Word 2: " + str(hex(sw2)))
Now we’ll get this as the output:
Selecting ICCID File Returned data: [] Returned Status Word 1: 0x61 Returned Status Word 2: 0x1e
Status Word 2 contains a value of 1e which tells us that there are 30 bytes of extra data available with additional info about the file. (We’ll cover this in a later post).
So now we’ve successfully selected the ICCID file.
Keeping in mind with smart cards we have to select a file before we can read it, so now let’s read the binary contents of the file we selected;
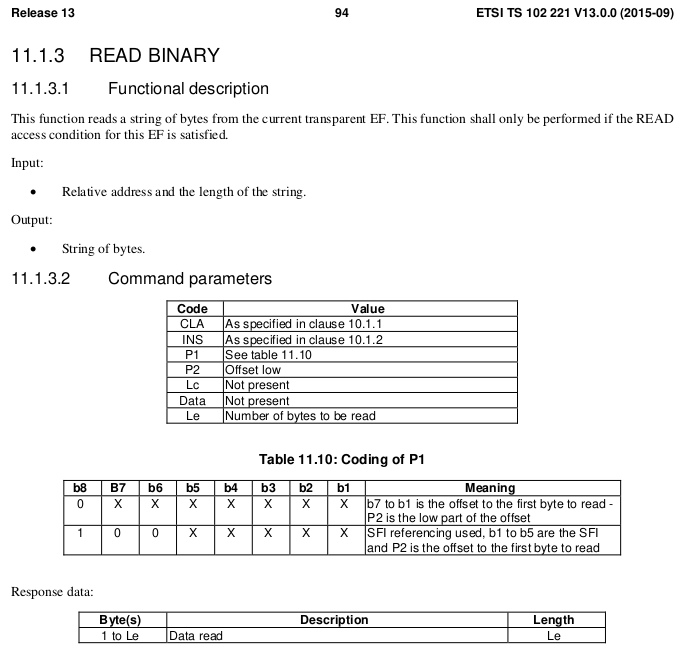
The READ BINARY command is used to read the binary contents of a selected file, and as we’ve already selected the file 2FE2 that contains our ICCID, if we run it, it should return our ICCID.
If we consult the table of values for the INS (Instruction) byte we can see that the READ BINARY instruction byte value is B0, and so let’s refer to the spec to find out how we should format a READ BINARY instruction:
Code
Meaning
Value
CLA
Class bytes – Coding options
A0 (ISO 7816-4 coding)
INS
Instruction (Command) to be called
B0 (READ BINARY)
P1
Parameter 1 – Coding / Offset
00 (No Offset)
P2
Parameter 2 – Offset Low
00
Le
How many bytes to read
0A (10 bytes of data to come)
We know the ICCID file is 10 bytes from the specification, so the length of the data to return will be 0A (10 bytes).
Let’s add this new APDU into our code and print the output:
#!/usr/bin/env python3
from smartcard.System import *
from smartcard.util import *
r = readers()
connection = r[0].createConnection()
connection.connect()

print("Selecting ICCID File")
data, sw1, sw2 = connection.transmit(toBytes('00a40000022fe2'))
print("Returned data: " + str(data))
print("Returned Status Word 1: " + str(hex(sw1)))
print("Returned Status Word 2: " + str(hex(sw2)))
And we have read the ICCID of the card.
Phew.
That’s the hardest thing we’ll need to do over.
From now on we’ll be building the concepts we covered here to build other APDUs to get our cards to do useful things. Now you’ve got the basics of how to structure an APDU down, the rest is just changing values here and there to get what you want.
In our next post we’ll read a few more files, write some files and delve a bit deeper into exactly what it is we are doing.
Australia is a strange country; As a kid I was scared of dogs, and in response, our family got a dog.
This year started off with adventures working with ASN.1 encoded data, and after a week of banging my head against the table, I was scared of ASN.1 encoding.
But now I love dogs, and slowly, I’m learning to embrace ASN.1 encoding.
What is ASN.1?
ASN.1 is an encoding scheme.
The best analogy I can give is to image a sheet of paper with a form on it, the form has fields for all the different bits of data it needs,
Each of the fields on the form has a data type, and the box is sized to restrict input, and some fields are mandatory.
Now imagine you take this form and cut a hole where each of the text boxes would be.
We’ve made a key that can be laid on top of a blank sheet of paper, then we can fill the details through the key onto the blank paper and reuse the key over and over again to fill the data out many times.
When we remove the key off the top of our paper, and what we have left on the paper below is the data from the form. Without the key on top this data doesn’t make much sense, but we can always add the key back and presto it’s back to making sense.
While this may seem kind of pointless let’s look at the advantages of this method;
The data is validated by the key – People can’t put a name wherever, and country code anywhere, it’s got to be structured as per our requirements. And if we tried to enter a birthday through the key form onto the paper below, we couldn’t.
The data is as small as can be – Without all the metadata on the key above, such as the name of the field, the paper below contains only the pertinent information, and if a field is left blank it doesn’t take up any space at all on the paper.
It’s these two things, rigidly defined data structures (no room for errors or misinterpretation) and the minimal size on the wire (saves bandwidth), that led to 3GPP selecting ASN.1 encoding for many of it’s protocols, such as S1, NAS, SBc, X2, etc.
It’s also these two things that make ASN.1 kind of a jerk; If the data structure you’re feeding into your ASN.1 compiler does not match it will flat-out refuse to compile, and there’s no way to make sense of the data in its raw form.
But working with a super simple ASN.1 definition you’ve created is one thing, using the 3GPP defined ASN.1 definitions is another,
With the aid of the fantastic PyCrate library, which is where the real magic happens, and this was the nut I cracked this week, compiling a 3GPP ASN.1 definition and communicating a standards-based protocol with it.
I’ve written a playbook that provisions some server infrastructure, however one of the steps is to change the hostname.
A common headache when changing the hostname on a Linux machine is that if the hostname you set for the machine, isn’t in the machine’s /etc/hosts file, then when you run sudo su or su, it takes a really long time before it shows you the prompt as the machine struggles to do a DNS lookup for it’s own hostname and fails,
This becomes an even bigger problem when you’re using Ansible to setup these machines, Ansible times out when changing the hostname;
Simple fix, edit the /etc/ansible/ansible.cfg file and include
In my last post I talked about using KEMI in Kamailio and how you can integrate in a different programming language to handle your SIP request handling in a language you already know – Like Python!
Before we get too excited there’s some boilerplate we’ve got to add to our Python script, we need to create a class called kamailio and populate the class by defining some functions, we’ll define an __init__ to handle loading of the class, define a child_init for handling child processes, define ksr_request_route to handle the initial requests. We’ll also need to define a mod_init – outside of the Kamailio class to initialize the class.
import sys
import Router.Logger as Logger
import KSR as KSR

import requests

# global function to instantiate a kamailio class object
# -- executed when kamailio app_python module is initialized
def mod_init():
    KSR.info("===== from Python mod init\n");
    return kamailio();


# -- {start defining kamailio class}
class kamailio:
    def __init__(self):
        KSR.info('===== kamailio.__init__\n');


    # executed when kamailio child processes are initialized
    def child_init(self, rank):
        KSR.info('===== kamailio.child_init(%d)\n' % rank);
        return 0;


    # SIP request routing
    # -- equivalent of request_route{}
    def ksr_request_route(self, msg):
        KSR.info("===== request - from kamailio python script\n");
        KSR.dbg("method " + KSR.pv.get("$rm") + " r-uri " + KSR.pv.get("$ru"))
Most of these should be pretty self explanatory for anyone who’s done a bit more in-depth Python programming, but it’s no big deal if you don’t understand all this, the only part you need to understand is the ksr_request_route function.
ksr_request_route: translates to our request_route{} in the Kamailio native scripting language, all requests that come in will start off in this part.
Python Kamailio Routing
So let’s start to build upon this, so we’ll blindly accept all SIP registrations;
Here you’ll see we’ve added an if statement, as if we were doing any other If statement in Python, in this case we’re asking if the KSR.is_method(“REGISTER”), and if it is, we’ll send back a 200 OK response.
Let’s pause and talk about KSR
All the Kamailio bits we’ll use in Python will have the KSR. prefix, so let’s take a quick break here to talk about KSR. The KSR. functions are the KEMI functions we’ve exposed to Python.
Without them, we’re just writing Python, and we’d have to do all the functions provided by Kamailio nativeley in Python, which would be crazy.
So we leverage the Kamailio modules you know and love from Python using Python’s logic / programming syntax, as well as opening up the ability to pull in other libraries from Python.
Let’s look at how we might send a stateless reply,
There’s a module function to send a stateless reply;
KSR.sl.send_reply(200, "OK")
The vast majority of functions are abstracted as module functions, like the example above, but not all of them.
So every function doesn’t need to be wrapped up as a module, there’s also a way to call any function that you’d call from the native scripting language, wrapped up, kind of like an Exec command:
KSR.x.modf("sl_send_reply", "200", "OK");
So thanks to this we can call any Kamailio function from Python, even if it’s not explicitly in the KEMI abstraction.
Python Kamailio Routing (Continued)
So earlier we managed REGISTER requests and sent back a 200 OK response.
What about forwarding a SIP Request to another proxy? Let’s follow on with an elif statement to test if the method is an INVITE and statelessly forward it.
elif KSR.is_method("INVITE"):
#Lookup our public IP address
try:
ip = requests.get('https://api.ipify.org').text
except:
ip = "Failed to resolve"
#Add that as a header
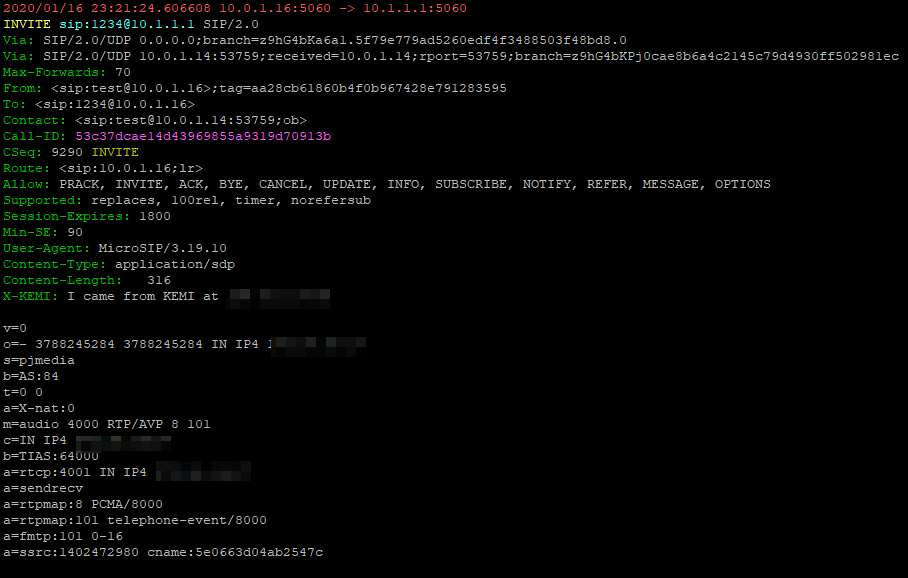
KSR.hdr.append("X-KEMI: I came from KEMI at " + str(ip) + "\r\n");
#Set host IP to 10.1.1.1
KSR.sethost("10.1.1.1");
#Forward the request on
KSR.forward()
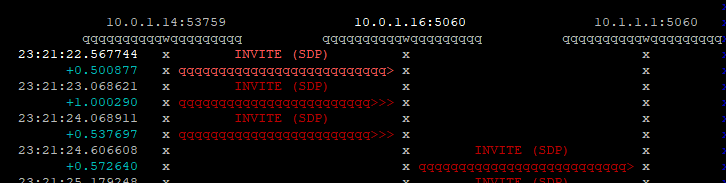
Now an incoming SIP invite will be proxied / forwarded to 10.1.1.1, all from Python.
But so far we’ve only done things in KEMI / Python that we could do in our native Kamailio scripting language, so let’s use some Python in our Python!
I utterly love the Python Requests library, so let’s use that to look up our public IP address and add it as a header to our forwarded SIP INVITE;
        elif KSR.is_method("INVITE"):
                #Lookup our public IP address
                try:
                    ip = requests.get('https://api.ipify.org').text
                except:
                    ip = "Failed to resolve"

                #Add that as a header
                KSR.hdr.append("X-KEMI: I came from KEMI at " + str(ip) + "\r\n");

                #Set host IP to 10.1.1.1
                KSR.sethost("10.1.1.1");

                #Forward the request on
                KSR.forward()
Bottom header is the X-KEMI custom header we included with our public IP
So let’s wrap this up a bit and handle any other request that’s not an INVITE or a REGISTER, with a 500 error code.
    # SIP request routing
    # -- equivalent of request_route{}
    def ksr_request_route(self, msg):

        KSR.dbg("method " + KSR.pv.get("$rm") + " r-uri " + KSR.pv.get("$ru"))


        if KSR.is_method("REGISTER"):
            KSR.sl.send_reply(200, "OK")

        elif KSR.is_method("INVITE"):
                #Lookup our public IP address
                try:
                    ip = requests.get('https://api.ipify.org').text
                except:
                    ip = "Failed to resolve"

                #Add that as a header
                KSR.hdr.append("X-KEMI: I came from KEMI at " + str(ip) + "\r\n");

                #Set host IP to 10.1.1.1
                KSR.sethost("10.1.1.1");

                #Forward the request on
                KSR.forward()
        else:
               KSR.sl.send_reply(500, "Got no idea...")