There’s a cool feature in PFCP that allows you to redirect traffic, which I’ve written about before.
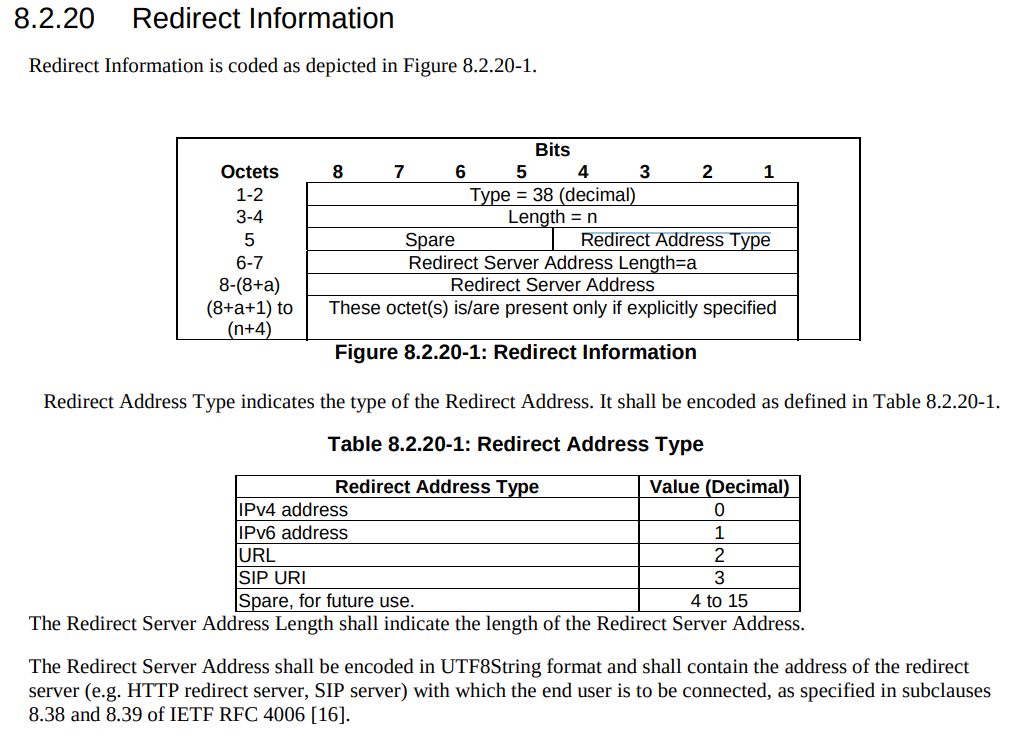
But there’s a funky thing that’s left me scratching my head, in the Redirect information IE, you can set a SIP URI.
Snippet from TS 3GPP TS 29.244
That’d be great and all, but PFCP is all about packets not about calls.
So what’s the deal?
Had I uncovered some Machiavellian plot to move channel-associated-signaling onto PFCP instead of TDM links as God intended?
Well, no…
The Redirect Information in PFCP comes from the Redirect Information in Diameter, that’s how your OCS can tell your SMF or your PGW-C (or your TAS) – hey this session is all out of usage, and should be redirected.
Of course, PFCP is just all about packets, but Diameter has a foot in both camps, Gy and Ro are both on Diameter.
CAMEL is primarily focused on charging for Voice & SMS services, as data generally uses Diameter, so it’s voice and SMS we’ll focus on.
CAMEL is spoken between the MSC (gsmSSF) and the OCS (gsmSCF).
Basic Call State Model
CAMEL is closely related to the Intelligent Network stuff on the 1980s, and steals a lot of it’s ideas from there, unfortunately if you’re to read the CAMEL standard it also implies you were involved in IN stuff and had been born at that point, alas I was neither.
So the key to understanding CAMEL is the Basic Call State Model (BCSM) which is a model of all the different states a call can be in, such as ringing, answered, abandoned, call failed, etc, etc.
Over CAMEL, our OCS can be told by the MSC when a certain event happens; the MSC can tell the OCS, that the call has changed state. For example a BCSM event might indicate the call has hung up, is ringing, cancelled, etc.
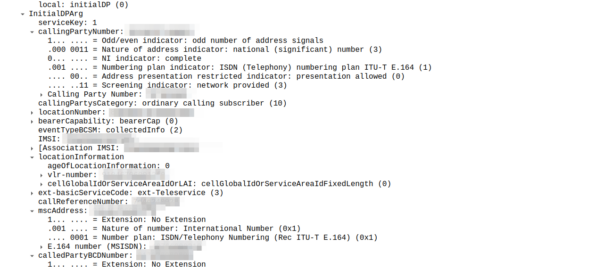
Below is the list of all the valid BCSM states:
List of BCSM states for events
Basic MO Call with CAMEL
Our subscriber makes an outbound call.
Based on the data the MSC has in it from the HLR, it knows that we should use CAMEL for this call, and it has the SCCP Address of the OCS (gsmSCF) it needs to send the CAMEL messages to.
So the MSC sends an InitialDP message to the OCS (via it’s Global Title Address) to Authorize the call that the user is trying to make.
This is like any other Authorization step for an OCS, which allows the OCS to authorize the call by checking the subscriber is valid, check if they’re allowed to call that destination and they’ve got the balance to do so, etc.
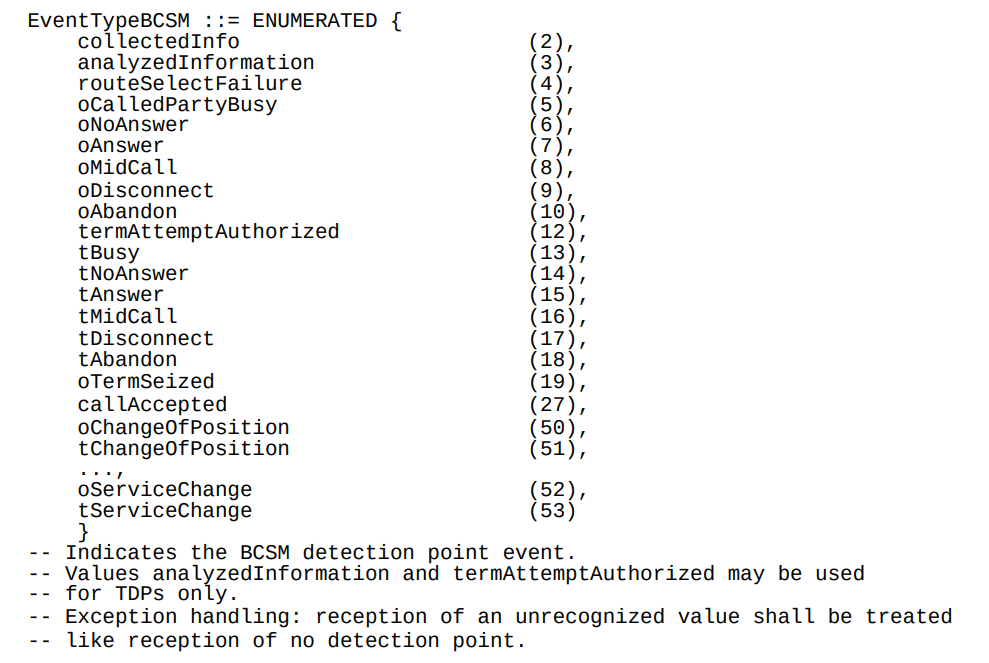
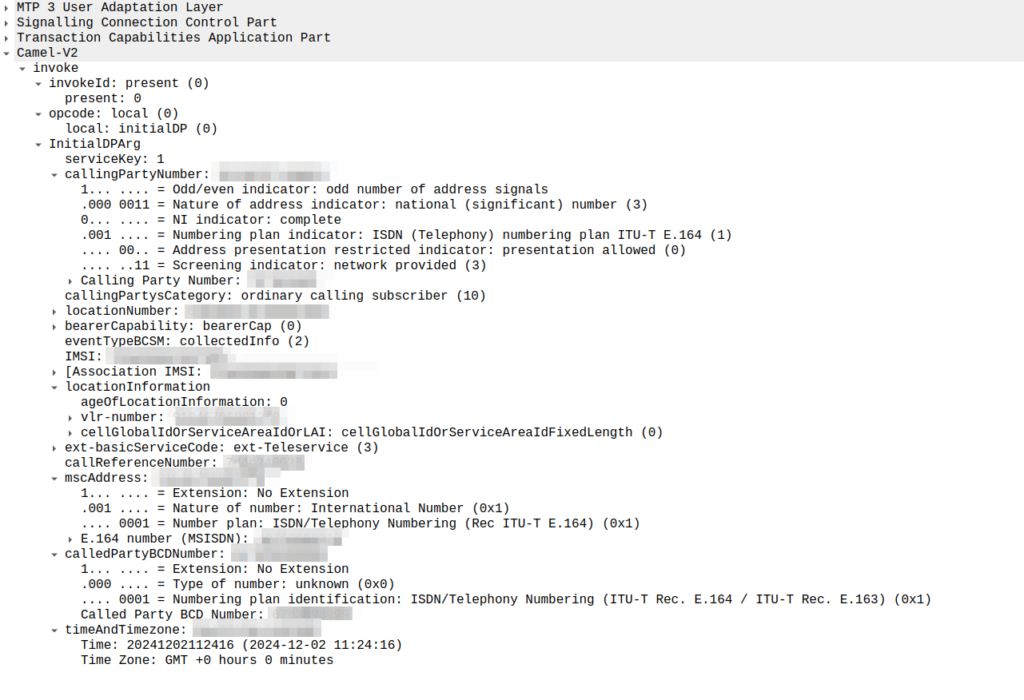
initialDP message from an MSC to an OCS
The initialDP (Initial Detection Point) is telling our OCS all about the call event that’s being requested, who’s calling, what number they’ve dialed, where they are in the network (of note especially if they’re roaming), etc, etc.
Generally the OCS also uses this message as a chance to subscribe to BCSM Events using RequestReportBCSMEventArg so the OCS will get notified by the MSC when the state of the call changes. This means the MSC will tell us when the state of the call changes; events like the call getting answered, disconnected, etc. This is critical so we know when the call gets answered and hung-up, so we can charge correctly.
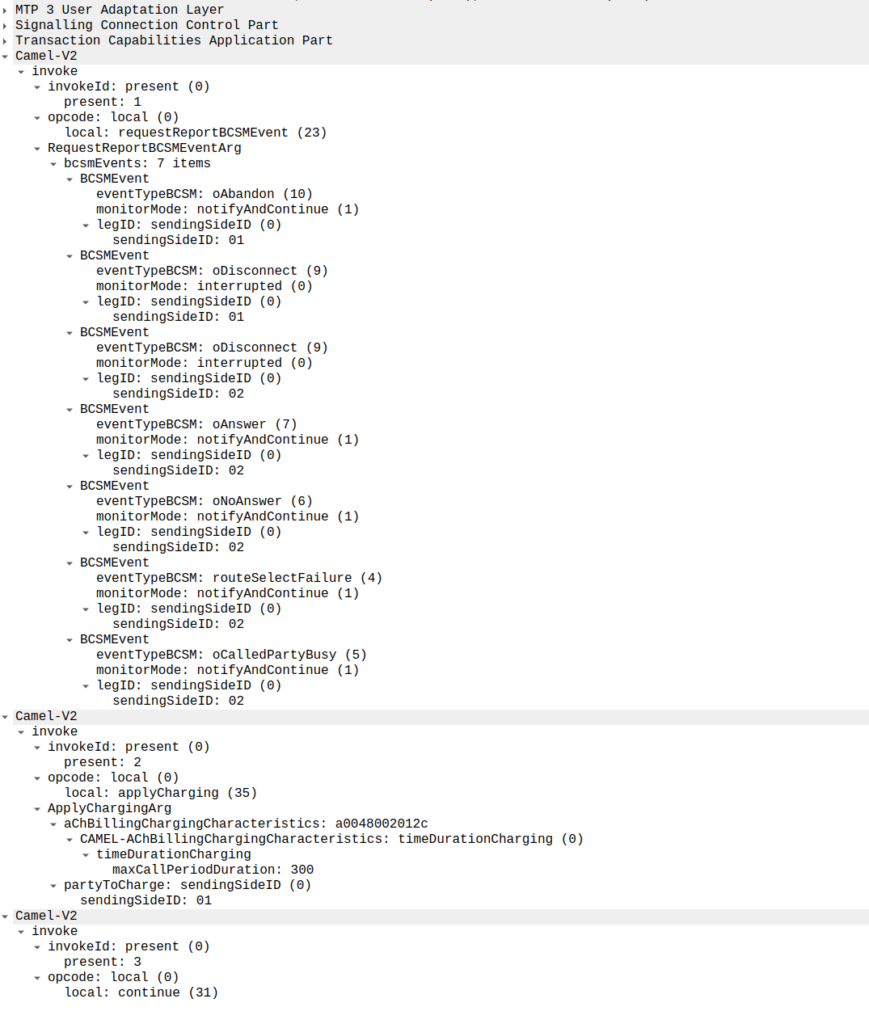
In the below example, as well as sending the Continue and RequestReportBCSMEventArg the OCS is also setting the ChargingArgs for this call, so the MSC knows who to charge (the caller) set via sendingSide and that the MSC must send an Apply Charging Report (ACR) messages every 300 units (1 unit = 100 ms, so a value of 300 = 300 x 100 milliseconds = 30 seconds) so the OCS keeps track of what’s going on.
continue sent by the OCS to the MSC, also including reportBCSMEvent and applyCharging messages
Or in a slightly less appropriate analogy but easier to understand for SIP folks, the InitialDP is sent for INVITE and the 180 RINGING is sent once the continue message is received.
Call is Answered
So at this stage our call can start to ring.
As we’ve subscribed to BCSM events in our last message, the MSC is going to tell us when the call gets answered or the call times out, is abandoned or the sun burns out.
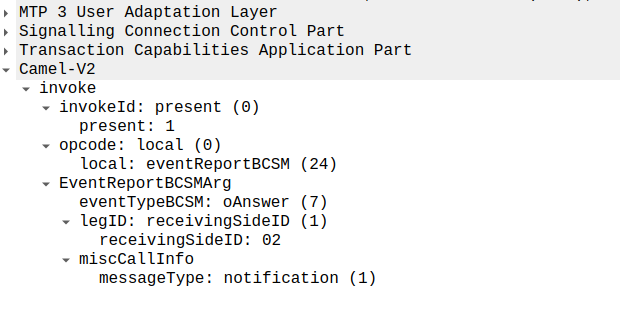
The MSC provides this info a eventReportBCSM, which is very simple and just tells us the event that’s been triggered, in the example below, the call was answered.
eventReportBCSM from MSC to OCS
These eventReportBCSM are informational from the MSC to the OCS, so the OCS doesn’t need to send anything back, but the OCS does need to mark the call as answered so it can start timing the call.
At this stage, the call is connected and our two parties are talking, but our MSC has been told it needs to send us applyChargingReports every 30 seconds (due to the value of 300 in maxCallPeriodDuration) after the call was connected, so the MSC sends the OCS it’s first applyChargingReport 30 seconds after the call was answered:
applyChargingReport sent by the MSC to the OCS every reporting period
We can calculate the duration of the call so far based on the time of the eventReportBCSM, then the OCS must make a decision of if it should allow the call to continue or not.
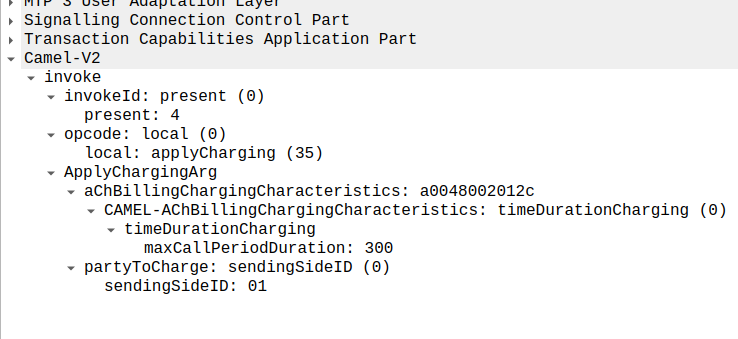
For simplicity’s sake, let’s imagine we’re still got a balance in the OCS and the OCS wants the call to continue, the OCS send back an applyCharging message to the MSC in response, and includes the current allowed maxCallPeriodDuration, keeping in mind the value is x100 and in nanoseconds (so this is 30 seconds).
applyCharging from the OCS back to the MSC
Perfect, our call is good to go for another 30 more seconds, son in 30 seconds we’ll get another ACR messages from MSC to the OCS to keep it abreast of what’s going on.
Now one of two things is going to happen, either subscriber is going to burn through all of their minutes, and get their call cutoff, or the call will end while they’ve still got balance, let’s look at both scenarios.
Normal Hangup Scenario
When the call ends, we get an applyChargingReport from the MSC to the OCS.
As we’ve subscribed to reportBCSMEvent we get both the applyChargingReport with legActive: False` so we know the call has hungup, and we’ve got an event report to tell us more about the event, in this case a hangup from the Originating Side.
reportBCSMEvent and applyChargingReport Sent by the MSC to the OCS to indicate the call has ended, note the legActive flag is now false
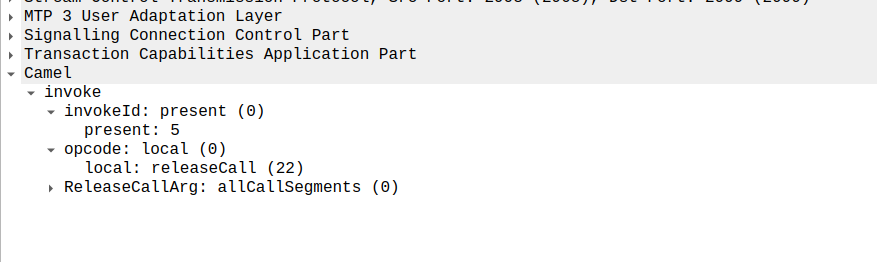
Lastly the OCS confirms by sending a releaseCall to the MSC, to indicate all legs should now terminate.
releaseCall Sent by OCS to MSC at the very end
So that’s it!
Obviously there are other flows, such as running out of balance mid-call, rejecting a call, SMS and PBX / VPN services that rely on CAMEL, but hopefully you now understand the basics of how CAMEL based charging looks and works.
If you’re looking for a CAMEL capable OCS or a CAMEL to Diameter or API gateway, get in touch!
After we setup CgrateS the next thing we’d generally want to do would be to rate some traffic.
Of course, that could be realtime traffic, from Diameter, Radius, Kamailio, FreeSWITCH, Asterisk or whatever your case may be, but it could just as easily be CSV files, records from a database or a text file.
We’re going to be rating CDRs from simple CSV files with the date of the event, calling party, called party, and talk time, but of course your CDR exports will have a different format, and that’s to be expected – we tailor the Event Reader Service to match the format of the files we need.
The Event Reader Service, like everything inside CgrateS, is modular. ERS is a module we load that parses files using the rules we define, and creates Events that CgrateS can process and charge for, based on the rules we define.
But before I can tell you that story, I have to tell you this story…
Nick’s imaginary CSV factory
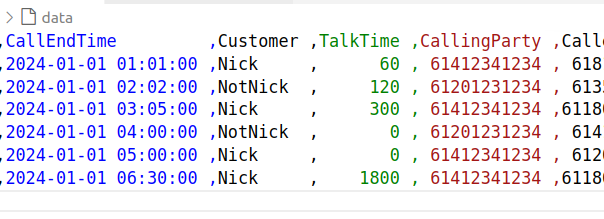
In the repo I’ve added a DummyCSV.csv, it’s (as you might have guessed) a CSV file.
This CSV file is like a million other CSV formats out there – We’ve got a CSV file with Start Time, End Time, Customer, Talk Time, Calling Party, Called Party, Animal (for reasons) and CallID to uniquely identify this CDR.
Protip: The Rainbow CSV VScode extension makes viewing/editing/querying CSV files in VScode much easier.
Call Start Time
Row 0
Call End Time
Row 1
Customer
Row 2
Talk Time
Row 3
Calling Party
Row 4
Called Party
Row 5
Animal
Row 6
CallID
Row 7
File Format
Next we need to feed this into CGrateS, and for that we’ll be using the Event Reporter Service.
JSON config files don’t make for riveting blog posts, but you’ve made it this far, so let’s power through.
ERS is setup in CGrateS’ JSON config file, where we’ll need to define one or more readers which are the the logic we define inside CGrateS to tell it what fields are what, where to find the files we need to import, and set all the parameters for the imports.
This means if we have a CSV file type we get from one of our suppliers with CDRs in it, we’d define a reader to parse that type of file. Likewise, if we’ve got a CSV of SMS traffic out of our SMSc, we’d need to define another reader to parse the CDRs in that format – Generally we’ll do a Reader for each file type we want to parse.
So let’s define a reader for this CSV spec we’ve just defined:
"ers": {
	"enabled": true,
	"readers": [
		{
			"id": "blog_example_csv_parser",
			"enabled": true,
			"run_delay":  "-1",
			"type": "*file_csv",
			"opts": {
				"csvFieldSeparator":",",
				"csvLazyQuotes": true,
				//csvLazyQuotes Counts the row length and if does not match this value declares an error
				//-1 means to look at the first row and use that as the row length
				"csvRowLength": -1
			},
			"source_path": "/var/spool/cgrates/blog_example_csv_parser/in",
			"processed_path": "/var/spool/cgrates/blog_example_csv_parser/out",
			"concurrent_requests": 1024,	//How many files to process at the same time
			"flags": [
				"*cdrs",
				"*log"
			],
			"tenant": "cgrates.org",
			"filters": [
				"*string:~*req.2:Nick", //Only process CDRs where Customer column == "Nick"
			],
			"fields":[]
}]}
This should hopefully be relatively simple (I’ve commented it as best I can).
The ID of the ERS object is just the name of this reader – you can name it anything you like, keeping in mind we can have multiple readers defined for different file formats we may want to read, and setting the ID just helps to differentiate them.
The run_delay of -1 means ERS will run as soon as a file is moved into the source_path directory, and the type is a CSV file – Note that’s moved not copied. We’ve got to move the file, not just copy it, as CGrateS waits for the inode notify.
In the opts section we set the specifics for the CSV we’re reading, field separator if how we’re separating the values in our CSV, and in our case, we’re using commas to delineate the fields, but if you were using a file using semicolons or another delineator, you’d adjust this.
Lastly we’ve got the paths, the source path is where we’ll need to move the files to get processed into, and the processed_path is where the processed files will end up.
For now I’ve set the flags to *log and *cdrs – By calling log we’ll make our lives a bit easier for debugging, and CDRs will send the event to the CDRs module to generate a rated CDR in CGrateS, which we could then use to bill a customer, a supplier, etc, and access via the API or exporting using Event Exporter Service.
Lastly under FilterS we’re able to define the filters that should define if we should process a row or not. You don’t know how much you need this feature until you need this feature. The filter rule I’ve included will only process lines where the Customer field in the CSV (row #2) is equal to “Nick”. You could use this to also filter only calls that have been answered, only calls to off-net, etc, etc – FilterS needs a blog post all on it’s own (and if you’re reading this in the future I may have already written one).
Alright, so far so good, we’ve just defined the metadata we need to do to read the file, but now how do we actually get down to parsing the lines in the file?
Well, that’s where the data in Fields: [] comes in.
If you’ve been following along the CgrateS in baby steps series, you’ll have rated a CDR using the API, that looked something like this:
ERS is going to use the same API to rate a CDR, calling more-or-less the same API, so we’re going to set the parameters that go into this from the CSV contents inside the fields:
			"fields":[

				//Type of Record (Voice)
				{"tag": "ToR", "path": "*cgreq.ToR", "type": "*constant", "value": "*voice"},

				//Category set to "call" to match RatingProfile_VoiceCalls from our RatingProfile
				{"tag": "Category", "path": "*cgreq.Category", "type": "*constant", "value": "call"},

				//RequestType is *rated as we won't be deducting from an account balance
				{"tag": "RequestType", "path": "*cgreq.RequestType", "type": "*constant", "value": "*rated"},

]
That’s the static values out of the way, next up we’ll define our values we pluck from the CSV. We can get the value of each row from “~*req.ColumnNumber” where ColumnNumber is the column number starting from 0.
				//Unique ID for this call - We get this from the CallID field in the CSV
				{"tag": "OriginID", "path": "*cgreq.OriginID", "type": "*variable","value":"~*req.7"},

				//Account is the Source of the call
				{"tag": "Account", "path": "*cgreq.Account", "type": "*variable", "value": "~*req.4"},

				//Destination is B Party Number - We use 'Called Party Number'
				{"tag": "Destination", "path": "*cgreq.Destination", "type": "*variable", "value": "~*req.5"},
				{"tag": "Subject", "path": "*cgreq.Subject", "type": "*variable", "value": "~*req.5"},

				//Call Setup Time (In this case, CGrateS can already process this as a datetime object)
				{"tag": "SetupTime", "path": "*cgreq.SetupTime", "type": "*variable", "value": "~*req.0"},

				//Usage in seconds - We use 'Call duration'
				{"tag": "Usage", "path": "*cgreq.Usage", "type": "*variable", "value": "~*req.3"},

				//We can include extra columns with extra data - Like this one:
				{"tag": "Animal", "path": "*cgreq.Animal", "type": "*variable", "value": "~*req.6"},
]
You’ll need to restart CGrateS after putting the config changes in, but your instance will probably fail to start as we’ll need to create the directories we specified CGrateS should monitor for incoming CSV files:
But before we can put this all into play, we’ll need to setup some rates. My previous posts have covered how to do this, so for that I’ve included a Python script to setup all the rates, which you can run once you’ve restarted CGrateS.
Alright, with that out of the way, we can test it out, move our Dummy.csv file to /var/spool/cgrates/blog_example_csv_parser/in and see what happens.
How does one encode / interpret the value of this AVP / IE was the question I set out to answer.
TS 29.274 says:
For the encoding of this information element see 3GPP TS 32.298
TS 32.298 says:
The functional requirements for the Charging Characteristics as well as the profile and behaviour bits are further defined in normative Annex A of TS 32.251
TS 32.251 Annex A says:
The Charging Characteristics parameter consists of a string of 16 bits designated as Behaviours (B), freely defined by Operators, as shown in TS 32.298 [51]. Each bit corresponds to a specific charging behaviour which is defined on a per operator basis, configured within the PCN and pointed when bit is set to “1” value.
After a few circular references I found this is imported from 32.298.
Finally we find some solid answers hidden away in TS 132 215, under the Charging Characteristics Profile index.
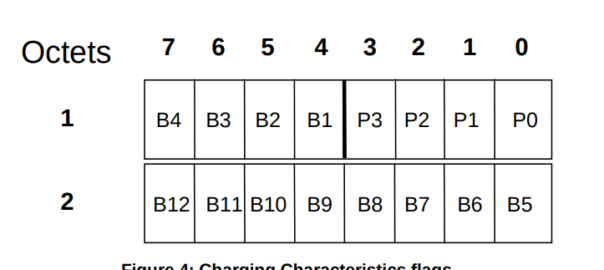
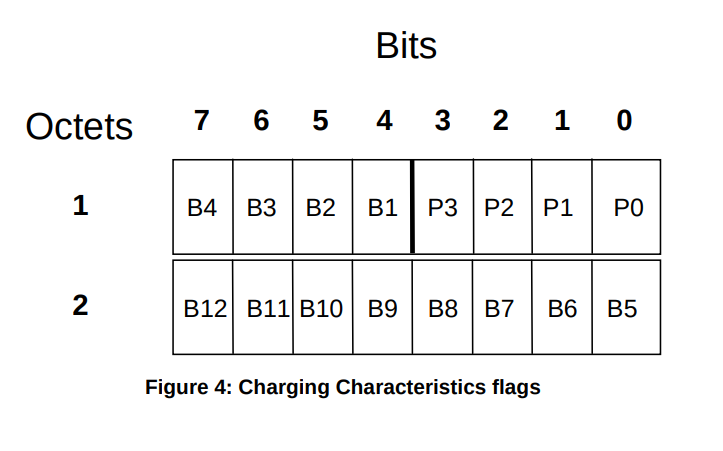
Charging Characteristics consists of a string of 16 bits designated as Profile (P) and Behaviour (B), shown in Figure 4. The first four bits (P) shall be used to select different charging trigger profiles, where each profile consists of the following trigger sets:
S-CDR: activate/deactivate CDRs, time limit, volume limit, maximum number of charging conditions, tariff times;
G-CDR: same as SGSN, plus maximum number of SGSN changes;
M-CDR: activate/deactivate CDRs, time limit, and maximum number of mobility changes;
SMS-MO-CDR: activate/deactivate CDRs;
SMS-MT-CDR: active/deactivate CDRs.
The Charging Characteristics field allows the operator to apply different kind of charging methods in the CDRs. A subscriber may have Charging Characteristics assigned to his subscription. These characteristics can be supplied by the HLR to the SGSN as part of the subscription information, and, upon activation of a PDP context, the SGSN forwards the charging characteristics to the GGSN on the Gn / Gp reference point according to the rules specified in Annex A of TS 32.251 [11].
This information can be used by the GSNs to activate CDR generation and control the closure of the CDR or the traffic volume containers (see clause 5.1.2.2.23) and is included in CDRs transmitted to nodes handling the CDRs via the Ga reference point. It can also be used in nodes handling the CDRs (e.g., the CGF or the billing system) to influence the CDR processing priority and routing.
These functions are accomplished by specifying the charging characteristics as sets of charging profiles and the expected behaviour associated with each profile.
The interpretations of the profiles and their associated behaviours can be different for each PLMN operator and are not subject to standardisation. In the present document only the charging characteristic formats and selection modes are specified.
The functional requirements for the Charging Characteristics as well as the profile and behaviour bits are further defined in normative Annex A of TS 32.251 [11], including the definitions of the trigger profiles associated with each CDR type.
The format of charging characteristics field is depicted in Figure 4. Px (x =0..3) refers to the Charging Characteristics Profile index. Bits classified with a “B” may be used by the operator for non-standardised behaviour (see Annex A of TS 32.251 [11]).
Right, well hopefully next time someone goes looking for this info you’ll find it a bit more easily than I did!
The docs describe AttributeS as a Key-Value-Store, but that’s probably selling it short – You can do some really cool stuff with AttributeS, and in this post, we’re going to learn about using AttributeS to transform stuff.
Note: Before we get started, I’d suggest copying this config file to use for testing.
Let’s look at a really basic example, where we add some data into AttributeS, match based on Account in CGrateS, and get back that data.
Well, for starters we’re calling the SetAttributeProfile endpoint, this is where we go to create / update Attribute Profiles, but in this case, because we’re hitting it for the first time with this ID, we’re creating a new entry called “ATTR_Nick_Key_Value_Example“, this will match any Contexts (more on them later) where the FilterIDs is a string, where the request Account, is equal to 1234.
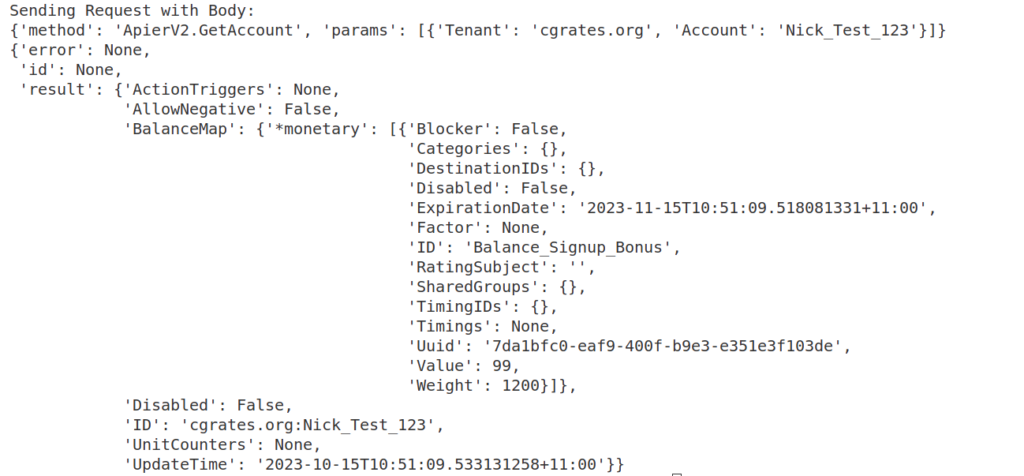
Let’s run this against the CGrateS API and take a look at the result:
This tells us we matched the Attribute with the ID ATTR_Nick_Key_Value_Example, and inside Event we can see that ExampleKey was added with value ExampleValue.
Okay, you’re saying, well what was the point of that?
Well, what if as a key in the attributes, we had the password for the SIP account, which we passed to our SIP switch (Kamailio, FreeSWITCH or Asterisk for example), and used that to authenticate?
Now if the CGrateS Agent for your SIP Switch, includes the *attributes flag, and the call is coming from 1234, we’ll get back a key called “SIP_password” with the value “sosecretiputitonthewebsite”, which you can use to auth the SIP account.
We can also return multiple AttributeS, for example, we created two Attributes (ATTR_Nick_Password_Example and ATTR_Nick_Key_Value_Example) which match on the account 1234. This means we’ll get back the SIP Password from ATTR_Nick_Password_Example and the key:value we set in ATTR_Nick_Key_Value_Example:
The order can be controlled by the Weight flag in the attribute, and if you want to stop matching any other AttributeS rules after the current Attribute, you can set the Blocker=True flag when you create/update the Attribute.
Okay, I hear you saying, that’s all well and good, I can add arbitrary key/values to stuff. Here endeth the lesson right?
Well not quite, because we can add key/values, but we can also rewrite variables using AttributeS.
Let’s imagine we’ve got 3 phone numbers (DIDs) associated with an account inside CGrateS, for example’s sake let’s say we have 12340001, 12340002 and 12340003, and we want any calls from these numbers to be billed to a CGrateS account called “NickTest1234”.
Our SIP switch doesn’t need to know anything about “NickTest1234”, just the 3 DIDs it can use to call out from your SIP stack. But to do this, we’d need CGrateS to transform any events from these DIDs to replace the Account value inside CGrateS, with NickTest1234.
In the example code to go with this I’ve put together a simple for loop to add these – You can find the code on Github (link at the bottom).
So with these defined, let’s try and rate something, we’ll add a default Charger, and add an SMS balance, before simulating an SMS where the account is set to 12340003:
#Define default Charger
print(CGRateS_Obj.SendData({"method":"APIerSv1.SetChargerProfile","params":[{"Tenant":"cgrates.org","ID":"DEFAULT","FilterIDs":[],"AttributeIDs":["*none"],"Weight":0}]}))

#Add an SMS Balance
print(CGRateS_Obj.SendData({"method":"ApierV1.SetBalance","params":[{"Tenant":"cgrates.org","Account":"Nick_Test_123","BalanceType":"*sms","Categories":"*any","Balance":{"ID":"SMS_Balance_1","Value":"100","Weight":25}}],"id":13}))

import uuid
import datetime
now = datetime.datetime.now()
result = CGRateS_Obj.SendData({
    "method": "CDRsV2.ProcessExternalCDR",
    "params": [
        {
            "OriginID": str(uuid.uuid1()),
            "ToR": "*sms",
            "RequestType": "*pseudoprepaid",
            "AnswerTime": now.strftime("%Y-%m-%d %H:%M:%S"),
            "SetupTime": now.strftime("%Y-%m-%d %H:%M:%S"),
            "Tenant": "cgrates.org",
            #This is going to be transformed to Nick_Test_123 by Attributes
            "Account": "12340003",
            "Usage": "1",
        }
    ]
})
pprint.pprint(result)
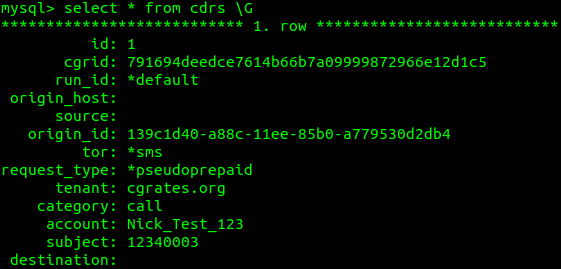
Right, so all going well, here’s what you should see in the CDRs table:
Bingo! Despite the fact the Account in the ProcessExternalCDR was set to 12340003, and had no mention of “NickTest1234”, CGrateS transformed it to NickTest1234.
How did that happen? Well, inside our cgrates.json file we have set the cdrs and chargers modules to have a link to Attributes, which means that when we call CDRs or Chargers modules via the API, these will in turn bounce the data through AttributesS for any transformations.
This means we don’t need to run AttributeSv1.ProcessEvent ourselves, when we call CDRsV2.ProcessExternalCDR, the CDRs module will call AttributeSv1.ProcessEvent for us.
We can actually see this happening, using ngrep, which as you work more with CGrateS, is a tool you’ll get very familiar with, let’s take a peek:
sudo ngrep -t -W byline port 2012 -d lo
Now if we run the CDRsV2.ProcessExternalCDR again, we’ll see the CDRs module has called Attributes for us:
Boom, there it is, same as we ran, but it’s being handled by CGrateS for us.
If you look carefully you’ll see the context in the API request is set to “*cdrs”, this means the CDRs module is calling Attributes.
When we define each of our Attributes, as we did earlier in the post, we can set what contexts they are valid in, for example we may want to apply the transformation when called by CDRs, but not other modules, you can restrict that when you define the Attribute by setting “Contexts”: [“*cdrs”].
Okay, so we’ve done some account replacement, what else can we do?
Well, let’s look at some other use cases,
Here in Australia we’ve got a few valid dialing formats, you could dial E.164 format (Numbers look like: +61212341234), 0NSN format (Numbers look like: 02 1234 1234) or NSN format (Numbers look like: 1234 1234 assuming you’re in the 03 area code yourself). If we want to define all our Destinations in E.164 format, we’ll need to to normalise the format using AttributeS, so the numbers always come as E.164.
And then under AttributeS we’ve defined a rule to replace anything matching the 0NSN regex, to strip the first digit and append a 61, to put it in E.164 format, and in SN format as the second entry.
And there you have it folks; our number format standardized.
We can combo / cascade AttributeS rules together, with the aid of the Weight and Blocker flags in the API.
Let’s imagine the 61212341234 number has been ported from Operator1 to Operator2, and the Destinations we’ve defined in CGrateS for this prefix are currently set to DST_Operator1. But because this number has been ported we should use DST_Operator2, so we charge the Operator2, as this number has been ported.
This means we don’t need to duplicate destination definitions to show this number has been ported, as this will be updated as the call gets rated, so we just assign the Attribute to each ported number.
So let’s match where the Subject of the call is 61212341234 (even though we’re going to input the Subject as 12341234), and rewrite the Destination attribute to DST_Operator2:
From the results we can see we matched two AttributeS rules, the first, ATTR_0NSN_to_E164_02_Area_Code reformatted the Subject of the call from 12341234 to 61212341234, then the updated Subject was passed through to ATTR_Ported_61212341234, which updated the Destination attribute to DST_Operator2.
If you’re having issues, make sure you have loaded the config file, are running the latest version, and if in doubt (and not on a production system), this script will clear all the data for you so you can rule out anything interfering.
In our last post we looked at Actions and ActionPlans, and one of the really funky things we can do is setting ActionPlans to trigger on a time schedule or setting ActionTriggers to trigger on an event.
We’re going to build on the examples we had on the last post, so we’ll assume your code is up to the point where we’ve added a Signup Bonus to an account, using an ActionPlan we assigned when creating the account.
In this post, we’re going to create an action that charges $6, called “Action_Monthly_Charge“, and tie it to an ActionPlan called “ActionPlan_Monthly_Charge“, but to demo how this works rather than charging this Monthly, we’re going to charge it every minute.
Then with our balances ticking down, we’ll set up an ActionTrigger to trigger when the balance drops below $95, and alert us.
Defining the Monthly Charge Action
The Action for the Monthly charge will look much like the other actions we’ve defined, except the Identifier is *debitso we know we’re deducting from the balance, and we’ll log to the CDRs table too:
Next we’ll need to wrap this up into an ActionPlan, this is where some of the magic happens. Inside the action plan we can set a once off time, or a recurring time, kinda like Cron.
We’re setting the time to *every_minute so things will happen quickly while we watch, this action will get triggered every 60 seconds. In real life of course, for a Monthly charge, we’d want to trigger this Action monthly, so we’d set this value to *monthly. If we wanted this to charge on the 2nd of the month we’d set the MonthDays to “2”, etc, etc.
If you think the accounts will start getting debited every 60 seconds after applying this, you’d be wrong, we need to associate this ActionPlan with an Account first, this is how we control which accounts get which ActionPlans tied to them, to do this we’ll use the SetAccout API again we’ve been using to create accounts:
Well, for starters the ActionPlan named “ActionPlan_Signup_Bonus” is going to be triggered, as in the ActionPlan it’s Timing is set to *asap, so CGrateS will apply the corresponding Action (“Action_Add_Signup_Bonus“) right away, which will credit the account $99.
But a minute after that, we’ll trigger the ActionPlan named “ActionPlan_Monthly_Charge”, as the timing for this is set to *every_minute, when the Action “Action_Monthly_Charge” is triggered, it’s going to be deducting $6 from the balance.
We can check this by using the GetAccount API:
# Get Account Info
pprint.pprint(CGRateS_Obj.SendData({'method': 'ApierV2.GetAccount', 'params': [
              {"Tenant": "cgrates.org", "Account": str(Account)}]}))
You should see a balance of $99 to start with, and then after 60 seconds, it should be down to $93, and so on.
Triggering Actions based on Balances with ActionTriggers
Okay, so we’ve set up recurring charges, now let’s get notified if the balance drops below $95, we’ll start, like we have before, with defining an Action, this will log to the CDRs table, HTTP post and write to syslog:
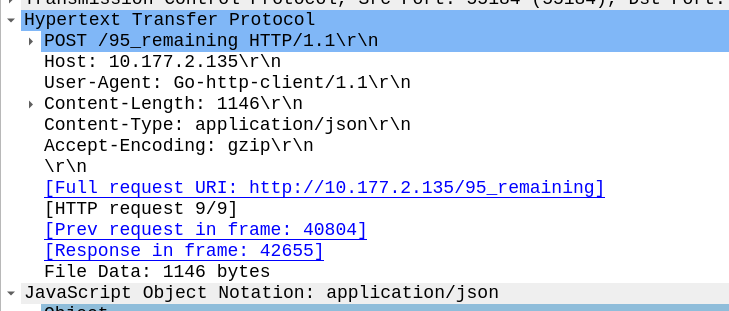
Now we’ll define an ActionTrigger to check if the balance is below $95 and trigger our newly created Action (“Action_HTTP_Notify_95“) when that condition is met:
We’ve defined the ThresholdType of *min_balance, but we could equally set this to ThresholdType to *max_balance, *balance_expired or trigger when a certain Counter has been triggered enough times.
Adding an ActionTrigger to an Account
Again, like the ActionPlan we created before, before the ActionTrigger we just created will be used, we need to associate it with an Account, for this we’ll use the AddAccountActionTriggers API, specify the Account and the ActionTriggerID for the ActionTrigger we just created.
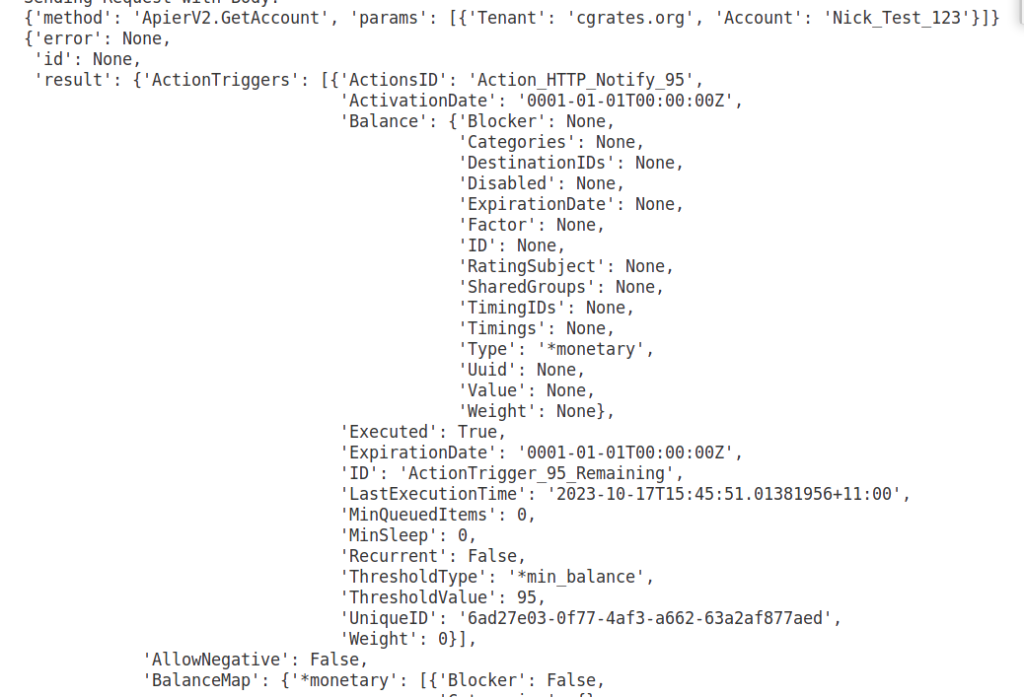
If we run this all together, creating the account with the “ActionPlan_Signup_Bonus” will give the account a $99 Balance. But after 60 seconds, “ActionPlan_Monthly_Charge” will kick in, and every 60 seconds after that, at which point the balance will get to below $95 when CGrateS will trigger the ActionTrigger “ActionTrigger_95_Remaining” and get the HTTP POST to the HTTP endpoint and log entry:
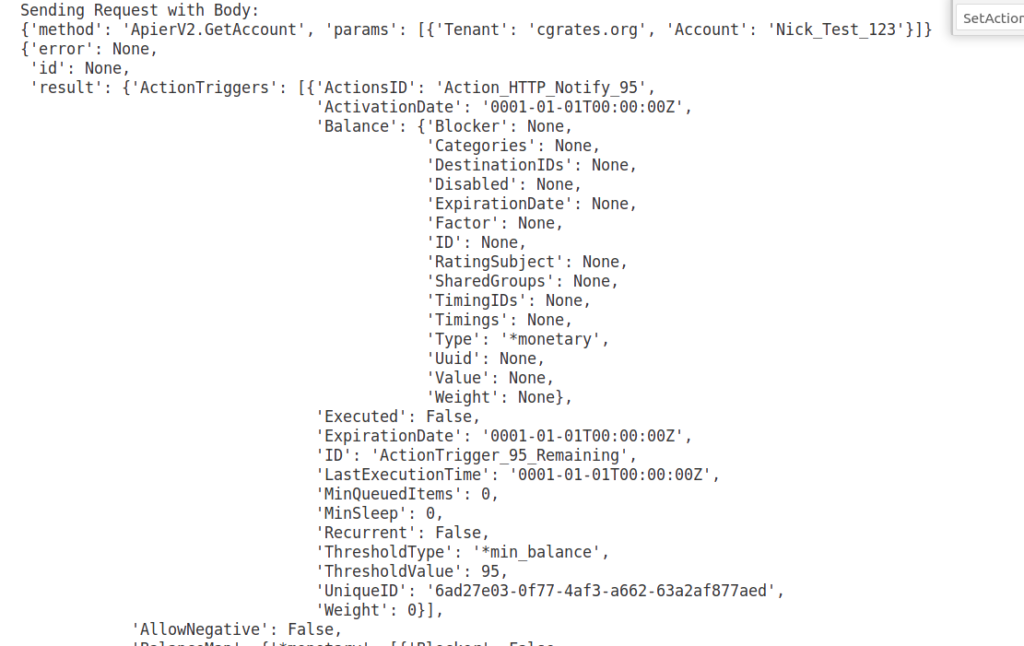
We can check on this using the ApierV2.GetAccount method, where we’ll see the ActionTrigger we just defined.
Checking out the LastExecutionTime we can see if the ActionTrigger been triggered or not.
So using this technique, we can notify a customer when they’ve used a certain amount of their balance, but we can lock out Accounts who have spent more than their allocated spend limit by setting an Action that suspends the Account once it reaches a certain level. We notify customers when balance expires, or if a certain number of counters has been triggered.
In our last post we added a series of different balances to an account, these were actions we took via the API specifically to add a balance.
But there’s a lot more actions we may want to do beyond just adding balance.
CGrateS has the concept of “Actions” which are, as the name suggests, things we want to do to the system.
Some example Actions would be:
Adding / Deducting / Resetting a balance
Adding a CDR log
Enable/Disable an account
Sending HTTP POST request or email notification
Deleting / suspending account
Transferring balances
We can run these actions on a timed basis, or when an event is triggered, and group Actions together to run multiple actions via an ActionTrigger, this means we can trigger these Actions, not just by sending an API request, but based on the state of the subscriber / account.
Let’s look at some examples,
We can define an Action named “Action_Monthly_Fee” to debit $12 from the monetary balance of an account, and add a CDR with the name “Monthly Account Fee” when it does so. We can use ActionTriggers to run this every month on the account automatically.
We can define an Action named “Usage_Warning_10GB” to send an email to the Account owner to inform them they’ve used 10GB of usage, and use ActionTriggers to send this when the customer has used 10GB of their *data balance.
Let’s start basic; to sweeten the deal for new Accounts, we’ll give them $99 of balance to use in the first month they have the service. Rather than hitting the AddBalance API, we’ll define an Action named “Action_Add_Signup_Bonus” to credit $99 of monetary balance to an account.
If you go back to our last post, you should know what we’d need to do to add this balance manually with the AddBalance API, but let’s look at how we can create the same balance add functionality using Actions:
#Add a Signup Bonus of $99 to the account with type *monetary expiring a month after it's added
Action_Signup_Bonus = {
"id": "0",
"method": "ApierV1.SetActions",
"params": [
{
"ActionsId": "Action_Add_Signup_Bonus",
"Actions": [
{
"Identifier": "*topup","BalanceId": "Balance_Signup_Bonus",
"BalanceUuid": "",
"BalanceType": "*monetary",
"Directions": "*out",
"Units": 99,
"ExpiryTime": "*month",
"Filter": "",
"TimingTags": "",
"DestinationIds": "",
"RatingSubject": "",
"Categories": "",
"SharedGroups": "",
"BalanceWeight": 1200,
"ExtraParameters": "",
"BalanceBlocker": "false",
"BalanceDisabled": "false",
"Weight": 10
}
]}]}
pprint.pprint(CGRateS_Obj.SendData(Action_Signup_Bonus))
Alright, this should look pretty familiar if you’ve just come from Account Balances. You’ll notice we’re no longer calling, SetBalance, we’re now calling SetActions, to create the ActionsId with the name “Action_Add_Signup_Bonus“. In “Action_Add_Signup_Bonus” we’ve got an actions we’ll do when “Action_Add_Signup_Bonus” is called. We can define multiple actions, but for now we’ve only got one action defined, which has the Identifier (which defines what the action does) set to *topup to add balance. As you probably guessed, we’re triggering a top up, and setting the BalanceId, BalanceType, Units, ExpiryTime and BalanceWeight just as we would using SetBalance to add a balance.
So how do we use the Action we just created? Well, there’s a lot of options, but let’s start with the most basic – Via the API:
Boom, now we’ll get a CDR created when the Action is triggered.
But let’s push this a bit more and add some more steps in the Action:
As well as adding balance and putting in a CDR to record what we did, let’s also send a notification to our customer via an HTTP API (BYO customer push notification system) and log to Syslog what’s going on.
So what have we done here? We’ve made an ActionPlan named “Action_Add_Signup_Bonus”, which, when associated with an account, will run the Action “Action_Add_Signup_Bonus” as soon as it’s tied to the account, thanks to the Time “*asap“.
Now if we create or update an Account using the SetAccount method, we can set the ActionPlanIds to reference our “ActionPlan_Signup_Bonus” and it’ll be triggered straight away.
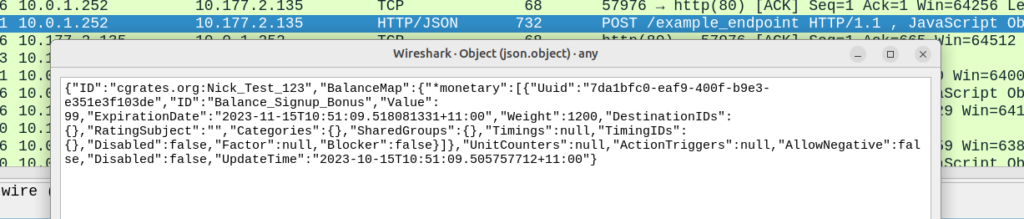
Now if we were to run a GetAccount API call, we’ll see the Account balance assigned that was created by the action Action_Add_Signup_Bonus which was triggered by ActionPlan assigned to the account:
But here’s where it gets interesting, in the ActionPlan we just defined the Time was set to “*asap“, which means the Action is triggered as soon as it was assigned to the account, but if we set the Time value to “*monthly“, the Action would get triggered every month, or *every_minute to trigger every minute, or *month_end to trigger at the end of every month.
I’m trying to keep these posts shorter as there’s a lot to cover. Stick around for our next post, we’ll look at some more ActionTriggers to keep decreasing the balance of the account, and setting up ActionTriggers to send a notification to the customer to tell them when their balance is getting low, or any other event based Action you can think of!
Early on as subscriber trunk dialing and automated time-based charging was introduced to phone networks, engineers were faced with a problem from Payphones.
Previously a call had been a fixed price, once the caller put in their coins, if they put in enough coins, they could dial and stay on the line as long as they wanted.
But as the length of calls began to be metered, it means if I put $3 of coins into the payphone, and make a call to a destination that costs $1 per minute, then I should only be allowed to have a 3 minute long phone call, and the call should be cutoff before the 4th minute, as I would have used all my available credit.
Conversely if I put $3 into the Payphone and only call a $1 per minute destination for 2 minutes, I should get $1 refunded at the end of my call.
We see the exact same problem with prepaid subscribers on IMS Networks, and it’s solved in much the same way.
In LTE/EPC Networks, Diameter is used for all our credit control, with all online charging based on the Ro interface. So let’s take a look at how this works and what goes on.
Generic 3GPP Online Charging Architecture
3GPP defines a generic 3GPP Online charging architecture, that’s used by IMS for Credit Control of prepaid subscribers, but also for prepaid metering of data usage, other volume based flows, as well as event-based charging like SMS and MMS.
Network functions that handle chargeable services (like the data transferred through a P-GW or calls through a S-CSCF) contain a Charging Trigger Function (CTF) (While reading the specifications, you may be left thinking that the Charging Trigger Function is a separate entity, but more often than not, the CTF is built into the network element as an interface).
The CTF is a Diameter application that generates requests to the Online Charging Function (OCF) to be granted resources for the session / call / data flow, the subscriber wants to use, prior to granting them the service.
So network elements that need to charge for services in realtime contain a Charging Trigger Function (CTF) which in turn talks to an Online Charging Function (OCF) which typically is part of an Online Charging System (AKA OCS).
For example when a subscriber turns on their phone and a GTP session is setup on the P-GW/PCEF, but before data is allowed to flow through it, a Diameter “Credit Control Request” is generated by the Charging Trigger Function (CTF) in the P-GW/PCEF, which is sent to our Online Charging Server (OCS).
The “Credit Control Answer” back from the OCS indicates the subscriber has the balance needed to use data services, and specifies how much data up and down the subscriber has been granted to use.
The P-GW/PCEF grants service to the subscriber for the specified amount of units, and the subscriber can start using data.
This is a simplified example – Decentralized vs Centralized Rating and Unit Determination enter into this, session reservation, etc.
The interface between our Charging Trigger Functions (CTF) and the Online Charging Functions (OCF), is the Ro interface, which is a Diameter based interface, and is common not just for online charging for data usage, IMS Credit Control, MMS, value added services, etc.
3GPP define a reference online-charging interface, the Ro interface, and all the application-specific interfaces, like the Gy for billing data usage, build on top of the Ro interface spec.
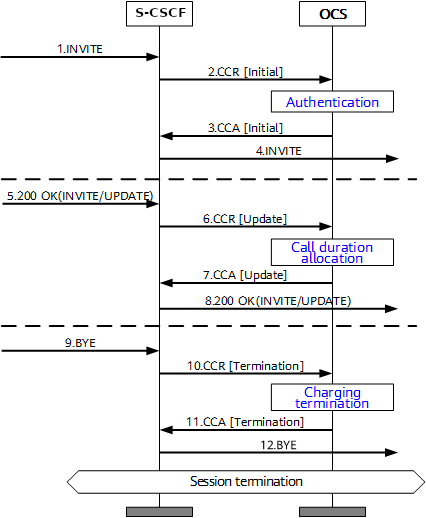
Basic Credit Control Request / Credit Control Answer Process
This example will look at a VoLTE call over IMS.
When a subscriber sends an INVITE, the Charging Trigger Function baked in our S-CSCF sends a Diameter “Credit Control Request” (CCR) to our Online Charging Function, with the type INITIAL, meaning this is the first CCR for this session.
The CCR contains the Service Information AVP. It’s this little AVP that is where the majority of the magic happens, as it defines what the service the subscriber is requesting. The main difference between the multitude of online charging interfaces in EPC networks, is just what the service the customer is requesting, and the specifics of that service.
For this example it’s a voice call, so this Service Information AVP contains a “IMS-Information” AVP. This AVP defines all the parameters for a IMS phone call to be online charged, for a voice call, this is the called-party, calling party, SDP (for differentiating between voice / video, etc.).
It’s the contents of this Service Information AVP the OCS uses to make decision on if service should be granted or not, and how many service units to be granted. (If Centralized Rating and Unit Determination is used, we’ll cover that in another post) The actual logic, relating to this decision is typically based on the the rating and tariffing, credit control profiles, etc, and is outside the scope of the interface, but in short, the OCS will make a yes/no decision about if the subscriber should be granted access to the particular service, and if yes, then how many minutes / Bytes / Events should be granted.
In the received Credit Control Answer is received back from our OCS, and the Granted-Service-Unit AVP is analysed by the S-CSCF. For a voice call, the service units will be time. This tells the S-CSCF how long the call can go on before the S-CSCF will need to send another Credit Control Request, for the purposes of this example we’ll imagine the returned value is 600 seconds / 10 minutes.
The S-CSCF will then grant service, the subscriber can start their voice call, and start the countdown of the time granted by the OCS.
As our chatty subscriber stays on their call, the S-CSCF approaches the limit of the Granted Service units from the OCS (Say 500 seconds used of the 600 seconds granted). Before this limit is reached the S-CSCF’s CTF function sends another Credit Control Request with the type UPDATE_REQUEST. This allows the OCS to analyse the remaining balance of the subscriber and policies to tell the S-CSCF how long the call can continue to proceed for in the form of granted service units returned in the Credit Control Answer, which for our example can be 300 seconds.
Eventually, and before the second lot of granted units runs out, our subscriber ends the call, for a total talk time of 700 seconds.
But wait, the subscriber been granted 600 seconds for our INITIAL request, and a further 300 seconds in our UPDATE_REQUEST, for a total of 900 seconds, but the subscriber only used 700 seconds?
The S-CSCF sends a final Credit Control Request, this time with type TERMINATION_REQUEST and lets the OCS know via the Used-Service-Unit AVP, how many units the subscriber actually used (700 seconds), meaning the OCS will refund the balance for the gap of 200 seconds the subscriber didn’t use.
If this were the interface for online charging of data, we’d have the PS-Information AVP, or for online charging of SMS we’d have the SMS-Information, and so on.
The architecture and framework for how the charging works doesn’t change between a voice call, data traffic or messaging, just the particulars for the type of service we need to bill, as defined in the Service Information AVP, and the OCS making a decision on that based on if the subscriber should be granted service, and if yes, how many units of whatever type.