I’ve been writing a fair bit recently about the “VoLTE Mess” – It’s something that’s been around for a long time, mostly impacting greenfield players rolling out LTE only, but now the big carriers are starting to feel it as they shut off their 2G and 3G networks, so I figured a brief history was in order to understand how we got here.
Note: I use the terms 4G or LTE interchangeably
The Introduction of LTE
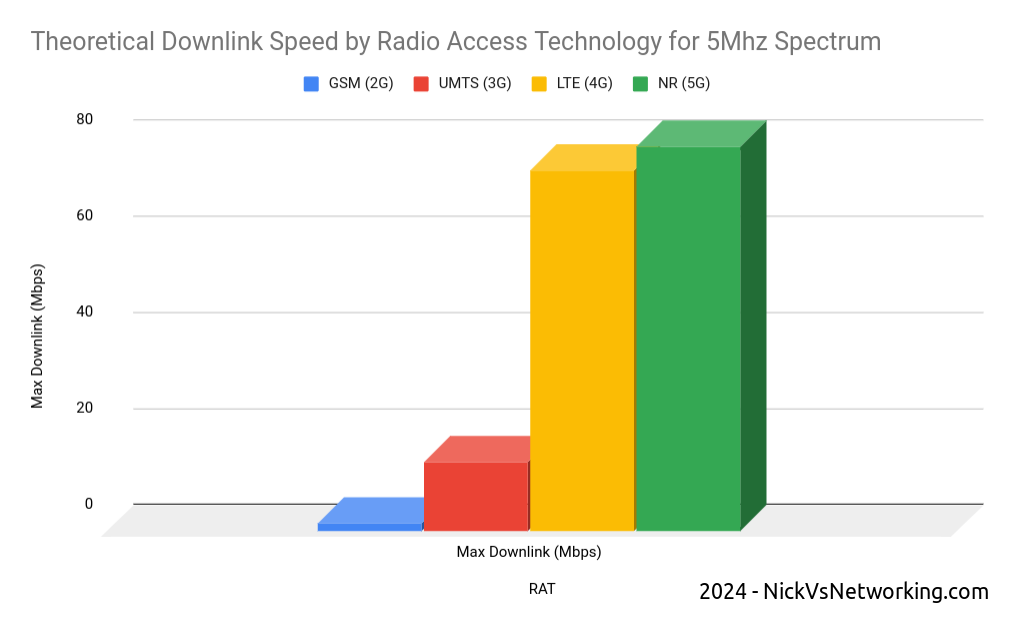
LTE (4G) is more “spectrally efficient” than the technologies that came before it. In simple terms, 1 “chunk” of spectrum will get you more speed (capacity) on LTE than the same size chunk of spectrum would on 2G or 3G.
So imagine it’s 2008 and you’re the CTO of a mobile network operator.
Your network is congested thanks to carrying more data traffic than it was ever designed for (the first iPhone had launched the year before) and the network is struggling under the weight of all this new data traffic.
You have two options here, to build more cell sites for more density (very expensive) or buy more spectrum (extremely expensive) – Both options see you going cap in hand to the finance team and asking for eye-wateringly large amounts of capital for either option.
But then the answer to your prayers arrives in the form of 3GPP’s Release 8 specification with the introduction of LTE. Now by taking some 2G or 3G spectrum, and by using it on 4G, you can get ~5x more capacity from the same spectrum. So just by changing spectrum you own from 2G or 3G to 4G, you’ve got 5x more capacity. Hallelujah!
So you go to Nortel and buy a packet core, and Alcatel and Siemens provide 4G RAN (eNodeBs) which you selectively deploy on the cell sites that are the most congested.
The finance team and the board are happy and your marketing team runs amok with claims of 4G data speeds.
You’ve dodged the crisis, phew.
This is the path that all established mobile operators took; throw LTE at the congested cell sites, to cheaply and easily free up capacity, and as the natural hardware replacement cycle kicked in, or cell sites reached capacity, swap out the hardware to kit that supports LTE in addition to the 2G and 3G tech.
Circuit Switched Fallback
But it’s hard to talk about the machinations of late 2000s telecom executives, without at least mentioning Hitler.
This video below from 15 years ago is pretty obscure and fairly technical, but the crux of it it is that Hitler is livid because LTE does not have a “CS Domain” aka circuit switched voice (the way 2G and 3G had handled voice calls).
It was optional to include support for voice calls in the LTE network (Voice over LTE) when you launched LTE services. So if you already had a 2G or 3G network (CS Network) you could just keep using 2G and 3G for your voice calls, while getting that sweet capacity relief.
So our hypothetical CTO, strapped for cash and data capacity, just didn’t bother to support VoLTE when they launched LTE – Doing so would have taken more time to launch, during which time the capacity problem would become worse, so “don’t worry about VoLTE for now” was the mantra.
All the operators who still had 2G and 3G networks, opted to just “Fallback” to using the 2G / 3G network for calling. This is called “Circuit Switched Fallback” aka CSFB.
Operators loved this as they got the capacity relief provided by shifting to 4G/LTE (more capacity in the network is always good) and could all rant about how their network was the fastest and had 4G first, this however was what could be described as a “Foot gun” – Something you can shoot yourself in the foot with in the future.
Operators eventually introduce VoLTE
Time ticked on an operators built out their 4G networks, and many in the past 10 years or so have launched VoLTE in their own networks.
For phones that support it, in areas with blanket 4G coverage, they can use VoLTE for all their calls.
But that’s the sticking point right there – If the phones support it.
But if the phones don’t support it, they’re roaming or making emergency calls, there is always been the safety blanket of 2G or 3G and Circuit Switched fallback to well, fall back to.
There’s no driver for operators who plan to (or are required to) operate a 2G or 3G network for the foreseeable future, to ensure a high level of VoLTE support in their devices.
For an operator today with 2G or 3G, Voice over LTE is still optional.
Many operators still rely exclusively on Circuit Switched Fallback, and there are only a handful of countries that have turned off 2G and 3G and rely solely on VoLTE.
VoLTE Handset Support
For the past 16 years phone manufacturers have been making LTE capable phones.
But that does not mean they’ve been making phones that support Voice over LTE.
But it’s never been an issue up until this point, as there’s always been a circuit switched (2G/3G) network to fall back to, so the fact that these chips may not support VoLTE was not a big problem.
Many of the cheaper chipsets that power phones simply don’t support VoLTE – These chips do support LTE for data connections but rely on Circuit Switched Fallback for voice calls. This is in part due to the increased complexity, but also because some of the technologies for VoLTE (like AMR) required intellectual property deals to licence to use, so would add to the component cost to manufacture, and in the chips game, keeping down component cost is critical.
Even for chips that do support Voice over LTE, it’s “special”. Unlike calling in 2G or 3G that worked the same for every operator, phone manufacturers require a “Carrier Bundle” for each operator, containing that specific operators’ special flavor of VoLTE, that operator uses in their network.
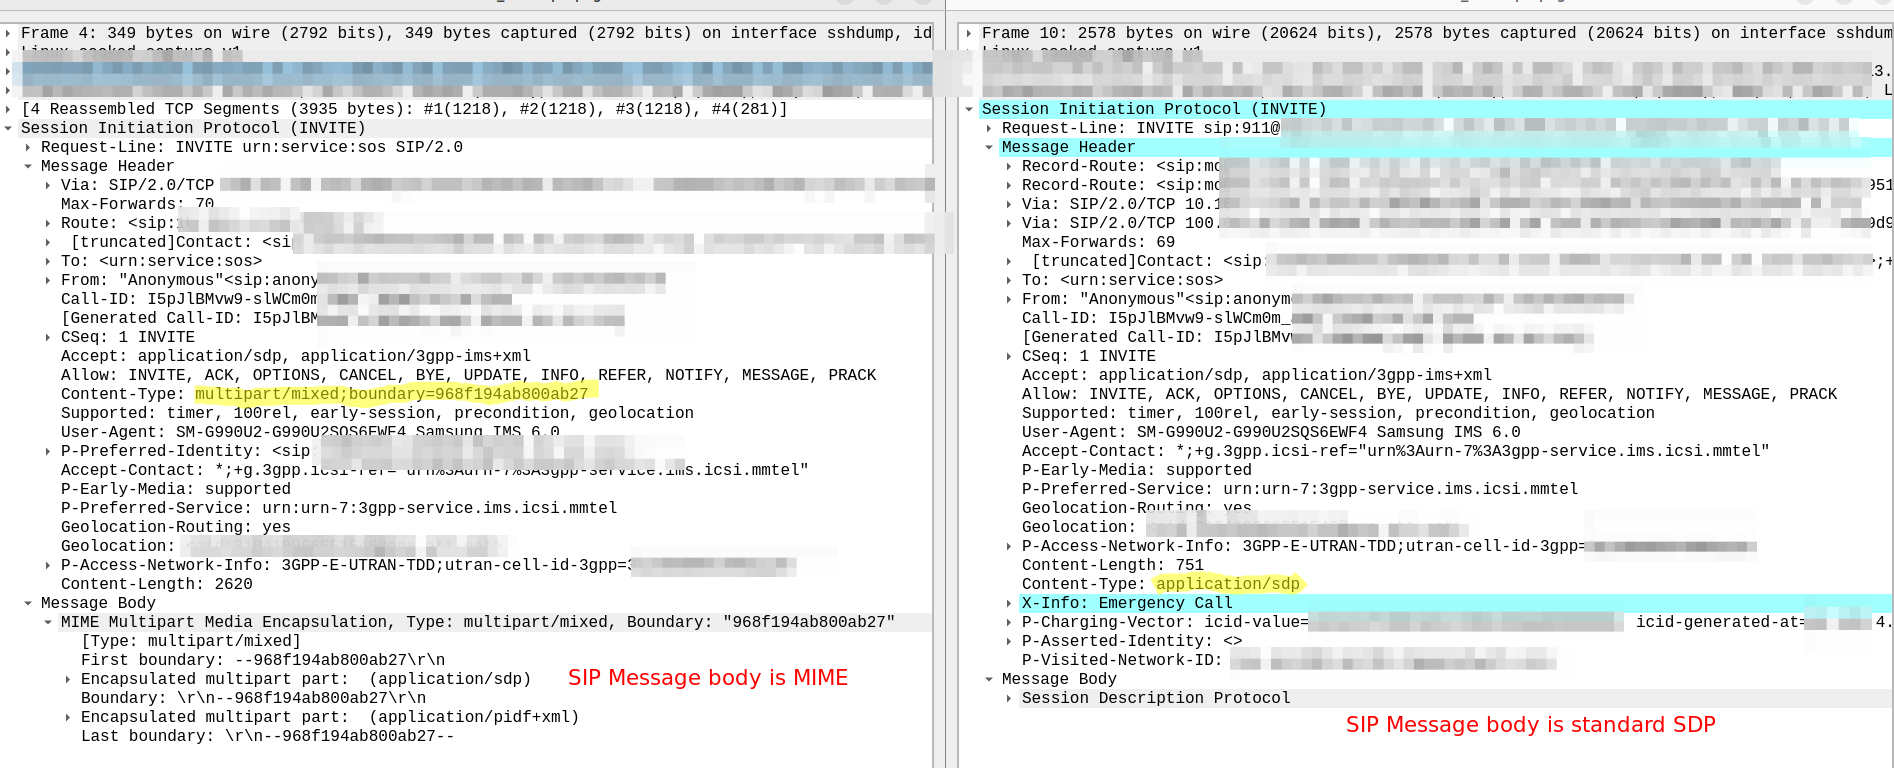
This is because while VoLTE is standardized (Despite some claims to the contrary) a lot of “optional” bits have existed, and different operators built networks with subtle differences in the “flavor” of their Voice over LTE (IMS) stack they used. The OEMs (Phone / Chip manufacturers) had to handle these changes in the devices they made, for in order to sell their phones through that operator.
This means I can have a phone from vendor X that works with VoLTE on Network Y, but does not support VoLTE on Network Z.
Worse still, knowing which phones are supported is a bit of a guessing game.
Most operators sell phones directly to their customer base, so buying an Network Y branded phone from Vendor X, you know it’s going to support Network Y’s VoLTE settings, but if you change carriers, who knows if it’ll still support it?
When you’ve still got a Circuit Switched network it’s not the end of the world, you’ll just use CSFB and probably not realize it, until operators go to shut down 2G / 3G networks…

Navigating the Maze of VoLTE Compatibility
Here are some simple checklist you can ask your elderly family members if they ask if their phone is VoLTE compatible:
- Does the underlying chipset the phone is based on support VoLTE? (you can find this out by disassembling the phone and checking the datasheets for the components from the OEMs after signing NDAs for each)
- Does the underlying chipset require a “carrier bundle” of settings to have been loaded for this operator in order to support VoLTE (See Qualcomm MBM as an example)?
- What version of this list am I currently on (generally set in the factory) and does it support this operator? (You can check by decapping the ICs and dumping their NVRAM and then running it through a decompiler)
- Does my phones OS (Android / iOS) require a “carrier bundle” of it’s own to enable VoLTE? Is my operator in the version of the database on the phone? (See Android’s Carrier Database for example) (You can find the answer by rooting the phone and running some privileged commands to poke around the internal file system)
- Does my operator / MNO support VoLTE – Does my plan / package support VoLTE? (You can easily find the answer by visiting the store and asking questions that don’t appear on the script)
If you managed to answer yes to all of the above, congratulations! You have conditional VoLTE support on your phone, although you probably don’t have a working phone anymore.
Wait, conditional VoLTE support?
That’s right folks, VoLTE will work in some scenarios with your operator!
If you plan on traveling, well your phone may support VoLTE at home, but does the phone have VoLTE roaming enabled?
Many phones support VoLTE in the home network, but resort to CSFB when roaming.
If it does support VoLTE roaming, does the network you’re visiting support VoLTE roaming? Has the roaming agreement (IRA) between the operator you’re using while traveling and your home operator been updated to include VoLTE Roaming? These IRAs (AA.12 / AA.13 docs) also indicate if the network must turn off IPsec encryption for the VoLTE traffic when roaming, which is controlled by the phone anyway.
Phew, all this talk of VoLTE roaming while traveling scares me, I think I’ll stay home in the safety of the Australian bush with all these great friendly animals around a phone that supports VoLTE on my home network.
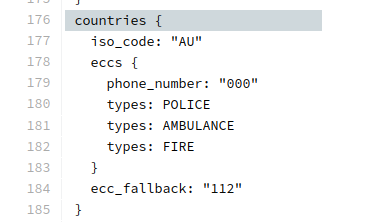
Ah – After spending some time in the Australian bush one of our many deadly animals bit me. Time to call for help! Wait, what about emergency calls over VoLTE? Again, many phones support VoLTE for normal calls, fall back to 2G or 3G for the emergency call, so if you have one of those phones (You’ll only find out if you try to make an emergency call and it fails) and try to make an emergency call in a country without 2G or 3G, you’d better find a payphone.
There’s many real world examples of this, our friends at OptimERA have been lobbying the FCC since 2019 on this.
Sarcasm aside, there’s no dataset or compatibility matrix here – No simple way to see if your phone will work for VoLTE on a given operator, even if the underlying chip does support VoLTE.
Operators in Australia which recently shut down their 3G network, were mandated to block devices that didn’t support VoLTE for emergency calling. They did this using an Equipment Identity Register, and blocking devices based on the Type Allocation Code, but this scattergun approach just blocked non-carrier issued devices, regardless of it they supported VoLTE or VoLTE emergency calling.
Blame Game
So who’s to blame here?
There’s no one group to blame here, the industry has created a shitty cycle here:
- Standards orgs for having too many “flavors” available
- Operators deploying their own “Flavors” of VoLTE then mandating OEMs / Chip manufacturers comply with their “flavor”.
- OEMs / Chip manufactures respond by adding “Carrier Bundles” to account for this per-operator customization
I’ve got some ideas on a way to unscramble this egg, and it’s going to take a push from the industry.
If you’re in the industry and keen to push for a fix, get in touch!
It’s time to get a long term solution to this problem, and we as an industry need to lead the change.