I had a question recently on LinkedIn regarding how to preference Voice over WiFi traffic so that a network engineer operating the WiFi network can ensure the best quality of experience for Voice over WiFi.
Voice over WiFi is underpinned by the ePDG – Evolved Packet Data Gateway (this is a fancy IPsec tunnel we authenticate to using the SIM to drop our traffic into the P-CSCF over an unsecured connection). To someone operating a WiFi network, the question is how do we prioritise the traffic to the ePDGs and profile it?
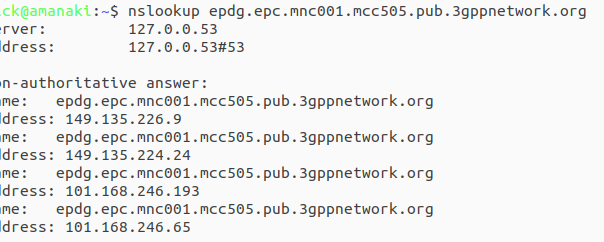
ePDGs can be easily discovered through a simple DNS lookup, once you know the Mobile Network Code and Mobile Country code of the operators you want to prioritise, you can find the IPs really easily.
ePDG addresses take the form epdg.epc.mncXXX.mccYYY.pub.3gppnetwork.org so let’s look at finding the IPs for each of these for the operators in a country:
The first step is nailing down the mobile network code and mobile country codes of the operators you want to target, Wikipedia is a great source for this information. Here in Australia we have the Mobile Country Code 505 and the big 3 operators all support Voice over WiFi, so let’s look at how we’d find the IPs for each. Telstra has mobile network code (MNC) 01, in 3GPP DNS we always pad network codes to 3 digits, so that’ll be 001, and the mobile country code (MCC) for Australia is 505. So to find the IPs for Telstra we’d run an nslookup for epdg.epc.mnc001.mcc505.pub.3gppnetwork.org – The list of IPs that are returned, are the IPs you’ll see Voice over WiFi traffic going to, and the IPs you should provide higher priority to:
The same rules apply in other countries, you’d just need to update the MNC/MCC to match the operators in your country, do an nslookup and prioritise those IPs.
Generally these IPs are pretty static, but there will need to be a certain level of maintenance required to keep this list up to date by rechecking.
I needed to have both legs of the B2BUA bridge call through FreeSWITCH using the same Call-ID (long story), and went down the rabbit hole of looking for how to do this.
A post from 15 years ago on the mailing list from Anthony Minessale said he added “sip_outgoing_call_id” variable for this, and I found the commit, but it doesn’t work – More digging shows this variable disappears somewhere in history.
But by looking at what it changed I found sip_invite_call_id does the same thing now, so if you want to make both legs use the same Call-ID here ya go:
We recently added support in PyHSS for fixed line SIP subscribers to attach to the IMS.
Traditional telecom operators are finding their fixed line network to be a bit of a money pit, something they’re required to keep operating to meet regulatory obligations, but the switches are sitting idle 99% of the time. As such we’re seeing more and more operators move fixed line subs onto their IMS.
This new feature means we can use PyHSS to serve as the brains for a fixed network, as well as for mobile, but there’s one catch – How we authenticate subscribers changes.
Most banks of line cards in a legacy telecom switches, or IP Phones, don’t have SIM slots to allow us to authenticate, so instead we’re forced to fallback to what they do support.
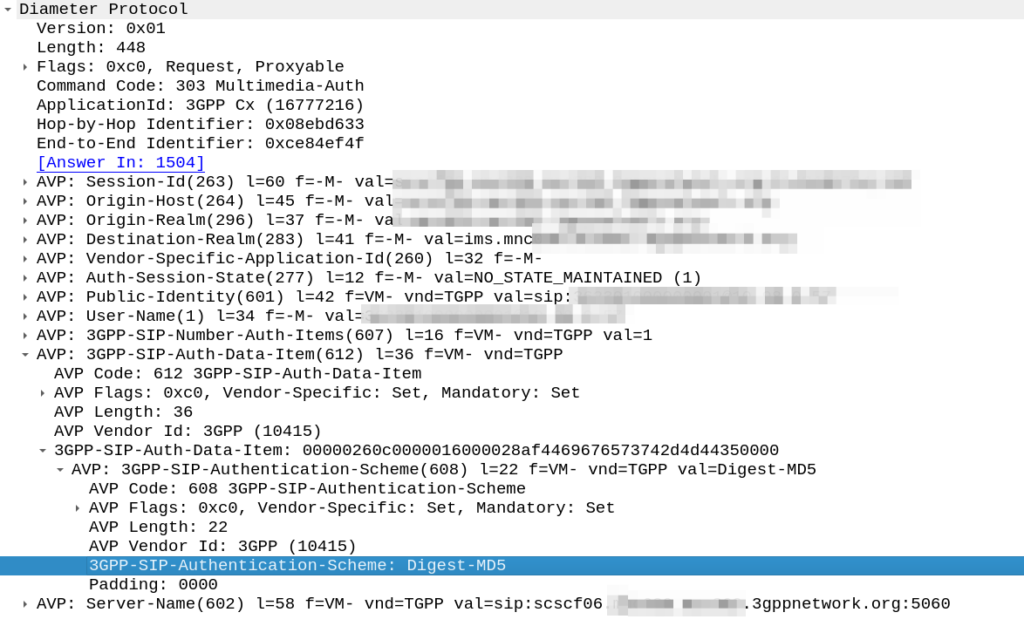
Unfortunately for the most part, what is supported by these IP phones or telecom switches is SIP MD5 Digest Authentication.
The Nonce is generated by the HSS and put into the Multimedia-Authentication-Answer, along with the subscriber’s password and sent in the clear to the S-CSCF.
The HSS then generates the the Multimedia-Auth Answer, it generates a nonce (in the 3GPP-SIP-Authenticate / 609 AVP) and sends the Subscriber’s password in the 3GPP-SIP-Authorization (610) AVP in response back to the S-CSCF.
I would have thought a better option would be for the HSS to generate the Nonce and Digest, and then the S-CSCF to just send the Nonce to the Sub and compare the returned Digest from the Sub against the expected Digest from the HSS, but it would limit flexibility (realm adaptation, etc) I guess.
The UE/UA (I guess it’s a UA in this context as it’s not a mobile) then generates its own Digest from the Nonce and sends it back to the S-CSCF via the P-CSCF.
The S-CSCF compares the received Digest response against the one it generated, and if the two match, the sub is authenticated and allowed to attach onto the network.
In the past I had my iFCs setup to look for the P-Access-Network-Info header to know if the call was coming from the IMS, but it wasn’t foolproof – Fixed line IMS subs didn’t have this header.
If you work with FreeSWITCH there’s a good chance every time you do, you run fs_cli and attempt to read the firehose of data shown when making a call to make sense of what’s going on and why what you’re trying to do isn’t working.
That’s because we’ve edited the event_socket.conf.xml file, and fs_cli uses the event socket to connect to FreeSWITCH as well.
But there’s a simple fix,
Create a new file in /etc/fs_cli.conf and populate it with the info needed to connect to your ESL session you defined in event_socket.conf.xml, so if this is is your
[default]
; Put me in /etc/fs_cli.conf or ~/.fs_cli_conf
;overide any default options here
loglevel => 6
log-uuid => false


host     => 10.98.0.76
port     => 8021
password => mysupersecretpassword
debug    => 7
And that’s it, now you can run fs_cli and connect to the terminal once more!
Everything was working on the IMS, then I go to bed, the next morning I fire up the test device and it just won’t authenticate to the IMS – The S-CSCF generated a 401 in response to the REGISTER, but the next REGISTER wouldn’t pass.
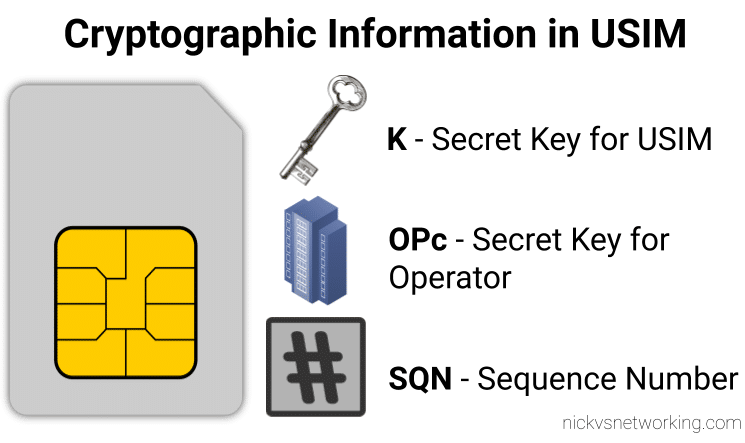
When we generate the vectors (for IMS auth and standard auth) one of the inputs to generate the vectors is the Sequence Number or SQN.
This SQN ticks over like an odometer for the number of times the SIM / HSS authentication process has been performed.
There is some leeway in the SQN – It may not always match between the SIM and the HSS and that’s to be expected. When the MME sends an Authentication-Information-Request it can ask for multiple vectors so it’s got some in reserve for the next time the subscriber attaches, and that’s allowed.
But there are limits to how far out our SQN can be, and for good reason – One of the key purposes for the SQN is to protect against replay attacks, where the same vector is replayed to the UE. So the SQN on the HSS can be ahead of the SIM (within reason), but it can’t be behind – Odometers don’t go backwards.
So the issue was with the SQN on the SIM being out of Sync with the SQN in the IMS, how do we know this is the case, and how do we fix this?
Well there is a resync mechanism so the SIM can securely tell the HSS what the current SQN it is using, so the HSS can update it’s SQN.
When verifying the AUTN, the client may detect that the sequence numbers between the client and the server have fallen out of sync. In this case, the client produces a synchronization parameter AUTS, using the shared secret K and the client sequence number SQN. The AUTS parameter is delivered to the network in the authentication response, and the authentication can be tried again based on authentication vectors generated with the synchronized sequence number.
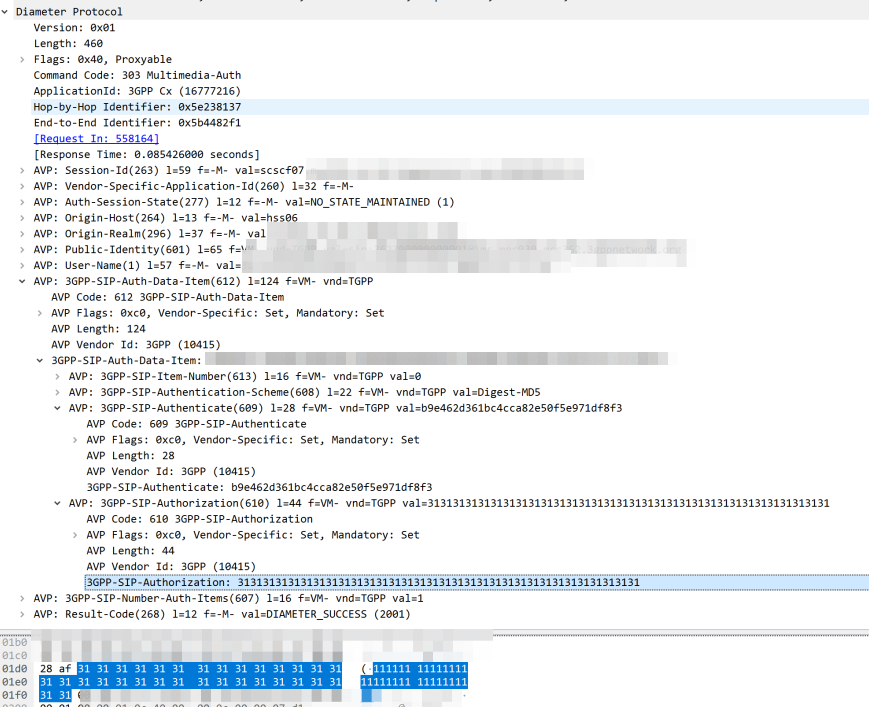
In our example we can tell the sub is out of sync as in our Multimedia Authentication Request we see the SIP-Authorization AVP, which contains the AUTS (client synchronization parameter) which the SIM generated and the UE sent back to the S-CSCF. Our HSS can use the AUTS value to determine the correct SQN.
SIP-Authorization AVP in the Multimedia Authentication Request means the SQN is out of Sync and this AVP contains the RAND and AUTN required to Resync
Note: The SIP-Authorization AVP actually contains both the RAND and the AUTN concatenated together, so in the above example the first 32 bytes are the AUTN value, and the last 32 bytes are the RAND value.
So the HSS gets the AUTS and from it is able to calculate the correct SQN to use.
Then the HSS just generates a new Multimedia Authentication Answer with a new vector using the correct SQN, sends it back to the IMS and presto, the UE can respond to the challenge normally.
We’re doing more and more network automation, and something that came up as valuable to us would be to have all the IPs in HOMER SIP Capture come up as the hostnames of the VM running the service.
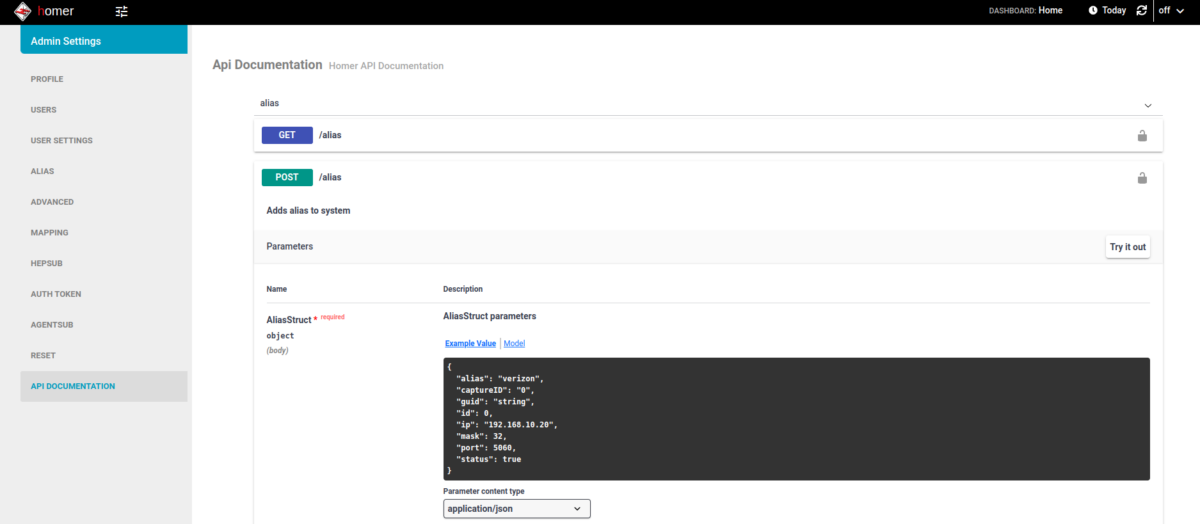
Luckily for us HOMER has an API for this ready to roll, and best of all, it’s Swagger based and easily documented (awesome!).
(Probably through my own failure to properly RTFM) I was struggling to work out the correct (current) way to Authenticate against the API service using a username and password.
Because the HOMER team are awesome however, the web UI for HOMER, is just an API client.
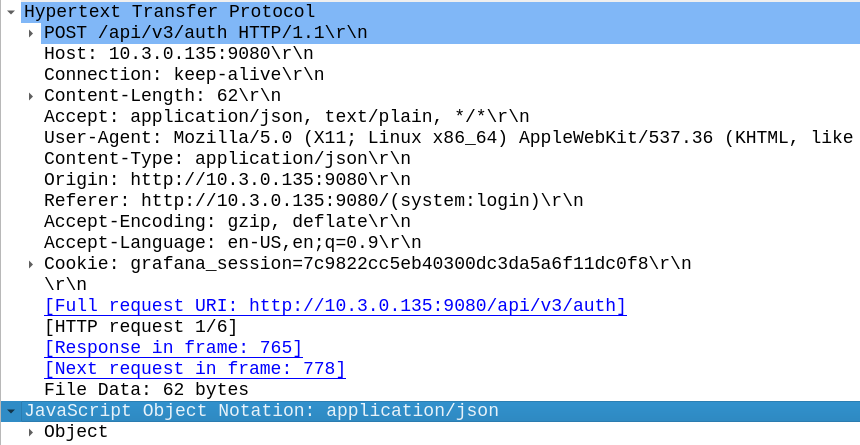
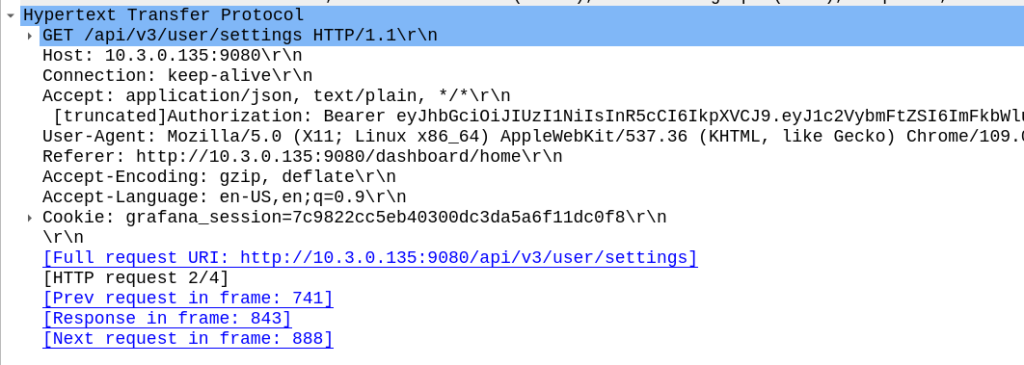
This means to look at how to log into the API, I just needed to fire up Wireshark, log into the Web UI via my browser and then flick through the packets for a real world example of how to do this.
Homer Login JSON body as seen by Wireshark
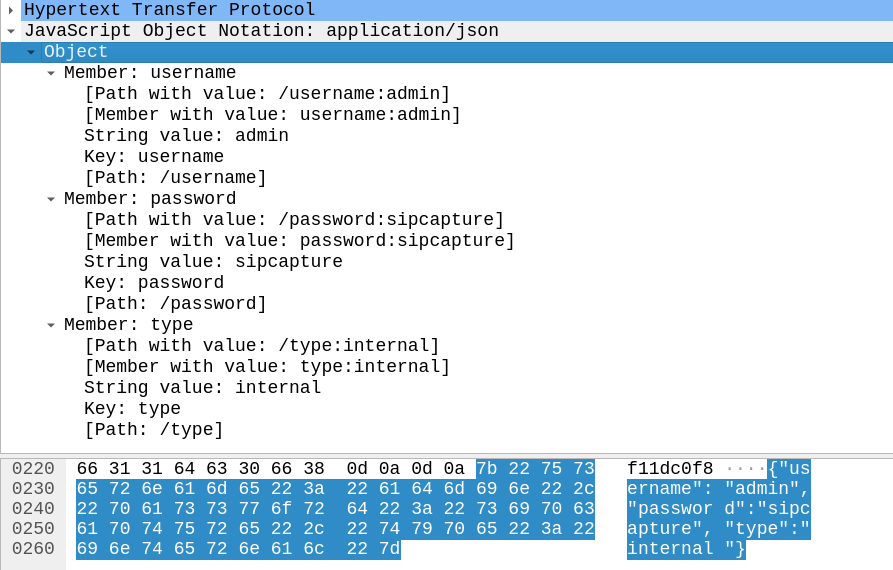
In the Login action I could see the browser posts a JSON body with the username and password to /api/v3/auth
And in return the Homer API Server responds with a 201 Created an a auth token back:
Now in order to use the API we just need to include that token in our Authorization: header then we can hit all the API endpoints we want!
For me, the goal we were setting out to achieve was to setup the aliases from our automatically populated list of hosts. So using the info above I setup a simple Python script with Requests to achieve this:
import requests
s = requests.Session()

#Login and get Token
url = 'http://homer:9080/api/v3/auth'
json_data = {"username":"admin","password":"sipcapture"}
x = s.post(url, json = json_data)
print(x.content)
token = x.json()['token']
print("Token is: " + str(token))


#Add new Alias
alias_json = {
          "alias": "Blog Example",
          "captureID": "0",
          "id": 0,
          "ip": "1.2.3.4",
          "mask": 32,
          "port": 5060,
          "status": True
        }

x = s.post('http://homer:9080/api/v3/alias', json = alias_json, headers={'Authorization': 'Bearer ' + token})
print(x.status_code)
print(x.content)


#Print all Aliases
x = s.get('http://homer:9080/api/v3/alias', headers={'Authorization': 'Bearer ' + token})
print(x.json())
And bingo we’re done, a new alias defined.
We wrapped this up in a for loop for each of the hosts / subnets we use and hooked it into our build system and away we go!
With the Homer API the world is your oyster in terms of functionality, all the features of the Web UI are exposed on the API as the Web UI just uses the API (something I wish was more common!).
Using the Swagger based API docs you can see examples of how to achieve everything you need to, and if you ever get stuck, just fire up Wireshark and do it in the Homer WebUI for an example of how the bodies should look.
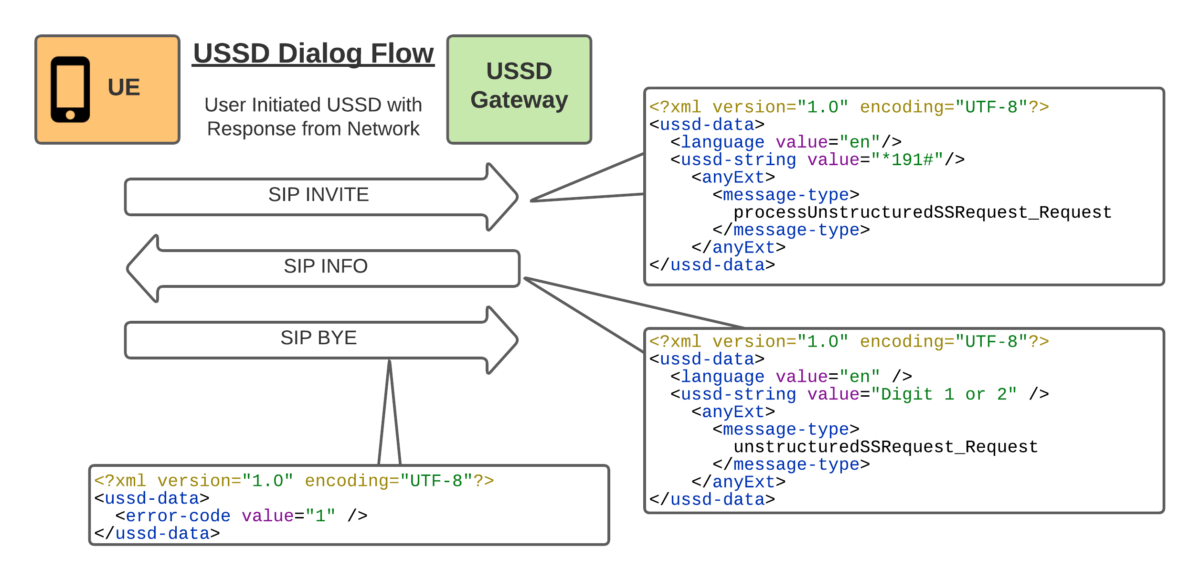
One day recently I was messing with the XCAP server, trying to set the Call Forward timeout. In the process I triggered the UE to send a USSD request to the IMS.
Huh, I thought, “I wonder how hard it would be to build a USSD Gateway for our IMS?”, and this my friends, is the story of how I wasted a good chunk of my weekend trying (and failing) to add support for USSD.
You might be asking “Who still uses USSD?” – The use cases for USSD are pretty thin on the ground in this day and age, but I guess balance query, and uh…
But this is the story of what I tried before giving up and going outside…
Routing
First I’d need to get the USSD traffic towards the USSD Gateway, this means modifying iFCs. Skimming over the spec I can see the Recv-Info: header for USSD traffic should be set to “g.3gpp.ussd” so I knocked up an iFC to match that, and route the traffic to my dev USSD Gateway, and added it to the subscriber profile in PyHSS:
Easy peasy, now we have the USSD requests hitting our USSD Gateway.
The Response
I’ll admit that I didn’t jump straight to the TS doc from the start.
The first place I headed was Google to see if I could find any PCAPs of USSD over IMS/SIP.
And I did – Restcomm seems to have had a USSD product a few years back, and trawling around their stuff provided some reference PCAPs of USSD over SIP.
So the flow seemed pretty simple, SIP INVITE to set up the session, SIP INFO for in-dialog responses and a BYE at the end.
With all the USSD guts transferred as XML bodies, in a way that’s pretty easy to understand.
Being a Kamailio fan, that’s the first place I started, but quickly realised that SIP proxies, aren’t great at acting as the UAS.
So I needed to generate in-dialog SIP INFO messages, so I turned to the UAC module to generate the SIP INFO response.
My Kamailio code is super simple, but let’s have a look:
request_route {

        xlog("Request $rm from $fU");

        if(is_method("INVITE")){
                xlog("USSD from $fU to $rU (Emergency number) CSeq is $cs ");
                sl_reply("200", "OK Trying USSD Phase 1");      #Generate 200 OK
                route("USSD_Response"); #Call USSD_Response route block
                exit;
        }
}

route["USSD_Response"]{
        xlog("USSD_Response Route");
        #Generate a new UAC Request
        $uac_req(method)="INFO";
        $uac_req(ruri)=$fu;     #Copy From URI to Request URI
        $uac_req(furi)=$tu;     #Copy To URI to From URI
        $uac_req(turi)=$fu;     #Copy From URI to To URI
        $uac_req(callid)=$ci;   #Copy Call-ID
                                #Set Content Type to 3GPP USSD
        $uac_req(hdrs)=$uac_req(hdrs) + "Content-Type: application/vnd.3gpp.ussd+xml\r\n";
                                #Set the USSD XML Response body
        $uac_req(body)="<?xml version='1.0' encoding='UTF-8'?>
        <ussd-data>
                <language value=\"en\"/>
                <ussd-string value=\"Bienvenido. Seleccione una opcion: 1 o 2.\"/>
        </ussd-data>";
        $uac_req(evroute)=1;    #Set the event route to use on return replies
        uac_req_send();         #Send it!
}
So the UAC module generates the 200 OK and sends it back.
“That was quick” I told myself, patting myself on the back before trying it out for the first time.
Huston, we have a problem – Although the Call-ID is the same, it’s not an in-dialog response as the tags aren’t present, this means our UE send back a 405 to the SIP INFO.
Right. Perhaps this is the time to read the Spec…
Okay, so the SIP INFO needs to be in dialog. Can we do that with the UAC module? Perhaps not…
But alas real life came back to rear its ugly head, and this adventure will have to continue another day…
Update: Thanks to a kindly provided PCAP I now know what I was doing wrong, and so we’ll soon have a follow up to this post named “Successes in cobbling together a USSD Gateway” just as soon as I have a weekend free.
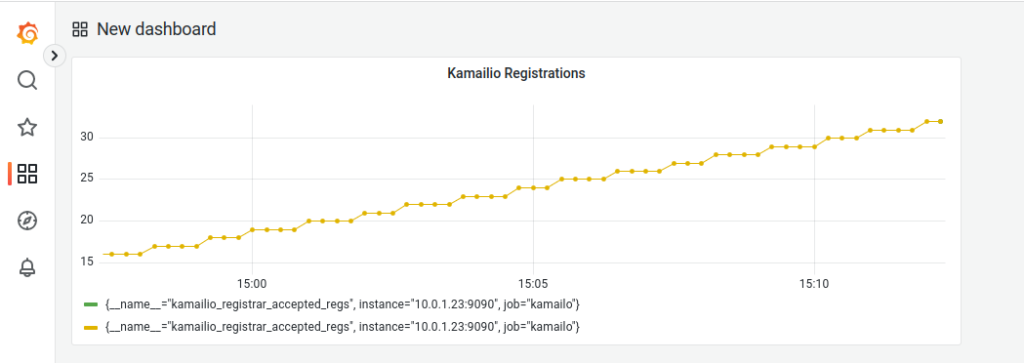
I recently fell in love with the Prometheus + Grafana combo, and I’m including it in as much of my workflow as possible, so today we’ll be integrating this with another favorite – Kamailio.
Why would we want to integrate Kamailio into Prometheus + Grafana? Observability, monitoring, alerting, cool dashboards to make it look like you’re doing complicated stuff, this duo have it all!
I’m going to assume some level of familiarity with Prometheus here, and at least a basic level of understanding of Kamailio (if you’ve never worked with Kamailio before, check out my Kamailio 101 Series, then jump back here).
So what will we achieve today?
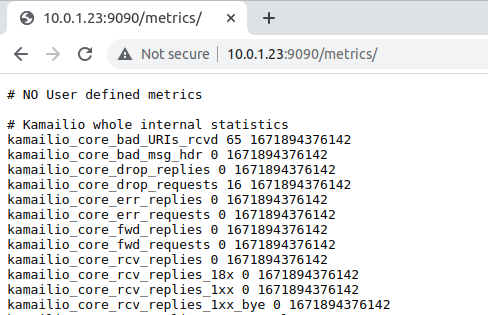
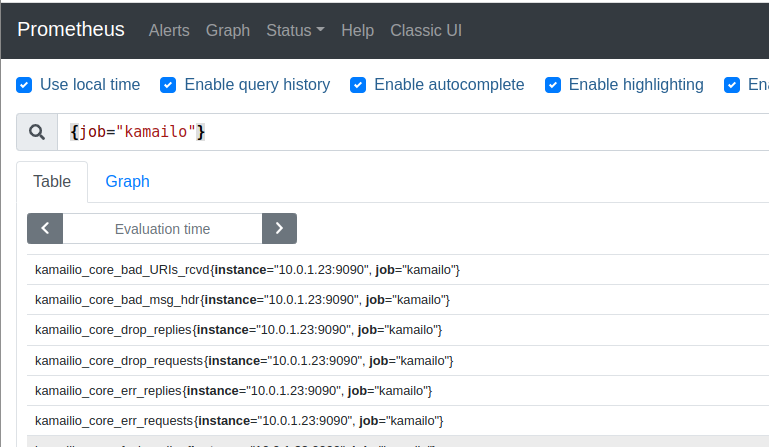
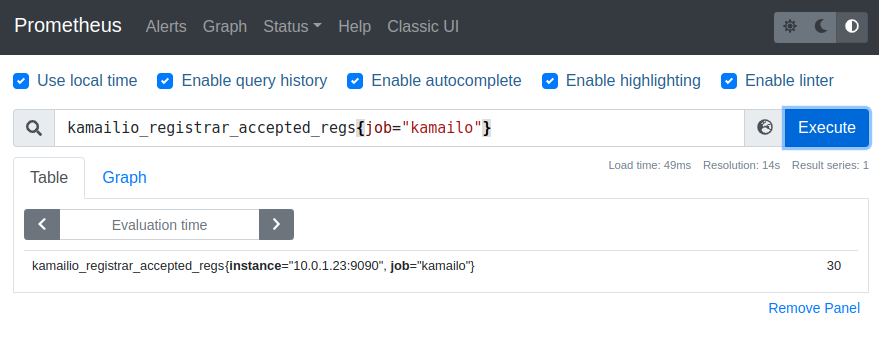
We’ll start with the simple SIP Registrar in Kamailio from this post, and we’ll add on the xhttp_prom module, and use it to expose some stats on the rate of requests, and responses sent to those requests.
So to get started we’ll need to load some extra modules, xhttp_prom module requires xhttp (If you’d like to learn the basics of xhttp there’s also a Kamailio Bytes – xHTTP Module post covering the basics) so we’ll load both.
xHTTP also has some extra requirements to load, so in the top of our config we’ll explicitly specify what ports we want to bind to, and set two parameters that control how Kamailio handles HTTP requests (otherwise you’ll not get responses for HTTP GET requests).
Then where you load all your modules we’ll load xhttp and xhttp_prom, and set the basic parameters:
loadmodule "xhttp.so"
loadmodule "xhttp_prom.so"

# Define two counters and a gauge
modparam("xhttp_prom", "xhttp_prom_stats", "all")
By setting xhttp_prom module to expose all stats, this exposes all of Kamailio’s internal stats as counters to Prometheus – This means we don’t need to define all our own counters / histograms / gauges, instead we can use the built in ones from Kamailio. Of course we can define our own custom ones, but we’ll do that in our next post.
Lastly we’ll need to add an event route to handle HTTP requests to the /metrics URL:
Recently I’ve been working on open source Diameter Routing Agent implementations (See my posts on FreeDiameter).
With the hurdles to getting a DRA working with open source software covered, the next step was to get all my Diameter traffic routed via the DRAs, however I soon rediscovered a Kamailio limitation regarding support for Diameter Routing Agents.
You see, when Kamailio’s C Diameter Peer module makes a decision as to where to route a request, it looks for the active Diameter peers, and finds a peer with the suitable Vendor and Application IDs in the supported Applications for the Application needed.
Unfortunately, a DRA typically only advertises support for one application – Relay.
This means if you have everything connected via a DRA, Kamailio’s CDP module doesn’t see the Application / Vendor ID for the Diameter application on the DRA, and doesn’t route the traffic to the DRA.
The fix for this was twofold, the first step was to add some logic into Kamailio to determine if the Relay application was advertised in the Capabilities Exchange Request / Answer of the Diameter Peer.
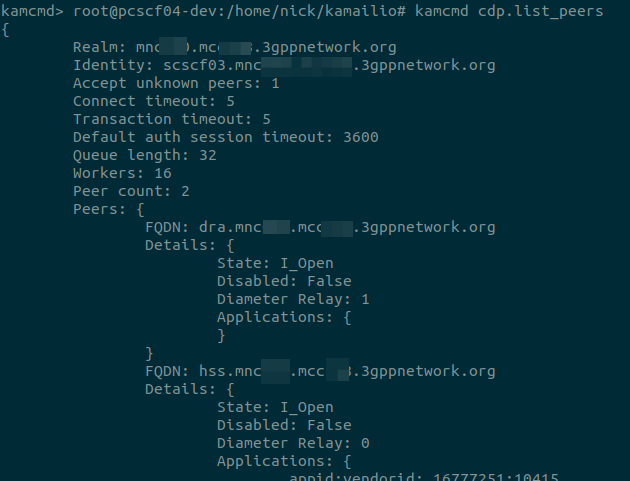
I added the logic to do this and exposed this so you can see if the peer supports Diameter relay when you run “cdp.list_peers”.
With that out of the way, next step was to update the routing logic to not just reject the candidate peer if the Application / Vendor ID for the required application was missing, but to evaluate if the peer supports Diameter Relay, and if it does, keep it in the game.
I added this functionality, and now I’m able to use CDP Peers in Kamailio to allow my P-CSCF, S-CSCF and I-CSCF to route their traffic via a Diameter Routing Agent.
What I typically refer to as Diameter interfaces / reference points, such as S6a, Sh, Sx, Sy, Gx, Gy, Zh, etc, etc, are also known as Applications.
Diameter Application Support
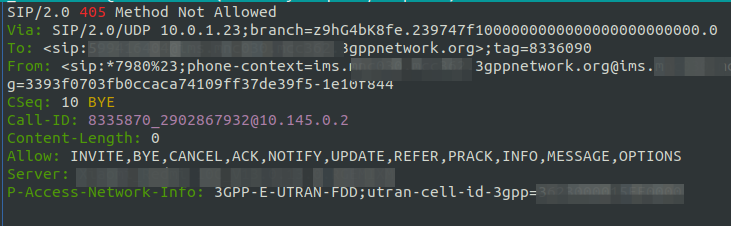
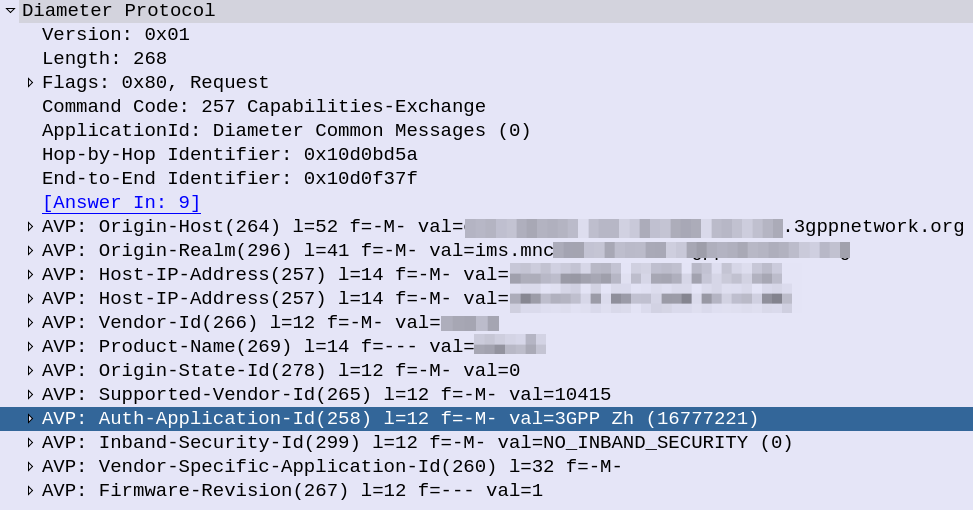
If you look inside the Capabilities Exchange Request / Answer dialog, what you’ll see is each side advertising the Applications (interfaces) that they support, each one being identified by an Application ID.
CER showing support for the 3GPP Zh Application-ID (Interface)
If two peers share a common Application-Id, then they can communicate using that Application / Interface.
For example, the above screenshot shows a peer with support for the Zh Interface (Spoiler alert, XCAP Gateway / BSF coming soon!). If two Diameter peers both have support for the Zh interface, then they can use that to send requests / responses to each other.
This is the basis of Diameter Routing.
Diameter Routing Tables
Like any router, our DRA needs to have logic to select which peer to route each message to.
For each Diameter connection to our DRA, it will build up a Diameter Routing table, with information on each peer, including the realm and applications it advertises support for.
Then, based on the logic defined in the DRA to select which Diameter peer to route each request to.
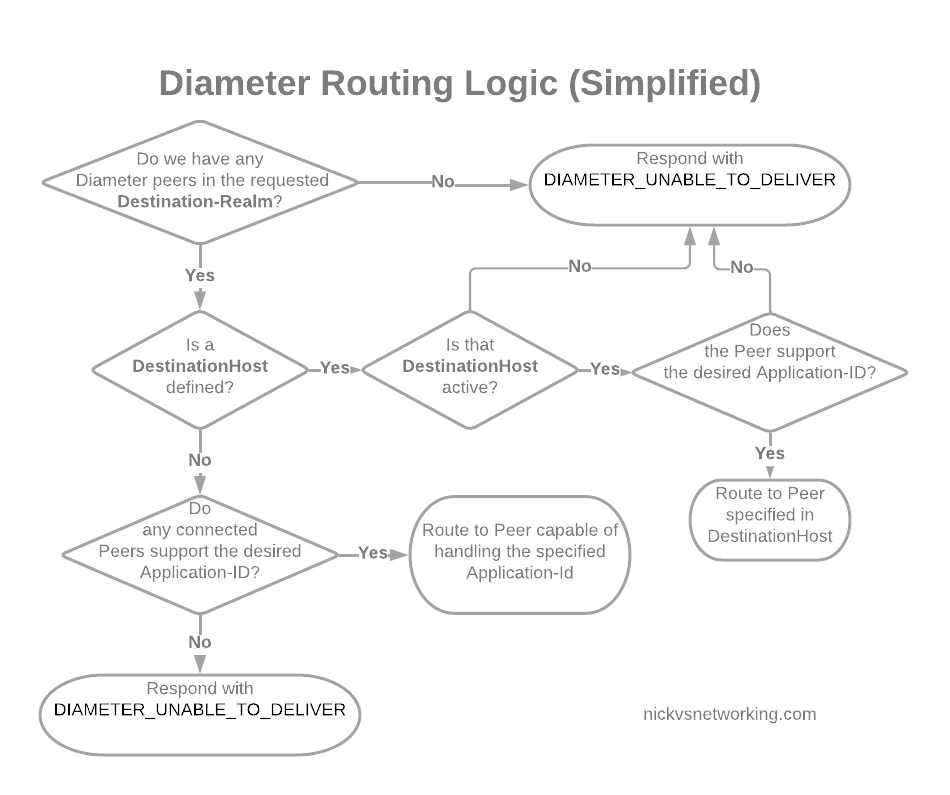
In its simplest form, Diameter routing is based on a few things:
Look at the DestinationRealm, and see if we have any peers at that realm
If we do then look at the DestinationHost, if that’s set, and the host is connected, and if it supports the specified Application-Id, then route it to that host
If no DestinationHost is specified, look at the peers we have available and find the one that supports the specified Application-Id, then route it to that host
Simplified Diameter Routing Table used by DRAs
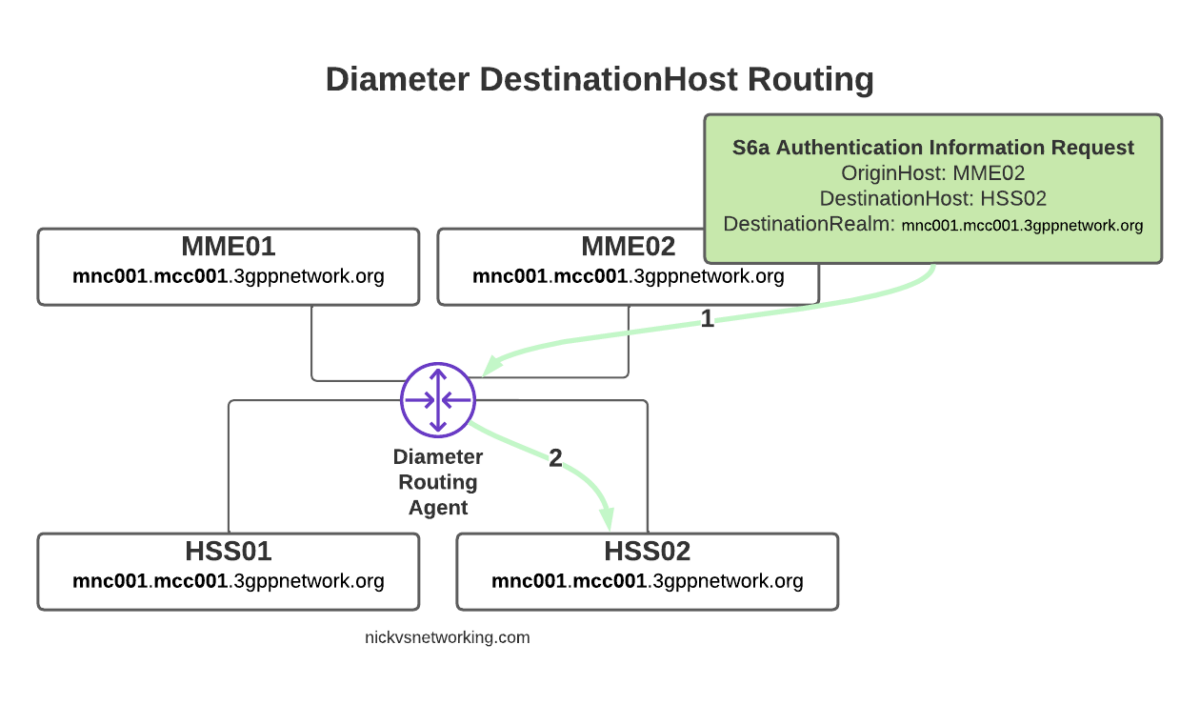
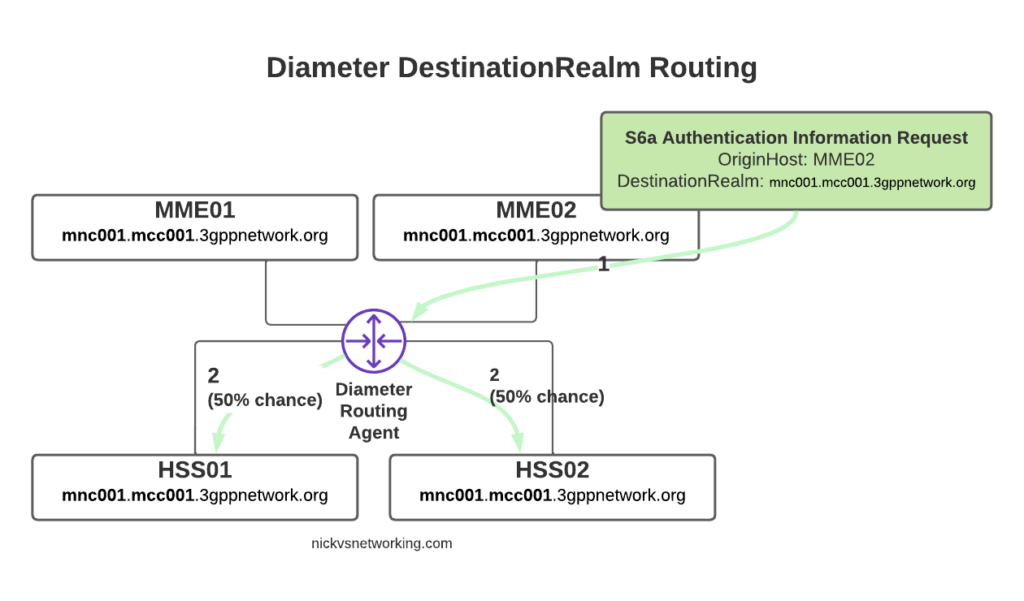
With this in mind, we can go back to looking at how our DRA may route a request from a connected MME towards an HSS.
Let’s look at some examples of this at play.
The request from MME02 is for DestinationRealm mnc001.mcc001.3gppnetwork.org, which our DRA knows it has 4 connected peers in (3 if we exclude the source of the request, as we don’t want to route it back to itself of course).
So we have 3 contenders still for who could get the request, but wait! We have a DestinationHost specified, so the DRA confirms the host is available, and that it supports the requested ApplicationId and routes it to HSS02.
So just because we are going through a DRA does not mean we can’t specific which destination host we need, just like we would if we had a direct link between each Diameter peer.
Conversely, if we sent another S6a request from MME01 but with no DestinationHost set, let’s see how that would look.
Again, the request is from MME02 is for DestinationRealm mnc001.mcc001.3gppnetwork.org, which our DRA knows it has 3 other peers it could route this to. But only two of those peers support the S6a Application, so the request would be split between the two peers evenly.
Clever Routing with DRAs
So with our DRA in place we can simplify the network, we don’t need to build peer links between every Diameter device to every other, but let’s look at some other ways DRAs can help us.
Load Control
We may want to always send requests to HSS01 and only use HSS02 if HSS01 is not available, we can do this with a DRA.
Or we may want to split load 75% on one HSS and 25% on the other.
Both are great use cases for a DRA.
Routing based on Username
We may want to route requests in the DRA based on other factors, such as the IMSI.
Our IMSIs may start with 001010001xxx, but if we introduced an MVNO with IMSIs starting with 001010002xxx, we’d need to know to route all traffic where the IMSI belongs to the home network to the home network HSS, and all the MVNO IMSI traffic to the MVNO’s HSS, and DRAs handle this.
Inter-Realm Routing
One of the main use cases you’ll see for DRAs is in Roaming scenarios.
For example, if we have a roaming agreement with a subscriber who’s IMSIs start with 90170, we can route all the traffic for their subs towards their HSS.
But wait, their Realm will be mnc901.mcc070.3gppnetwork.org, so in that scenario we’ll need to add a rule to route the request to a different realm.
DRAs handle this also.
In our next post we’ll start actually setting up a DRA with a default route table, and then look at some more advanced options for Diameter routing like we’ve just discussed.
One slight caveat, is that mutual support does not always mean what you may expect. For example an MME and an HSS both support S6a, which is identified by Auth-Application-Id 16777251 (Vendor ID 10415), but one is a client and one is a server. Keep this in mind!
If you work with IMS or Packet Core, there’s a good chance you need DNS to work, and it doesn’t always.
When I run traces, I’ve always found I get swamped with DNS traffic, UE traffic, OS monitoring, updates, etc, all combine into a big firehose – while my Wireshark filters for finding EPC and IMS traffic is pretty good, my achilles heel has always been filtering the DNS traffic to just get the queries and responses I want out of it.
Well, today I made that a bit better.
By adding this to your Wireshark filter:
dns contains 33:67:70:70:6e:65:74:77:6f:72:6b:03:6f:72:67:00
You’ll only see DNS Queries and Responses for domains at the 3gppnetwork.org domain.
This makes my traces much easier to read, and hopefully will do the same for you!
Bonus, here’s my current Wireshark filter for working EPC/IMS:
(diameter and diameter.cmd.code != 280) or (sip and !(sip.Method == "OPTIONS") and !(sip.CSeq.method == "OPTIONS")) or (smpp and (smpp.command_id != 0x00000015 and smpp.command_id != 0x80000015)) or (mgcp and !(mgcp.req.verb == "AUEP") and !(mgcp.rsp.rspcode == 500)) or isup or sccp or rtpevent or s1ap or gtpv2 or pfcp or (dns contains 33:67:70:70:6e:65:74:77:6f:72:6b:03:6f:72:67:00)
The Wiki on the Sangoma documentation page is really out of date and can’t be easily edited by the public, so here’s the skinny on how to setup a Sangoma transcoding card on a modern Debian system:
apt-get install libxml2* wget make gcc
wget https://ftp.sangoma.com/linux/transcoding/sng-tc-linux-1.3.11.x86_64.tgz
tar xzf sng-tc-linux-1.3.11.x86_64.tgz
cd sng-tc-linux-1.3.11.x86_64/
make
make install
cp lib/* /usr/local/lib/
ldconfig
At this point you should be able to check for the presence of the card with:
sngtc_tool -dev ens33 -list_modules
Where ens33 is the name of the NIC that the server that shares a broadcast domain with the transcoder.
Successfully discovering the Sangoma D150 transcoder
If instead you see something like this:
root@fs-131:/etc/sngtc#  sngtc_tool -dev ens33 -list_modules
Failed to detect and initialize modules with size 1
That means the server can’t find the transcoding device. If you’re using a D150 (The Ethernet enabled versions) then you’ve got to make sure that the NIC you specified is on the same VLAN / broadcast domain as the server, for testing you can try directly connecting it to the NIC.
I also found I had to restart the device a few times to get it to a “happy” state.
It’s worth pointing out that there are no LEDs lit when the system is powered on, only when you connect a NIC.
Next we’ll need to setup the sngtc_server so these resources can be accessed via FreeSWITCH or Asterisk.
Config is pretty simple if you’re using an all-in-one deployment, all you’ll need to change is the NIC in a file you create in /etc/sngtc/sngtc_server.conf.xml:
<configuration name="sngtc_server.conf" description="Sangoma Transcoding Manager Configuration">

        <settings>
                <!--
                By default the SOAP server uses a private local IP and port that will work for out of the box installations
                where the SOAP client (Asterisk/FreeSWITCH) and server (sngtc_server) run in the same box.
                However, if you want to distribute multiple clients across the network, you need to edit this values to
                listen on an IP and port that is reachable for those clients.
                <param name="bindaddr" value="0.0.0.0" />
                <param name="bindport" value="9000" />
                -->
        </settings>

        <vocallos>

                <!-- The name of the vocallo is the ethernet device name as displayed by ifconfig -->
                <vocallo name="ens33">
                        <!-- Starting UDP port for the vocallo -->
                        <param name="base_udp" value="5000"/>
                        <!-- Starting IP address octet to use for the vocallo modules -->
                        <param name="base_ip_octet" value="182"/>
                </vocallo>

        </vocallos>


</configuration>
With that set we can actually try starting the server,
Again, all going well you should see something like this in the log:
Well, there’s another concept I haven’t introduced yet, and that’s ChargerS, this is a concept / component we’ll dig into deeper for derived charging, but for now just know we need to add a ChargerS rule in order to get CDRs rated:
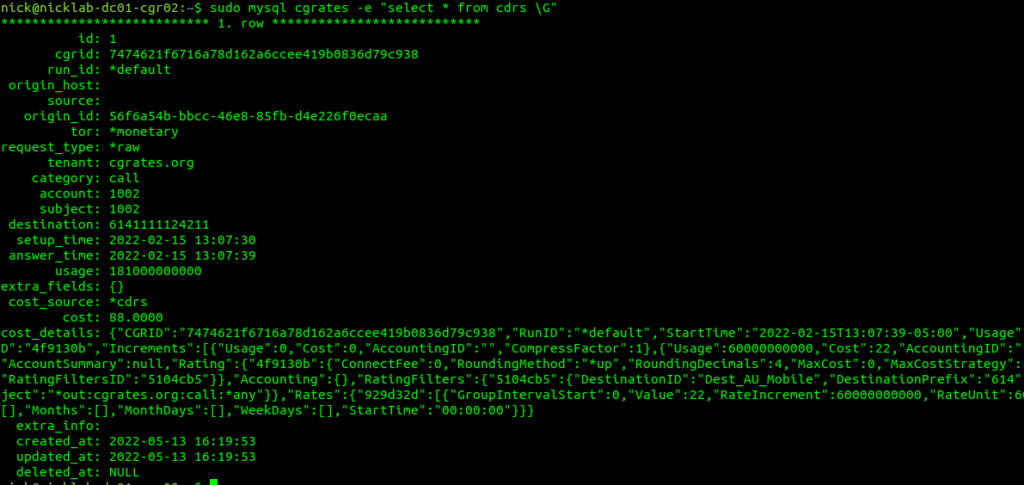
Well, if you’ve got CDR storage in StoreDB enabled (And you probably do if you’ve been following up until this point), then the answer is a MySQL table, and we can retrive the data with:
sudo mysql cgrates -e "select * from cdrs \G"
For those of you with a bit of MySQL experience under your belt, you’d be able to envisage using the SUM function to total a monthly bill for a customer from this.
Of course we can add CDRs via the API, and you probably already guessed this, but we can retrive CDRs via the API as well, filtering on the key criteria:
This would be useful for generating an invoice or populating recent calls for a customer portal.
Maybe creating rated CDRs and sticking them into a database is exactly what you’re looking to achieve in CGrateS – And if so, great, this is where you can stop – but for many use cases, there’s a want for an automated solution – For your platform to automatically integrate with CGrateS.
If you’ve got an Asterisk/FreeSWITCH/Kamailio or OpenSIPs based platform, then you can integrate CGrateS directly into your platform to add the CDRs automatically, as well as access features like prepaid credit control, concurrent call limits, etc, etc. The process is a little different on each of these platforms, but ultimately under the hood, all of these platforms have some middleware that generates the same API calls we just ran to create the CDR.
So far this tutorial has been heavy on teaching the API, because that’s what CGrateS ultimately is – An API service.
Our platforms like Asterisk and Kamailio with the CGrateS plugins are just CGrateS API clients, and so once we understand how to use and interact with the API it’s a breeze to plug in the module for your platform to generate the API calls to CGrateS required to integrate.
In our last post we introduced the CGrateS API and we used it to add Rates, Destinations and define DestinationRates.
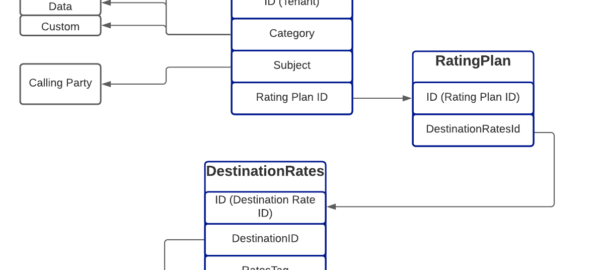
In this post, we’ll create the RatingPlan that references the DestinationRate we just defined, and the RatingProfile that references the RatingPlan, and then, as the cherry on top – We’ll rate some calls.
For anyone looking at the above diagram for the first time, you might be inclined to ask why what is the purpose of having all these layers?
This layered architecture allows all sorts of flexibility, that we wouldn’t otherwise have, for example, we can have multiple RatingPlans defined for the same Destinations, to allow us to have different Products defined, with different destinations and costs.
Likewise we can have multiple RatingProfiles assigned for the same destinations to allow us to generate multiple CDRs for each call, for example a CDR to bill the customer with and a CDR with our wholesale cost.
All this flexibility is enabled by the layered architecture.
Define RatingPlan
Picking up where we left off having just defined the DestinationRate, we’ll need to create a RatingPlan and link it to the DestinationRate, so let’s check on our DestinationRates:
From the output we can see we’ve got the DestinationRate defined, there’s a lot of info returned (I’ve left out most of it), but you can see the Destination, and the Rate associated with it is returned:
So after confirming that our DestinationRates are there, we’ll create a RatingPlan to reference it, for this we’ll use the APIerSv1.SetTPRatingPlan API call.
In our basic example, this really just glues the DestinationRate_AU object to RatingPlan_VoiceCalls.
It’s worth noting that you can use a RatingPlan to link to multiple DestinationRates, for example, we might want to have a different RatingPlan for each region / country, we can do that pretty easily too, in the below example I’ve referenced other Destination Rates (You’d go about defining the DestinationRates for these other destinations / rates the same way as we did in the last example).
One last step before we can test this all end-to-end, and that’s to link the RatingPlan we just defined with a RatingProfile.
StorDB & DataDB
Psych! Before we do that, I’m going to subject you to learning about backends for a while.
So far we’ve skirted around CGrateS architecture, but this is something we need to know for now.
To keep everything fast, a lot of data is cached in what is called a DataDB (if you’ve followed since part 1, then your DataDB is Redis, but there are other options).
To keep everything together, databases are used for storage, called StorDB (in our case we are using MySQL, but again, we can have other options) but calls to this database are minimal to keep the system fast.
If you’re an astute reader, you may have noticed many of our API calls have TP in method name, if the API call has TP in the name, it is storing it in the StoreDB, if it doesn’t, it means it’s storing it only in DataDB.
Why does this matter? Well, let’s look a little more closely and it will become clear:
ApierV1.SetRatingProfile will set the data only in DataDB (Redis), because it’s in the DataDB the change will take effect immediately.
ApierV1.SetTPRatingProfile will set the data only in StoreDB (MySQL), it will not take effect until it is copied from the database (StoreDB) to the cache (DataDB).
After we define the RatingPlan, we need to run this command prior to creating the RatingProfile, so it has something to reference, so we’ll do that by adding:
The last piece of the puzzle to define is the RatingProfile.
We define a few key things in the rating profile:
The Tenant – CGrateS is multitenant out of the box (in our case we’ve used tenant named “cgrates.org“, but you could have different tenants for different customers).
The Category – As we covered in the first post, CGrateS can bill voice calls, SMS, MMS & Data consumption, in this scenario we’re billing calls so we have the value set to *call, but we’ve got many other options. We can use Category to link what RatingPlan is used, for example we might want to offer a premium voice service with guaranteed CLI rates, using a different RatingPlan that charges more per call, or maybe we’re doing mobile and we want a different RatingPlan for use when Roaming, we can use Category to switch that.
The Subject – This is loosely the Source / Calling Party; in our case we’re using a wildcard value *any which will match any Subject
The RatingPlanActivations list the RatingPlanIds of the RatingPlans this RatingProfile uses
So let’s take a look at what we’d run to add this:
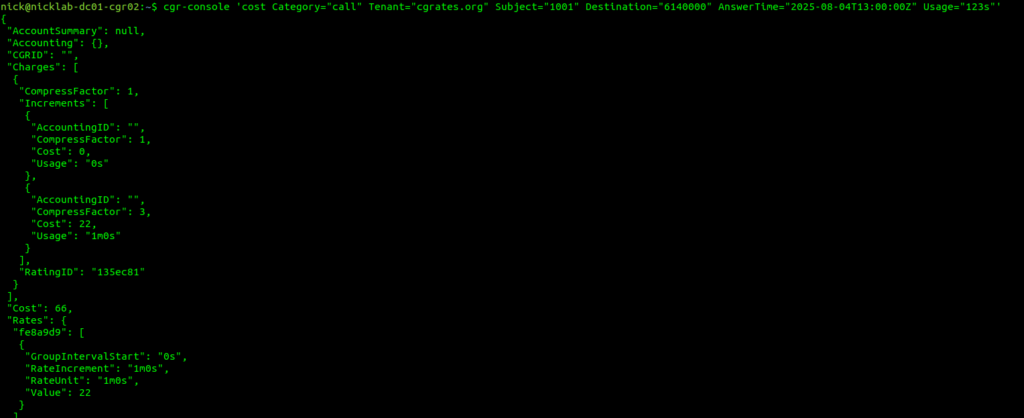
Okay, so at this point, all going well, we should have some data loaded, we’ve gone through all those steps to load this data, so now let’s simulate a call to a Mobile Number (22c per minute) for 123 seconds.