Tag Archives: HOMER

HOMER API in Python

We’re doing more and more network automation, and something that came up as valuable to us would be to have all the IPs in HOMER SIP Capture come up as the hostnames of the VM running the service.

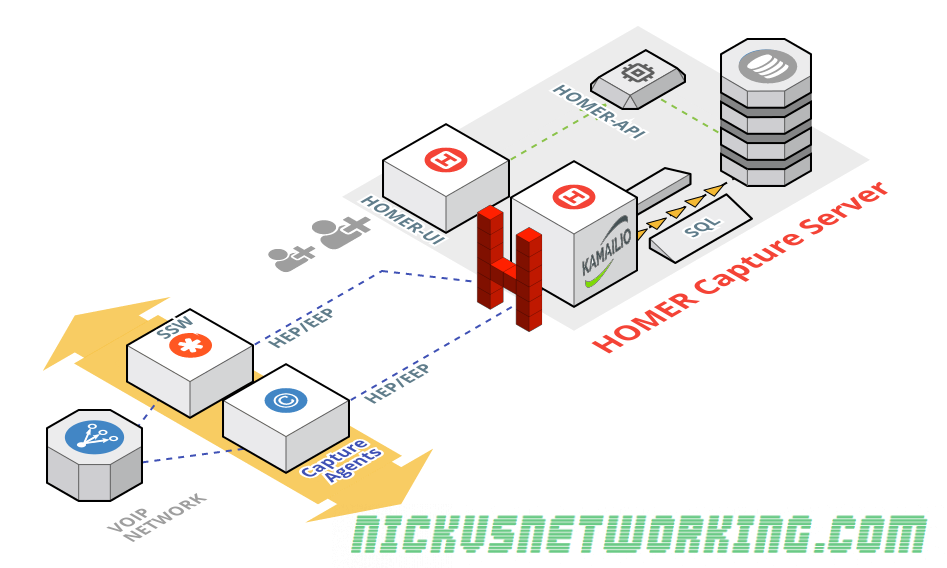
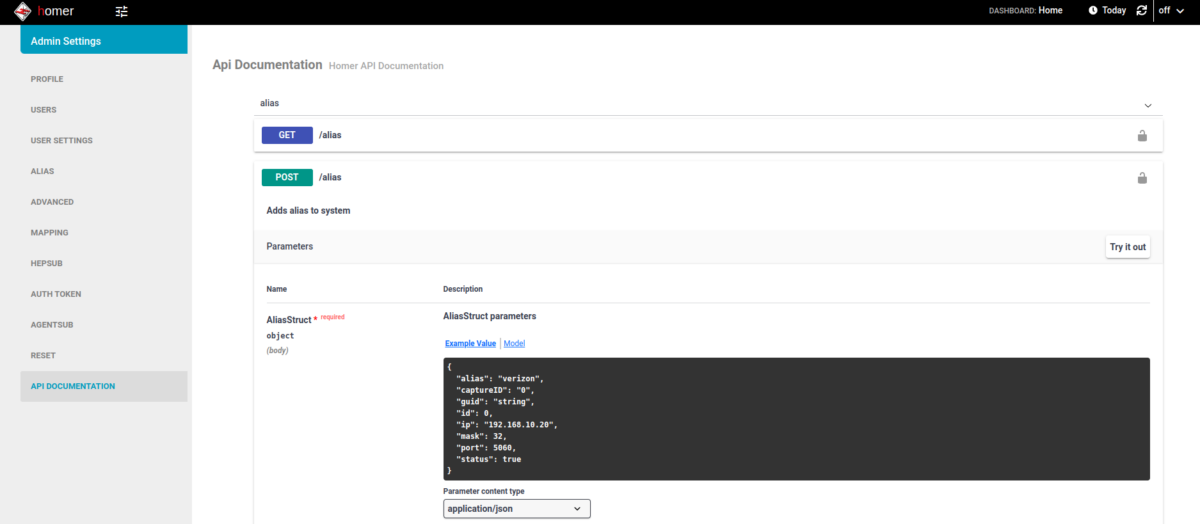
Luckily for us HOMER has an API for this ready to roll, and best of all, it’s Swagger based and easily documented (awesome!).

(Probably through my own failure to properly RTFM) I was struggling to work out the correct (current) way to Authenticate against the API service using a username and password.

Because the HOMER team are awesome however, the web UI for HOMER, is just an API client.

This means to look at how to log into the API, I just needed to fire up Wireshark, log into the Web UI via my browser and then flick through the packets for a real world example of how to do this.

Homer Login JSON body as seen by Wireshark

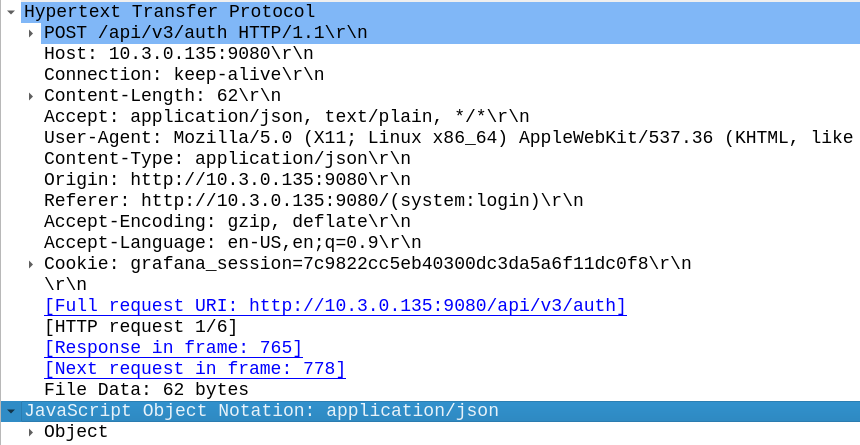
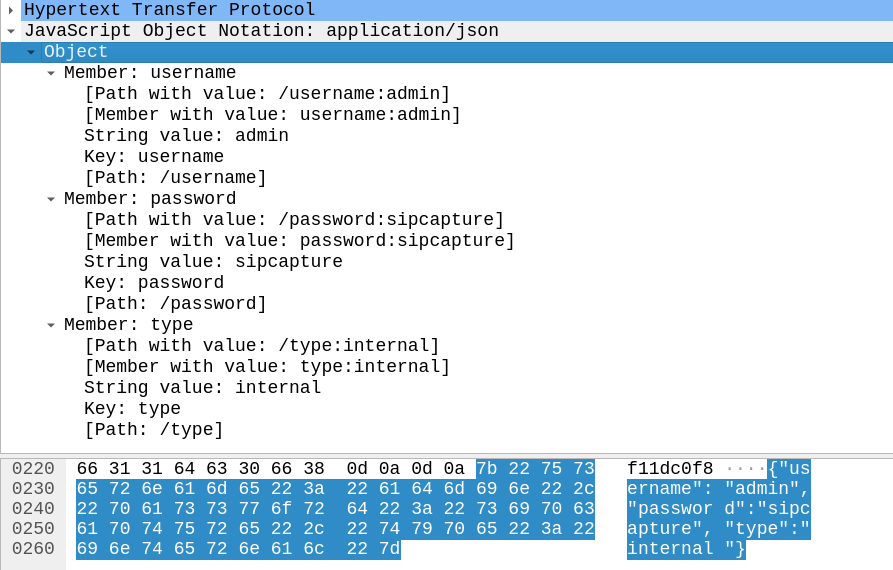
In the Login action I could see the browser posts a JSON body with the username and password to /api/v3/auth

{"username":"admin","password":"sipcapture","type":"internal"}

And in return the Homer API Server responds with a 201 Created an a auth token back:

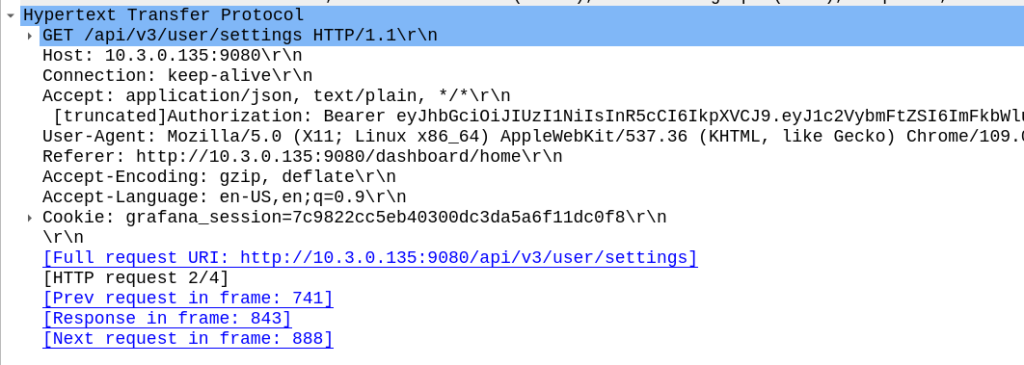
Now in order to use the API we just need to include that token in our Authorization: header then we can hit all the API endpoints we want!

For me, the goal we were setting out to achieve was to setup the aliases from our automatically populated list of hosts. So using the info above I setup a simple Python script with Requests to achieve this:

import requests
s = requests.Session()

#Login and get Token
url = 'http://homer:9080/api/v3/auth'
json_data = {"username":"admin","password":"sipcapture"}
x = s.post(url, json = json_data)
print(x.content)
token = x.json()['token']
print("Token is: " + str(token))


#Add new Alias
alias_json = {
          "alias": "Blog Example",
          "captureID": "0",
          "id": 0,
          "ip": "1.2.3.4",
          "mask": 32,
          "port": 5060,
          "status": True
        }

x = s.post('http://homer:9080/api/v3/alias', json = alias_json, headers={'Authorization': 'Bearer ' + token})
print(x.status_code)
print(x.content)


#Print all Aliases
x = s.get('http://homer:9080/api/v3/alias', headers={'Authorization': 'Bearer ' + token})
print(x.json())

And bingo we’re done, a new alias defined.

We wrapped this up in a for loop for each of the hosts / subnets we use and hooked it into our build system and away we go!

With the Homer API the world is your oyster in terms of functionality, all the features of the Web UI are exposed on the API as the Web UI just uses the API (something I wish was more common!).

Using the Swagger based API docs you can see examples of how to achieve everything you need to, and if you ever get stuck, just fire up Wireshark and do it in the Homer WebUI for an example of how the bodies should look.

Thanks to the Homer team at QXIP for making such a great product!

Setup HOMER SIP captagent and HEP processor on Ubuntu 18.04

There are a number of ways to feed Homer data, in this case we’re going to use Kamailio, which has a HEP module, so when we feed Kamailio SIP data it’ll use the HEP module to encapsulate it and send it to the database for parsing on the WebUI.

We won’t actually do any SIP routing with Kamailio, we’ll just use it to parse copies of SIP messages sent to it, encapsulate them into HEP and send them to the DB.

We’ll be doing this on the same box that we’re running the HomerUI on, if we weren’t we’d need to adjust the database parameters in Kamailio so it pushes the data to the correct MySQL database.

apt-get install kamailio* kamailio-mysql-modules captagent

Next we’ll need to configure Kamailio to capture data from captagent, for this we’ll use the provided config.

cp homer-api/examples/sipcapture/sipcapture.kamailio /etc/kamailio/kamailio.cfg

/etc/init.d/kamailio restart

Next we’ll need to configure captagent to capture data and feed it to Kamailio. There’s two things we’ll need to change from the default, the first is the interface we capture on (By default it’s eth0, but Ubuntu uses eth33 as the first network interface ID) and the second is the HEP destination we send our data to (By default it’s on 9061 but our Kamailio instance is listening on 9060).

We’ll start by editing captagent’s socket_pcap.xml file to change the interface we capture on:

vi /etc/captagent/socket_pcap.xml 
HOMER Captagent Interface Setup

Next we’ll edit the port that we send HEP data on

vi /etc/captagent/transport_hep.xml
Set HEP Port for Transport

And finally we’ll restart captagent

/etc/init.d/captagent

Now if we send SIP traffic to this box it’ll be fed into HOMER.

In most use cases you’d use a port mirror so you may need to define the network interface that’s the destination of the port mirror in socket_pcap.xml

Setup HOMER Web UI, API & DB on Ubuntu 18.04

HOMER is a popular open source SIP / RTP debug / recording tool.

It’s architecture is pretty straight forward, we have a series of Capture Agents feeding data into a central HOMER Capture Server, which runs a database (today we’re using MySQL), a Homer-UI (Running on Apache), a Homer-API (Also running on Apache) and a HEP processor, which takes the HEP encoded data from the Capture Agents and runs on Kamailio. (That’s right, I’m back rambling about Kamailio)

Homer data flow diagram

So this will get the web interface and DB backend of HOMER setup,

For HOMER to actually work you’ll need to feed it data, in the next tutorial we’ll cover configuring a capture agent to feed the HEP processor (Kamailio) which we’ll also setup, but for now we’ll just setup the web user interface for HOMER, API and Database.

Install Web Server Prerequisites

apt-get install apache2 php php-mysql mysql-server

git clone https://github.com/sipcapture/homer-api.git

git clone https://github.com/sipcapture/homer-ui.git

Configure Apache

cp homer-api/examples/web/homer5.apache /etc/apache2/sites-available/homer.conf

a2ensite homer
a2dissite 000-default

a2enmod rewrite

mkdir /var/log/httpd

systemctl reload apache2

Setup MySQL

mysql -u root < homer-api/sql/mysql/homer_databases.sql
mysql -u root < homer-api/sql/mysql/homer_user.sql
mysql -u root homer_data < homer-api/sql/mysql/schema_data.sql
mysql -u root homer_configuration < homer-api/sql/mysql/schema_configuration.sql
mysql -u root homer_statistic < homer-api/sql/mysql/schema_statistic.sql

Copy files to web server directory

mkdir /var/www/sipcapture
mkdir /var/www/sipcapture/htdocs
cp -r homer-ui/ /var/www/sipcapture/htdocs/
cp -r homer-api/api /var/www/sipcapture/htdocs/homer-ui/

Setup Rotation Script

mkdir /opt/sipcapture
cp homer-api/scripts/mysql/* /opt/sipcapture/
chmod +x /opt/sipcapture/*
apt-get install libdbi-perl libdbd-mysql-perl
/opt/sipcapture/homer_mysql_rotate
echo "30 3 * * * /opt/sipcapture/homer_mysql_rotate > /dev/null 2>&1" >> /etc/crontab

Copy default configuration files

cp /var/www/sipcapture/htdocs/homer-ui/api/preferences_example.php /var/www/sipcapture/htdocs/homer-ui/api/preferences.php
cp /var/www/sipcapture/htdocs/homer-ui/api/configuration_example.php /var/www/sipcapture/htdocs/homer-ui/api/configuration.php

Log in

http://yourip/homer-ui

Username: admin
Password: test123