I’ve written a playbook that provisions some server infrastructure, however one of the steps is to change the hostname.
A common headache when changing the hostname on a Linux machine is that if the hostname you set for the machine, isn’t in the machine’s /etc/hosts file, then when you run sudo su or su, it takes a really long time before it shows you the prompt as the machine struggles to do a DNS lookup for it’s own hostname and fails,
This becomes an even bigger problem when you’re using Ansible to setup these machines, Ansible times out when changing the hostname;
Simple fix, edit the /etc/ansible/ansible.cfg file and include
I wrote about using Ansible to automate Kamailio config management, Ansible is great at managing VMs or bare metal deployments, but for Containers using Docker to build and manage the deployments is where it’s at.
I’m going to assume you’ve got Docker in place, if not there’s heaps of info online about getting started with Docker.
The Dockerfile
The Kamailio team publish a Docker image for use, there’s no master branch at the moment, so you’ve got to specify the version; in this case kamailio:5.3.3-stretch.
Once we’ve got that we can start on the Dockerfile,
For this example I’m going to include
#Kamailio Test Stuff
FROM kamailio/kamailio:5.3.3-stretch

#Copy the config file onto the Filesystem of the Docker instance
COPY kamailio.cfg /etc/kamailio/

#Print out the current IP Address info
RUN ip add

#Expose port 5060 (SIP) for TCP and UDP
EXPOSE 5060
EXPOSE 5060/udp
Once the dockerfile is created we can build an image,
docker image build -t kamtest:0.1 .
And then run it,
docker run kamtest:0.1
Boom, now Kamailio is running, with the config file I pushed to it from my Dockerfile directory,
Now I can setup a Softphone on my local machine and point it to the IP of the Docker instance and away we go,
Where the real power here comes in is that I can run that docker run command another 10 times, and have another 10 Kamailio instannces running.
Tie this in with Kubernetes or a similar platform and you’ve got a way to scale and manage upgrades unlike anything you’d get on Bare Metal or VMs.
There’s always lots of talk of Network Function Virtualization (NFV) in the Telco space, but replacing custom hardware with computing resources is only going to get you so far, if every machine has to be configured manually.
Ansible is a topic I’ve written a little bit about in terms of network automation / orchestration.
I wanted to test limits of Open5gs EPC, which led me to creating a lot of Packet Gateways, so I thought I’d share a little Ansible Playbook I wrote for deploying P-GWs.
It dynamically sets the binding address and DHCP servers, and points to each PCRF in the defined pool.
You can obviously build upon this too, creating another playbook to deploy PCRFs, MMEs and S-GWs will allow you to reference the hosts in each group to populate the references.
logger:
    file: /var/log/open5gs/pgw.log

parameter:

pgw:
    freeDiameter: /etc/freeDiameter/pgw.conf
    gtpc:
      - addr: {{hostvars[inventory_hostname]['ansible_default_ipv4']['address']}}

    gtpu:
      - addr: {{hostvars[inventory_hostname]['ansible_default_ipv4']['address']}}

    ue_pool:
      - addr: 45.45.0.1/16
      - addr: cafe::1/64
    dns:
{% for dns in dns_servers %}
      - {{ dns }}
{% endfor %}
Diameter Config (pgw.conf.j2)
# This is a sample configuration file for freeDiameter daemon.

# Most of the options can be omitted, as they default to reasonable values.
# Only TLS-related options must be configured properly in usual setups.

# It is possible to use "include" keyword to import additional files
# e.g.: include "/etc/freeDiameter.d/*.conf"
# This is exactly equivalent as copy & paste the content of the included file(s)
# where the "include" keyword is found.


##############################################################
##  Peer identity and realm

# The Diameter Identity of this daemon.
# This must be a valid FQDN that resolves to the local host.
# Default: hostname's FQDN
#Identity = "aaa.koganei.freediameter.net";
Identity = "{{ inventory_hostname  }}.{{ diameter_realm }}";

# The Diameter Realm of this daemon.
# Default: the domain part of Identity (after the first dot).
#Realm = "koganei.freediameter.net";
Realm = "{{ diameter_realm }}";
##############################################################
##  Transport protocol configuration

# The port this peer is listening on for incoming connections (TCP and SCTP).
# Default: 3868. Use 0 to disable.
#Port = 3868;

# The port this peer is listening on for incoming TLS-protected connections (TCP and SCTP).
# See TLS_old_method for more information about TLS flavours.
# Note: we use TLS/SCTP instead of DTLS/SCTP at the moment. This will change in future version of freeDiameter.
# Default: 5868. Use 0 to disable.
#SecPort = 5868;

# Use RFC3588 method for TLS protection, where TLS is negociated after CER/CEA exchange is completed
# on the unsecure connection. The alternative is RFC6733 mechanism, where TLS protects also the
# CER/CEA exchange on a dedicated secure port.
# This parameter only affects outgoing connections.
# The setting can be also defined per-peer (see Peers configuration section).
# Default: use RFC6733 method with separate port for TLS.
#TLS_old_method;

# Disable use of TCP protocol (only listen and connect over SCTP)
# Default : TCP enabled
#No_TCP;

# Disable use of SCTP protocol (only listen and connect over TCP)
# Default : SCTP enabled
#No_SCTP;
# This option is ignored if freeDiameter is compiled with DISABLE_SCTP option.

# Prefer TCP instead of SCTP for establishing new connections.
# This setting may be overwritten per peer in peer configuration blocs.
# Default : SCTP is attempted first.
#Prefer_TCP;

# Default number of streams per SCTP associations.
# This setting may be overwritten per peer basis.
# Default : 30 streams
#SCTP_streams = 30;

##############################################################
##  Endpoint configuration

# Disable use of IP addresses (only IPv6)
# Default : IP enabled
#No_IP;

# Disable use of IPv6 addresses (only IP)
# Default : IPv6 enabled
#No_IPv6;

# Specify local addresses the server must bind to
# Default : listen on all addresses available.
#ListenOn = "202.249.37.5";
#ListenOn = "2001:200:903:2::202:1";
#ListenOn = "fe80::21c:5ff:fe98:7d62%eth0";
ListenOn = "{{hostvars[inventory_hostname]['ansible_default_ipv4']['address']}}";


##############################################################
##  Server configuration

# How many Diameter peers are allowed to be connecting at the same time ?
# This parameter limits the number of incoming connections from the time
# the connection is accepted until the first CER is received.
# Default: 5 unidentified clients in paralel.
#ThreadsPerServer = 5;

##############################################################
##  TLS Configuration

# TLS is managed by the GNUTLS library in the freeDiameter daemon.
# You may find more information about parameters and special behaviors
# in the relevant documentation.
# http://www.gnu.org/software/gnutls/manual/

# Credentials of the local peer
# The X509 certificate and private key file to use for the local peer.
# The files must contain PKCS-1 encoded RSA key, in PEM format.
# (These parameters are passed to gnutls_certificate_set_x509_key_file function)
# Default : NO DEFAULT
#TLS_Cred = "<x509 certif file.PEM>" , "<x509 private key file.PEM>";
#TLS_Cred = "/etc/ssl/certs/freeDiameter.pem", "/etc/ssl/private/freeDiameter.key";
TLS_Cred = "/etc/freeDiameter/pgw.cert.pem", "/etc/freeDiameter/pgw.key.pem";

# Certificate authority / trust anchors
# The file containing the list of trusted Certificate Authorities (PEM list)
# (This parameter is passed to gnutls_certificate_set_x509_trust_file function)
# The directive can appear several times to specify several files.
# Default : GNUTLS default behavior
#TLS_CA = "<file.PEM>";
TLS_CA = "/etc/freeDiameter/cacert.pem";

# Certificate Revocation List file
# The information about revoked certificates.
# The file contains a list of trusted CRLs in PEM format. They should have been verified before.
# (This parameter is passed to gnutls_certificate_set_x509_crl_file function)
# Note: openssl CRL format might have interoperability issue with GNUTLS format.
# Default : GNUTLS default behavior
#TLS_CRL = "<file.PEM>";

# GNU TLS Priority string
# This string allows to configure the behavior of GNUTLS key exchanges
# algorithms. See gnutls_priority_init function documentation for information.
# You should also refer to the Diameter required TLS support here:
#   http://tools.ietf.org/html/rfc6733#section-13.1
# Default : "NORMAL"
# Example: TLS_Prio = "NONE:+VERS-TLS1.1:+AES-128-CBC:+RSA:+SHA1:+COMP-NULL";
#TLS_Prio = "NORMAL";

# Diffie-Hellman parameters size
# Set the number of bits for generated DH parameters
# Valid value should be 768, 1024, 2048, 3072 or 4096.
# (This parameter is passed to gnutls_dh_params_generate2 function,
# it usually should match RSA key size)
# Default : 1024
#TLS_DH_Bits = 1024;

# Alternatively, you can specify a file to load the PKCS#3 encoded
# DH parameters directly from. This accelerates the daemon start
# but is slightly less secure. If this file is provided, the
# TLS_DH_Bits parameters has no effect.
# Default : no default.
#TLS_DH_File = "<file.PEM>";


##############################################################
##  Timers configuration

# The Tc timer of this peer.
# It is the delay before a new attempt is made to reconnect a disconnected peer.
# The value is expressed in seconds. The recommended value is 30 seconds.
# Default: 30
#TcTimer = 30;

# The Tw timer of this peer.
# It is the delay before a watchdog message is sent, as described in RFC 3539.
# The value is expressed in seconds. The default value is 30 seconds. Value must
# be greater or equal to 6 seconds. See details in the RFC.
# Default: 30
#TwTimer = 30;

##############################################################
##  Applications configuration

# Disable the relaying of Diameter messages?
# For messages not handled locally, the default behavior is to forward the
# message to another peer if any is available, according to the routing
# algorithms. In addition the "0xffffff" application is advertised in CER/CEA
# exchanges.
# Default: Relaying is enabled.
#NoRelay;

# Number of server threads that can handle incoming messages at the same time.
# Default: 4
#AppServThreads = 4;

# Other applications are configured by loaded extensions.

##############################################################
##  Extensions configuration

#  The freeDiameter framework merely provides support for
# Diameter Base Protocol. The specific application behaviors,
# as well as advanced functions, are provided
# by loadable extensions (plug-ins).
#  These extensions may in addition receive the name of a
# configuration file, the format of which is extension-specific.
#
# Format:
#LoadExtension = "/path/to/extension" [ : "/optional/configuration/file" ] ;
#
# Examples:
#LoadExtension = "extensions/sample.fdx";
#LoadExtension = "extensions/sample.fdx":"conf/sample.conf";

# Extensions are named as follow:
# dict_* for extensions that add content to the dictionary definitions.
# dbg_*  for extensions useful only to retrieve more information on the framework execution.
# acl_*  : Access control list, to control which peers are allowed to connect.
# rt_*   : routing extensions that impact how messages are forwarded to other peers.
# app_*  : applications, these extensions usually register callbacks to handle specific messages.
# test_* : dummy extensions that are useful only in testing environments.


# The dbg_msg_dump.fdx extension allows you to tweak the way freeDiameter displays some
# information about some events. This extension does not actually use a configuration file
# but receives directly a parameter in the string passed to the extension. Here are some examples:
## LoadExtension = "dbg_msg_dumps.fdx" : "0x1111"; # Removes all default hooks, very quiet even in case of errors.
## LoadExtension = "dbg_msg_dumps.fdx" : "0x2222"; # Display all events with few details.
## LoadExtension = "dbg_msg_dumps.fdx" : "0x0080"; # Dump complete information about sent and received messages.
# The four digits respectively control: connections, routing decisions, sent/received messages, errors.
# The values for each digit are:
#  0 - default - keep the default behavior
#  1 - quiet   - remove any specific log
#  2 - compact - display only a summary of the information
#  4 - full    - display the complete information on a single long line
#  8 - tree    - display the complete information in an easier to read format spanning several lines.

LoadExtension = "/usr/lib/x86_64-linux-gnu/freeDiameter/dbg_msg_dumps.fdx" : "0x8888";
LoadExtension = "/usr/lib/x86_64-linux-gnu/freeDiameter/dict_rfc5777.fdx";
LoadExtension = "/usr/lib/x86_64-linux-gnu/freeDiameter/dict_mip6i.fdx";
LoadExtension = "/usr/lib/x86_64-linux-gnu/freeDiameter/dict_nasreq.fdx";
LoadExtension = "/usr/lib/x86_64-linux-gnu/freeDiameter/dict_nas_mipv6.fdx";
LoadExtension = "/usr/lib/x86_64-linux-gnu/freeDiameter/dict_dcca.fdx";
LoadExtension = "/usr/lib/x86_64-linux-gnu/freeDiameter/dict_dcca_3gpp.fdx";


##############################################################
##  Peers configuration

#  The local server listens for incoming connections. By default,
# all unknown connecting peers are rejected. Extensions can override this behavior (e.g., acl_wl).
#
#  In addition to incoming connections, the local peer can
# be configured to establish and maintain connections to some
# Diameter nodes and allow connections from these nodes.
#  This is achieved with the ConnectPeer directive described below.
#
# Note that the configured Diameter Identity MUST match
# the information received inside CEA, or the connection will be aborted.
#
# Format:
#ConnectPeer = "diameterid" [ { parameter1; parameter2; ...} ] ;
# Parameters that can be specified in the peer's parameter list:
#  No_TCP; No_SCTP; No_IP; No_IPv6; Prefer_TCP; TLS_old_method;
#  No_TLS;       # assume transparent security instead of TLS. DTLS is not supported yet (will change in future versions).
#  Port = 5868;  # The port to connect to
#  TcTimer = 30;
#  TwTimer = 30;
#  ConnectTo = "202.249.37.5";
#  ConnectTo = "2001:200:903:2::202:1";
#  TLS_Prio = "NORMAL";
#  Realm = "realm.net"; # Reject the peer if it does not advertise this realm.
# Examples:
#ConnectPeer = "aaa.wide.ad.jp";
#ConnectPeer = "old.diameter.serv" { TcTimer = 60; TLS_old_method; No_SCTP; Port=3868; } ;
{% for pcrf in pcrf_hosts %}
ConnectPeer = "{{ pcrf }}" { ConnectTo = "{{ pcrf }}"; No_TLS; };
{% endfor %}


##############################################################
I’ve been working on a ePDG for VoWiFi access to my IMS core.
This has led to a bit of a deep dive into GTP (easy enough) and GTPv2 (Bit harder).
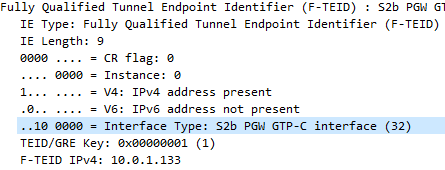
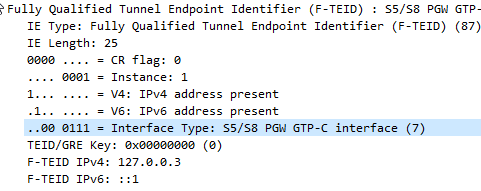
The Fully Qualified Tunnel Endpoint Identifier includes an information element for the Interface Type, identified by a two digit number.
Here we see S2b is 32
In the end I found the answer in 3GPP TS 29.274, but thought I’d share it here.
0
S1-U eNodeB GTP-U interface
1
S1-U SGW GTP-U interface
2
S12 RNC GTP-U interface
3
S12 SGW GTP-U interface
4
S5/S8 SGW GTP-U interface
5
S5/S8 PGW GTP-U interface
6
S5/S8 SGW GTP-C interface
7
S5/S8 PGW GTP-C interface
8
S5/S8 SGW PMIPv6 interface (the 32 bit GRE key is encoded in 32 bit TEID field and since alternate CoA is not used the control plane and user plane addresses are the same for PMIPv6)
9
S5/S8 PGW PMIPv6 interface (the 32 bit GRE key is encoded in 32 bit TEID field and the control plane and user plane addresses are the same for PMIPv6)
10
S11 MME GTP-C interface
11
S11/S4 SGW GTP-C interface
12
S10 MME GTP-C interface
13
S3 MME GTP-C interface
14
S3 SGSN GTP-C interface
15
S4 SGSN GTP-U interface
16
S4 SGW GTP-U interface
17
S4 SGSN GTP-C interface
18
S16 SGSN GTP-C interface
19
eNodeB GTP-U interface for DL data forwarding
20
eNodeB GTP-U interface for UL data forwarding
21
RNC GTP-U interface for data forwarding
22
SGSN GTP-U interface for data forwarding
23
SGW GTP-U interface for DL data forwarding
24
Sm MBMS GW GTP-C interface
25
Sn MBMS GW GTP-C interface
26
Sm MME GTP-C interface
27
Sn SGSN GTP-C interface
28
SGW GTP-U interface for UL data forwarding
29
Sn SGSN GTP-U interface
30
S2b ePDG GTP-C interface
31
S2b-U ePDG GTP-U interface
32
S2b PGW GTP-C interface
33
S2b-U PGW GTP-U interface
I also found how this data is encoded on the wire is a bit strange,
In the example above the Interface Type is 7,
This is encoded in binary which give us 111.
This is then padded to 6 bits to give us 000111.
This is prefixed by two additional bits the first denotes if IPv4 address is present, the second bit is for if IPv6 address is present.
Bit 1
Bit 2
Bit 3-6
IPv4 Address Present
IPv4 Address Present
Interface Type
1
1
000111
This is then encoded to hex to give us 87
Here’s my Python example;
interface_type = int(7)
interface_type = "{0:b}".format(interface_type).zfill(6)   #Produce binary bits
ipv4ipv6 = "10" #IPv4 only
interface_type = ipv4ipv6 + interface_type #concatenate the two
interface_type  = format(int(str(interface_type), 2),"x") #convert to hex
Despite the fact it’s 2020 there’s still a lot of folks in the world manually configuring boxes,
Ansible is a topic I could talk all day about, but in essence it’s kind of an automation framework, tell Ansible what to do one and it can spin you up two boxes, or two thousand boxes and manage the config on them.
I talked about DMQ, the Distributed Message Queue in a Kamailio Bytes post some time ago, and so as an example I’ll share an example playbook to Install Kamailio the lazy way from the Repos, and load the DMQ config with the IP Address and DMQ Address pulled from variables based on the host itself.
There’s a huge number of posts on installing and the basics of Ansible online, if you’re not familiar with Ansible already I’d suggest starting by learning the basics and then rejoining us.
The Hosts
Depending on if your hosts are running on bare metal, VMWare VMs or cloud based, I’m going to assume you’re working with a Debian system.
I’ve already got 3 servers ready to go, they’ve got sequential IP Addresses so I’ve added the range to my /etc/ansible/hosts file:
I’ve created the group kamailio and put the IP Address range 10.0.1.193 to 10.0.1.195 in there.
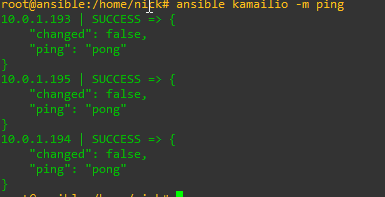
You will probably need to add the authentication info, such as passwords, private keys and privilege escalation details, but I’m going to assume you’ve already done that and you can run the ping module on each one:
ansible kamailio -m ping
Assuming that comes back OK and you can get into each one let’s move onto the Playbook.
The Playbook
There’s a few tasks we’ll get out of the way before we configure Kamailio,
The first of which is adding the Debian repo and the keys,
Next we’ll load a Kamailio config from a template that fills in our IP Address and Kamailio version, then we’ll install Kamailio,
Rather than talk you through each of the plays here’s a copy of my playbook:
---
- name: Configure Kamailio


  hosts: kamailio
  become: yes

  vars:
    kamailio_version: "53"
    debian_sources_dir: "/etc/apt/sources.list.d"

  tasks:


    - name: Add keys for Kamailio repo
      apt_key:
        url: http://deb.kamailio.org/kamailiodebkey.gpg
        state: present


    - name: Add repo to sources.list
      apt_repository:
        repo: deb http://deb.kamailio.org/kamailio{{kamailio_version}} {{hostvars[inventory_hostname]['ansible_lsb']['codename']}} main
                #The full list of Debian repos can be found at http://deb.kamailio.org/
                #The version is based off the versions listed there and the release is based on the codename of the Debian / Ubuntu release.
        state: present


    - name: Copy Config Template
                #Copies config from the template, fills in variables and uplaods to the server
      template:
        src: kamailio.cfg.j2
        dest: /etc/kamailio/kamailio.cfg
        owner: root
        group: root
        backup: yes
      register: config_changed

    - name: Install Kamailio
                #Updates cache (apt-get update) and then installs Kamailio
      apt:
        name: kamailio
        update_cache: yes
        state: present
      register: kamailio_installed_firstrun

    - name: Restart Kamailio if config changed
      service:
       name: kamailio
       state: restarted
      when: config_changed.changed

    - name: Start Kamailio if installed for the first time
      service:
       name: kamailio
       state: started
      when: kamailio_installed_firstrun.changed
Should be pretty straight forward to anyone who’s used Ansible before, but the real magic happens in the templatemodule. Let’s take a look;
Kamailio config in Jinja2 template
Pusing out static config is one thing, but things like IP Addresses, FQDNs and SSL certs may differ from machine to machine, so instead of just pushing one config, I’ve created a config and added some variables in Jinja2 format to the config, that will be filled with the value on the target when pushed out.
In the templatemodule of the playbook you can see I’ve specified the file kamailio.cfg.j2 this is just a regular Kamailio config file but I’ve added some variables, let’s look at how that’s done.
On the machine 10.0.1.194 we want it to listen on 10.0.1.194, we could put list 0.0.0.0 but this can lead to security concerns, so instead let’s specify the IP in the Jinja config,
By putting ansible_default_ipv4.address in two sets of curly brackets, this tells Ansible to fill in thes values from the template with the Ansible IPv4 Address of the target machine.
Let’s take a look on the 10.0.1.194’s actual kamailio.cfg file:
Let’s take another example,
To keep DMQ humming it makes sense to have different DMQ domains for different versions of Kamailio, so in the Kamailio config file template I’ve called the variable kamailio_versionin the DMQ address,
This means on a Kamailio 5.2 version this URL look like this on the boxes’ config:
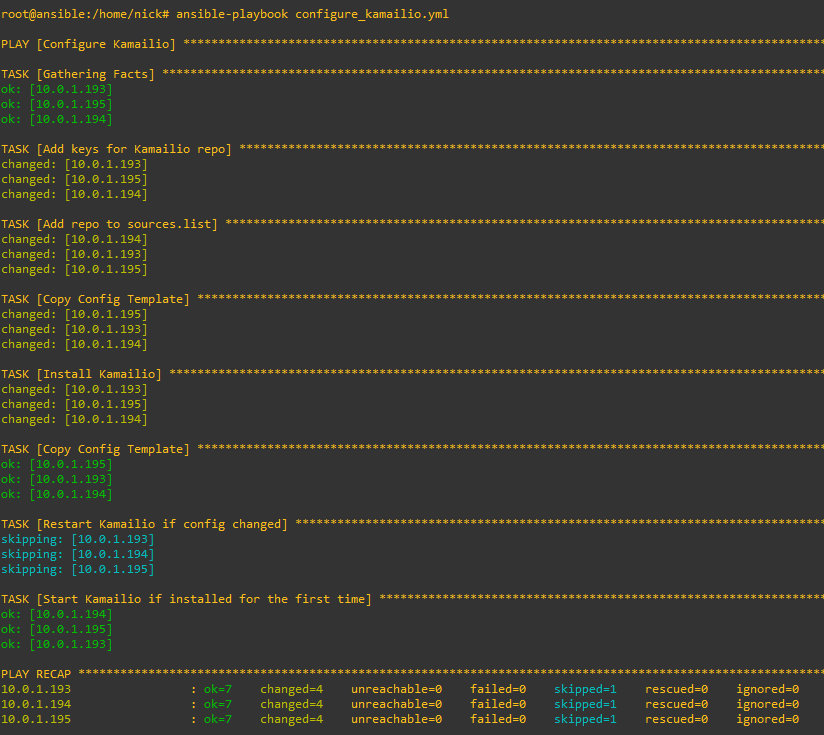
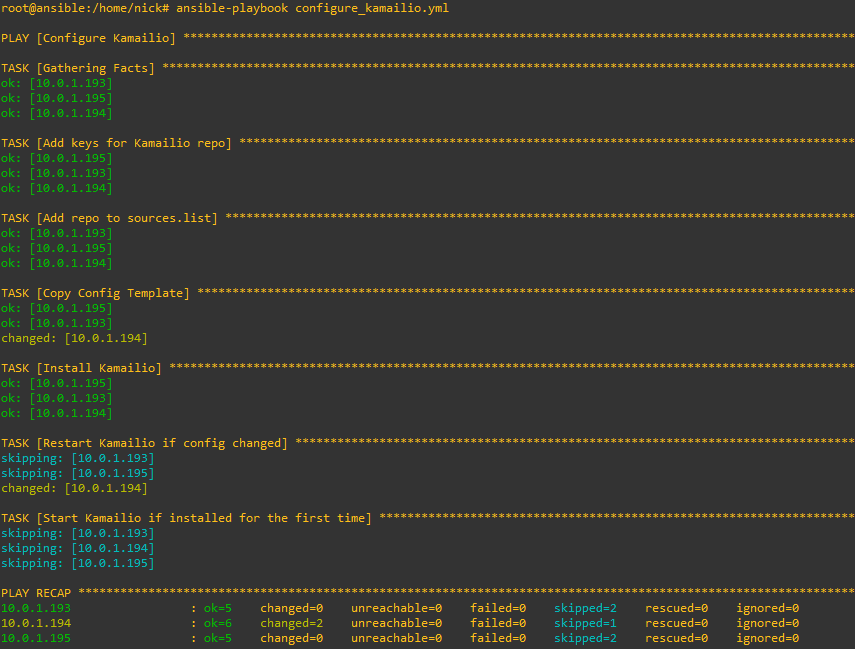
Running it is just a simple matter of calling ansible-playbook and pointing it at the playbook we created, here’s how it looks setting up the 3 hosts from their vanilla state:
The great thing about Kamailio is it’s omnipotent – This means it will detect if it needs to do each of the tasks specified in the playbook.
So if we run this again it won’t try and add the repo, GPG keys, install Kamailio and load the template, it’ll look and see each of those steps have already been done and skip each of them.
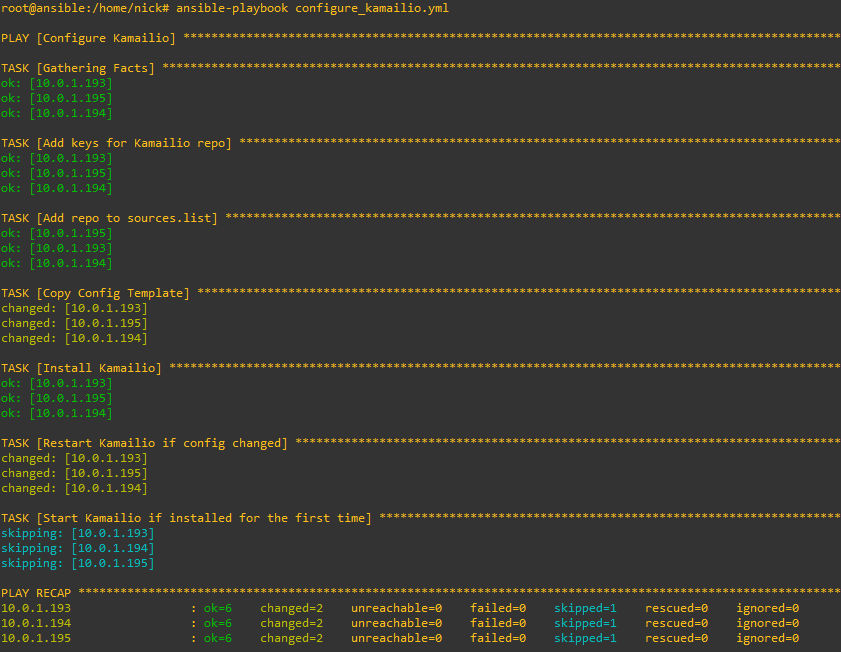
But what if someone makes some local changes on one of the boxes, let’s look at what happens:
Likewise now if we decide to change our config we only need to update the template file and Ansible will push it out to all our machines, I’ve added a comment into the Kamailio template, so let’s run it again and see the config pushed out to all the Kamailio instances and them restarting.
In my last post I talked about using KEMI in Kamailio and how you can integrate in a different programming language to handle your SIP request handling in a language you already know – Like Python!
Before we get too excited there’s some boilerplate we’ve got to add to our Python script, we need to create a class called kamailio and populate the class by defining some functions, we’ll define an __init__ to handle loading of the class, define a child_init for handling child processes, define ksr_request_route to handle the initial requests. We’ll also need to define a mod_init – outside of the Kamailio class to initialize the class.
import sys
import Router.Logger as Logger
import KSR as KSR

import requests

# global function to instantiate a kamailio class object
# -- executed when kamailio app_python module is initialized
def mod_init():
    KSR.info("===== from Python mod init\n");
    return kamailio();


# -- {start defining kamailio class}
class kamailio:
    def __init__(self):
        KSR.info('===== kamailio.__init__\n');


    # executed when kamailio child processes are initialized
    def child_init(self, rank):
        KSR.info('===== kamailio.child_init(%d)\n' % rank);
        return 0;


    # SIP request routing
    # -- equivalent of request_route{}
    def ksr_request_route(self, msg):
        KSR.info("===== request - from kamailio python script\n");
        KSR.dbg("method " + KSR.pv.get("$rm") + " r-uri " + KSR.pv.get("$ru"))
Most of these should be pretty self explanatory for anyone who’s done a bit more in-depth Python programming, but it’s no big deal if you don’t understand all this, the only part you need to understand is the ksr_request_route function.
ksr_request_route: translates to our request_route{} in the Kamailio native scripting language, all requests that come in will start off in this part.
Python Kamailio Routing
So let’s start to build upon this, so we’ll blindly accept all SIP registrations;
Here you’ll see we’ve added an if statement, as if we were doing any other If statement in Python, in this case we’re asking if the KSR.is_method(“REGISTER”), and if it is, we’ll send back a 200 OK response.
Let’s pause and talk about KSR
All the Kamailio bits we’ll use in Python will have the KSR. prefix, so let’s take a quick break here to talk about KSR. The KSR. functions are the KEMI functions we’ve exposed to Python.
Without them, we’re just writing Python, and we’d have to do all the functions provided by Kamailio nativeley in Python, which would be crazy.
So we leverage the Kamailio modules you know and love from Python using Python’s logic / programming syntax, as well as opening up the ability to pull in other libraries from Python.
Let’s look at how we might send a stateless reply,
There’s a module function to send a stateless reply;
KSR.sl.send_reply(200, "OK")
The vast majority of functions are abstracted as module functions, like the example above, but not all of them.
So every function doesn’t need to be wrapped up as a module, there’s also a way to call any function that you’d call from the native scripting language, wrapped up, kind of like an Exec command:
KSR.x.modf("sl_send_reply", "200", "OK");
So thanks to this we can call any Kamailio function from Python, even if it’s not explicitly in the KEMI abstraction.
Python Kamailio Routing (Continued)
So earlier we managed REGISTER requests and sent back a 200 OK response.
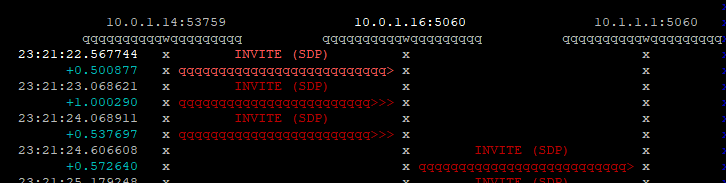
What about forwarding a SIP Request to another proxy? Let’s follow on with an elif statement to test if the method is an INVITE and statelessly forward it.
        elif KSR.is_method("INVITE"):
                #Lookup our public IP address
                try:
                    ip = requests.get('https://api.ipify.org').text
                except:
                    ip = "Failed to resolve"

                #Add that as a header
                KSR.hdr.append("X-KEMI: I came from KEMI at " + str(ip) + "\r\n");

                #Set host IP to 10.1.1.1
                KSR.sethost("10.1.1.1");

                #Forward the request on
                KSR.forward()
Now an incoming SIP invite will be proxied / forwarded to 10.1.1.1, all from Python.
But so far we’ve only done things in KEMI / Python that we could do in our native Kamailio scripting language, so let’s use some Python in our Python!
I utterly love the Python Requests library, so let’s use that to look up our public IP address and add it as a header to our forwarded SIP INVITE;
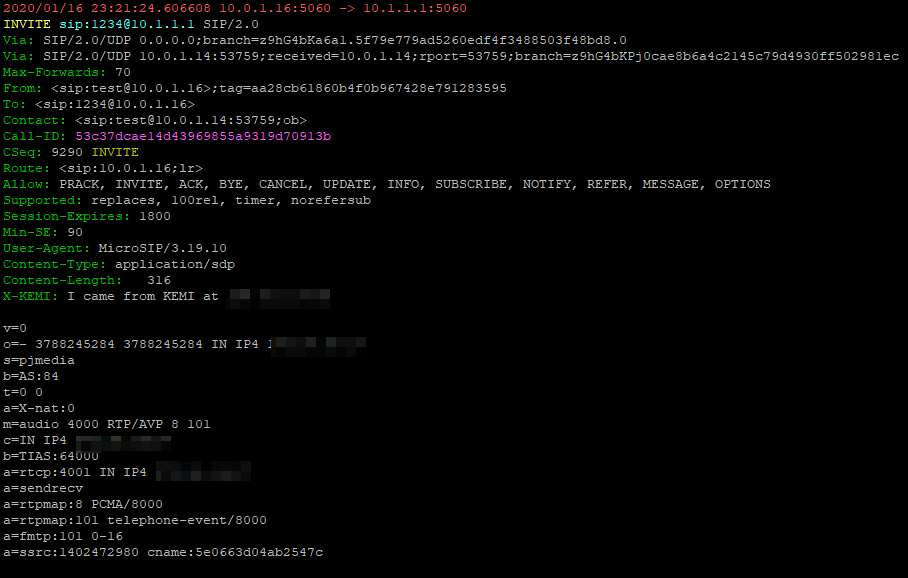
        elif KSR.is_method("INVITE"):
                #Lookup our public IP address
                try:
                    ip = requests.get('https://api.ipify.org').text
                except:
                    ip = "Failed to resolve"

                #Add that as a header
                KSR.hdr.append("X-KEMI: I came from KEMI at " + str(ip) + "\r\n");

                #Set host IP to 10.1.1.1
                KSR.sethost("10.1.1.1");

                #Forward the request on
                KSR.forward()
Bottom header is the X-KEMI custom header we included with our public IP
So let’s wrap this up a bit and handle any other request that’s not an INVITE or a REGISTER, with a 500 error code.
    # SIP request routing
    # -- equivalent of request_route{}
    def ksr_request_route(self, msg):

        KSR.dbg("method " + KSR.pv.get("$rm") + " r-uri " + KSR.pv.get("$ru"))


        if KSR.is_method("REGISTER"):
            KSR.sl.send_reply(200, "OK")

        elif KSR.is_method("INVITE"):
                #Lookup our public IP address
                try:
                    ip = requests.get('https://api.ipify.org').text
                except:
                    ip = "Failed to resolve"

                #Add that as a header
                KSR.hdr.append("X-KEMI: I came from KEMI at " + str(ip) + "\r\n");

                #Set host IP to 10.1.1.1
                KSR.sethost("10.1.1.1");

                #Forward the request on
                KSR.forward()
        else:
               KSR.sl.send_reply(500, "Got no idea...")
When learning to use Kamailio you might find yourself thinking about if you really want to learn to write a Kamailio configuration file, which is another weird scripting language to learn to achieve a task.
Enter KEMI – Kamailio Embedded Interface. KEMI allows you to abstract the routing logic to another programing language. In layman’s terms this means you can write your routing blocks, like request_route{}, reply_route{}, etc, in languages you already know – like Lua, JavaScript, Ruby – and my favorite – Python!
Why would you use KEMI?
Write in a language you already know;
You don’t need to learn how to do write complex routing logic in Kamailio’s native scripting language, you can instead do it in a language you’re already familiar with, writing your Routing Blocks in another programming language.
Change Routing on the Fly;
By writing the routing logic in KEMI allows you to change your routing blocks without having to restart Kamailio, something you can’t do with the “native” scripting language – This means you can change your routing live.
Note: This isn’t yet in place for all languages – Some still require a restart.
Leverage your prefered language’s libraries;
While Kamailio’s got a huge list of modules to interface with a vast number of different things, the ~200 Kamailio modules don’t compare with the thousands of premade libraries that exist for languages like Python, Ruby, JavaScript, etc.
Prerequisites
We’ll obviously need Kamailio installed, but we’ll also need the programming language we want to leverage setup (fairly obvious).
Configuring Kamailio to talk to KEMI
KEMI only takes care of the routing of SIP messages inside our routing blocks – So we’ve still got the Kamailio cfg file (kamailio.cfg) that we use to bind and setup the service as required, load the modules we want and configure them.
Essentially we need to load the app for the language we use, in this example we’ll use app_python3.so and use that as our Config Engine.
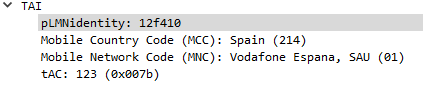
The PLMN Identifier is used to identify the radio networks in use, it’s made up of the MCC – Mobile Country Code and MNC – Mobile Network Code.
But sadly it’s not as simple as just concatenating MCC and MNC like in the IMSI, there’s a bit more to it.
In the example above the Tracking Area Identity includes the PLMN Identity, and Wireshark has been kind enough to split it out into MCC and MNC, but how does it get that from the value 12f410?
This one took me longer to work out than I’d like to admit, and saw me looking through the GSM spec, but here goes:
PLMN Contents: Mobile Country Code (MCC) followed by the Mobile Network Code (MNC). Coding: according to TS GSM 04.08 [14].
If storage for fewer than the maximum possible number n is required, the excess bytes shall be set to ‘FF’. For instance, using 246 for the MCC and 81 for the MNC and if this is the first and only PLMN, the contents reads as follows: Bytes 1-3: ’42’ ‘F6′ ’18’ Bytes 4-6: ‘FF’ ‘FF’ ‘FF’ etc.
TS GSM 04.08 [14].
Making sense to you now? Me neither.
Here’s the Python code I wrote to encode MCC and MNCs to PLMN Identifiers and to decode PLMN into MCC and MNC, and then we’ll talk about what’s happening:
In the above example I take MCC 505 (Australia) and MCC 93 and generate the PLMN ID 05f539.
The first step in decoding is to take the first two bits (in our case 05 and reverse them – 50, then we take the third and fourth bits (f5) and reverse them too, and strip the letter f, now we have just 5. We join that with what we had earlier and there’s our MCC – 505.
Next we get our MNC, for this we take bytes 5 & 6 (39) and reverse them, and there’s our MNC – 93.
Together we’ve got MCC 505 and MNC 93.
The one answer I’m still looking for; why not just encode 50593? What is gained by encoding it as 05f539?
After a few quiet months I’m excited to say I’ve pushed through some improvements recently to PyHSS and it’s growing into a more usable HSS platform.
MongoDB Backend
This has a few obvious advantages – More salable, etc, but also opens up the ability to customize more of the subscriber parameters, like GBR bearers, etc, that simple flat text files just wouldn’t support, as well as the obvious issues with threading and writing to and from text files at scale.
Knock knock.
Race condition.
Who’s there?
— Threading Joke.
For now I’m using the Open5GS MongoDB schema, so the Open5Gs web UI can be used for administering the system and adding subscribers.
The CSV / text file backend is still there and still works, the MongoDB backend is only used if you enable it in the YAML file.
The documentation for setting this up is in the readme.
SQN Resync
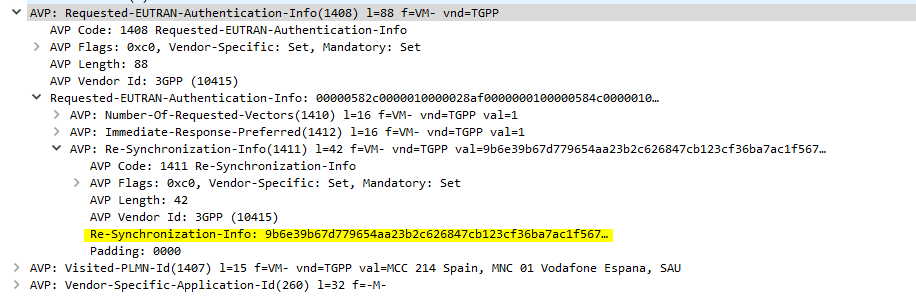
If you’re working across multiple different HSS’ or perhaps messing with some crypto stuff on your USIM, there’s a chance you’ll get the SQN (The Sequence Number) on the USIM out of sync with what’s on the HSS.
This manifests itself as an Update Location Request being sent from the UE in response to an Authentication Information Answer and coming back with a Re-Syncronization-Info AVP in the Authentication Info AVP. I’ll talk more about how this works in another post, but in short PyHSS now looks at this value and uses it combined with the original RAND value sent in the Authentication Information Answer, to find the correct SQN value and update whichever database backend you’re using accordingly, and then send another Authentication Information Answer with authentication vectors with the correct SQN.
SQN Resync is something that’s really cryptographically difficult to implement / confusing, hence this taking so long.
What’s next? – IMS / Multimedia Auth
The next feature that’s coming soon is the Multimedia Authentication Request / Answer to allow CSCFs to query for IMS Registration and manage the Cx and Dx interfaces.
Code for this is already in place but failing some tests, not sure if that’s to do with the MAA response or something on my CSCFs,
Note: NextEPC the Open Source project rebranded as Open5Gs in 2019 due to a naming issue. The remaining software called NextEPC is a branch of an old version of Open5Gs. This post was written before the rebranding.
I’ve been working for some time on Private LTE networks, the packet core I’m using is NextEPC, it’s well written, flexible and well supported.
I joined the Open5Gs group and I’ve contributed a few bits and pieces to the project, including a Python wrapper for adding / managing subscribers in the built in Home Subscriber Server (HSS).
Basic Python library to interface with MongoDB subscriber DB in NextEPC HSS / PCRF. Requires Python 3+, mongo, pymongo and bson. (All available through PIP)
If you are planning to run this on a different machine other than localhost (the machine hosting the MongoDB service) you will need to enable remote access to MongoDB by binding it’s IP to 0.0.0.0:
This is done by editing /etc/mongodb.conf and changing the bind IP to: bind_ip = 0.0.0.0
RTPengine has an API / control protocol, which is what Kamailio / OpenSER uses to interact with RTPengine, called the ng Control Protocol.
Connection is based on Bencode encoded data and communicates via a UDP socket.
I wrote a simple Python script to pull active calls from RTPengine, code below:
#Quick Python library for interfacing with Sipwise's fantastic rtpengine - https://github.com/sipwise/rtpengine
#Bencode library from https://pypi.org/project/bencode.py/ (Had to download files from webpage (PIP was out of date))

import bencode
import socket
import sys
import random
import string

sock = socket.socket(socket.AF_INET, socket.SOCK_DGRAM)
server_address = ('188.0.169.13', 2224)     #Your server address

cookie = "0_2393_6"
data = bencode.encode({'command': 'list'})

message = str(cookie) + " " + str(data)
print(message)


sent = sock.sendto(message, server_address)

print('waiting to receive')
data, server = sock.recvfrom(4096)
print('received "%s"' % data)
data = data.split(" ", 1)       #Only split on first space
print("Cookie is: " + str(data[0]))
print("Data is: " + str(bencode.decode(data[1])))
print("There are " + str(len(bencode.decode(data[1])['calls'])) + " calls up on RTPengine at " + str(server_address[0]))
for calls in bencode.decode(data[1])['calls']:
    print(calls)
    cookie = "1_2393_6"
    data = bencode.encode({'command': 'query', 'call-id': str(calls)})
    message = str(cookie).encode('utf-8') + " ".encode('utf-8') + str(data).encode('utf-8')
    sent = sock.sendto(message, server_address)
    print('\n\nwaiting to receive')
    data, server = sock.recvfrom(8192)

    data = data.split(" ", 1)       #Only split on first space
    bencoded_data = bencode.decode(data[1])

    for keys in bencoded_data:
        print(keys)
        print("\t" + str(bencoded_data[keys]))

sock.close()
I recently started working on an issue that I’d seen was to do with the HSS response to the MME on an Update Location Answer.
I took some Wireshark traces of a connection from the MME to the HSS, and compared that to a trace from a different HSS. (Amarisoft EPC/HSS)
The Update Location Answer sent by the Amarisoft HSS to the MME over the S6a (Diameter) interface includes an AVP for “Multiple APN Configuration” which has the the dedicated bearer for IMS, while the HSS in the software I was working on didn’t.
After a bit of bashing trying to modify the S6a responses, I decided I’d just implement my own Home Subscriber Server.
If you’d like to write your own software using SCTP there’s a fantastic SCTP sockets library from P1 Security that makes this easy as any other socket programming.
Take a look at the super simple client-server I made:
What is ASN.1 and why is it so hard to find a good explanation or example?
ISO, IEC & ITU-T all got together and wrote a standard for describing data transmitted by telecommunications protocols, it’s used by many well known protocols X.509 (SSL), LDAP, SNMP, LTE which all rely on ASN.1 to encode data, transmit it, and then decode it, reliably and efficiently.
Overview
Let’s take this XML encoded data:
<?xml version="1.0" encoding="UTF-8"?>
<Message>
  <number>61412341234</number>
  <text>Hello my friend!</text>
</Message>
As you can see it’s human readable and pretty clear.
But what if we split this in two, had the definitions in one file and the values in another:
Definitions:
Here we’ll describe each of our fields
Message: Number – Intiger- Destination of Message Text – String – Message to be sent
Values:
Now we’ll list the values.
61412341234
Hello my friend!
By taking the definitions out our data is now 28 bytes, instead of 122, so we’re a fraction of the size on the wire (becomes important if you’re sending this data all the time or with a limited link budget), and we’ve also defined the type of each value as well, so we know we shouldn’t have an integer as the heading for example, we can see it’s a string.
The sender and the receiver both have a copy of the definitions, so everyone is clear on where we stand in terms of what each field is, and the types of values we encode. As a bonus we’re down to less than 1/4 of our original size. Great!
That’s ASN.1 in a nutshell, but let’s dig a little deeper and use a real example.
ASN.1 IRL
Now let’s actually encode & decode some data.
I’ll be using asn1tools a Python library written by Erik Moqvist, you can add it through pip:
pip install asn1tools
We’ll create a new text file and put our ASN.1 definitions into it, so let’s create a new file called foo.asn which will contain our definitions in ASN.1 format:
HelloWorld DEFINITIONS ::= BEGIN
     Message ::= SEQUENCE {
         number      INTEGER,
         text        UTF8String
     }
 END
Copy and paste that into foo.asn and now we’ve got a definition, with a Module called Message containing a field called number (which is an integer) and a filed called text (which is a string).
Now let’s fire up our python shell in the same directory as our new file:
>>import asn1tools
>>foo = asn1tools.compile_files('foo.asn')
>>encoded = foo.encode('Message',  {'number': 61412341234, 'text': u'Hello my friend!'})
>>encoded
    bytearray(b'0\x19\x02\x05\x0eLu\xf5\xf2\x0c\x10Hello my friend!')
(You’ll need to run this in the Python shell, else it’ll just output encoded as plain text and not as a Byte Array as above)
So now we’ve encoded our values (number = 2 and text = ‘Hi!’) into bytes, ready to be sent down the wire and decoded at the other end. Not exactly human friendly but efficient and well defined.
So there you have it, an introduction to ASN1, how to encode & decode data.
We can grow our definitions (in the .asn file) and so long as both ends have the same definitions and you’re encoding the right stuff, you’ll be set.
Further Reading
There’s a whole lot more to ASN1 – Like how you encode the data, how to properly setup your definitions etc, but hopefully you understand what it actually does now.
SIP was written to be fast and resonably lightweight.
Motorola StarTAC
At the time SIP was created in 1996, Motorola just had launched it’s first flip phone, the web was only 100,000 websites online and I was playing Pokémon.
Security wasn’t so much an afterthought, but rather not something everyone was as conscious of as they are today.
UDP is the protocol of choice for most SIP deployments, which opens it up for Message Amplification attacks.
As the world saw a few years back with DNS Amplification attacks (Good explanation of how Message Amplification works courtesy of Cloudflare), amplification attacks are enabled by DNS requests being smaller than DNS responses, and carrier networks that don’t verify the source of their traffic allowing someone to request a DNS lookup saying they’re from an IP that isn’t theirs, and that IP getting flooded.
SIP is vulnerable to this too, not exactly zero-day exploits, but something that hasn’t been looked at outside of the theoretical sphere, so I thought I’d roll up my sleeves and see how bad it can look.
For starters it’s worth remembering for a Message Amplification attack to work, it’s got to amplify. RF Engineering will teach you that amplification is the ratio of power in to power out, and it’s the same for Message Amplification, the size of the packet we send has to be smaller than the packet received, else we’re just using someone else to do our dirty work, but not amplifying.
Typical Response Sizes
These are small SIP messages I created in Python using sockets, they’re not the absolute smallest you could go, but they were as small as I could go and still get through the basic packet validation / sanity checks.
Some SIP Proxies drop traffic missing required headers while some don’t, I’ve included the required headers.
I’ve pointed the traffic at a Kamailio instance and measured the bytes sent vs bytes returned.
Method
Request Size (bytes)
Response Size (bytes)
Gain
OPTIONS
168
209
1.2x
REGISTER
380
411
1x
INVITE
197
377
1.9x
Content Length Mismatch
339
400 Missing Required Header in Request
300
Max Forwards Exceeded
213
So the best we can get is a packet 1.9 times the size of the packet we put in, which means SIP isn’t the best for Message Amplification attacks, but passable, so long as it keeps responding.
INVITE gets our best amplification and we can tune this to get the request smaller.
The Workhorse
Carrier grade SIP servers are pretty powerful machines, able to handle huge amounts of traffic, quite literally hundreds of millions a day, generally split across geographic areas and clustered, all on high quality low loss, low latency IP links.
If you have 20,000 subscribers sending a keep alive every 60 seconds, you’re at 72 million dialogs consisting of two packets each (144,000,000 SIP messages).
So after some stripping down I managed to get a valid INVITE that would be responded too with an auth challenge (407 Proxy Authentication Required) which was 125 bytes on the wire, while the response was 330, giving me a gain of 2.64 times what I put in. (I send 125 bytes, I get back 330)
The Setup
We’ve got 3 IPs we’re dealing with here,
Our victim is on 10.0.1.15. UDP port 5060 won’t even be open for this poor fellow, but he’ll get flooded.
Next is our attacker who’s machine is on 10.0.1.12, but claiming their source IP is 10.0.1.15 (the Victim’s IP)
From here our attacker will be sending SIP traffic to 10.0.1.110 (our “carrier” / SIP server), which will send it’s responses to the victim. I’ve spun up an Asterisk instance because it’s the voice eng version of sticky tape, I’d love to test this against something a Broadsoft platform, but licences are hard to come by.
I setup the Asterisk instance to be single threaded, on a box with just enough resources to run, to try this small scale.
I wrote a threaded Python script that will ramp up the number of messages exponentially, we’ll start by sending one message per second, then two messages per second, and so on.
And we’ll do this until something breaks.
The Results
In short – inconclusive at first, but kinda scary after that.
Asterisk died really quickly. “Exceptionally long queue length” popped up after the first second. Interestingly, the box eventually came good and actually replied to every one of our requests, and even sent a BYE. Cute.
So I modified the script to be a bit less aggressive, a random wait time between 0 and 1 seconds between loops for each thread.
Struggling under the load.
I got about 60 seconds in before Asterisk really stopped responding to traffic.
So I tweaked my script again, enabled multi threading on the “carrier” and tried again.
So here’s the best rate (packets per second) I could get after a lot of tweaking:
Packets per Second – Red = Sent, Green = Received
Peak Receive: 14,000 packets per second Peak Send: 20,000 packets per second
In terms of packet size – what we really care about, the results were actually pretty promising:
Click for full size
Peak receive rate of 67Mbps, for which we were putting in ~25Mbps.
So can SIP be used for message amplification attacks? Sure.
Is it particulary practical? Not really. There’s easier targets out there for the time being, so VoIP will be spared the worst of it.
But for a carrier weaponisation of carrier SIP server should be a real fear.
Protection for Carriers
Don’t use UDP for your SIP traffic.
It’s easier said than done, I know… But the reasoning for putting SIP on UDP was primarily speed and limited bandwidth, but with more and more fibre in the ground it’s no longer the case.
SIP over TCP (better yet use it as an excuse to move to TLS), will protect you from some of these attacks.
Flood protection is built into most SBCs these days, if your box is being used to hit a specific target, the source IP will be masquerading as the target. So blocking that and not responding is your best bet. Lots of SBCs still respond with a 4xx “Rate Limiting” response instead of just dropping the traffic, ideally you’d disable the nice “Rate liming” response and just drop the traffic.
Traffic modeling, GeoIP blocking and rate limiting per IP & destination port will also help, as well as monitoring.
Ultimately you can’t stop spoofed UDP traffic coming into your network, but you can stop UDP traffic leaving your network, and if everyone did that we wouldn’t be in this mess.
UDP spoofing is made possible by networks that don’t verify that the traffic that’s leaving their network is traffic that is sourced from your network.
Your core routers know what IPs are assigned to your network, and should be configured to drop traffic that’s leaving the network but not coming from those IPs.
IETF came up with this solution, and it’s built into all major router OSes:
If we were to take the password password and hash it using an online tool to generate MD5 Hashes we’d get “5f4dcc3b5aa765d61d8327deb882cf99”
If we hash password again with MD5 we’d get the same output – “5f4dcc3b5aa765d61d8327deb882cf99”,
The catch with this is if you put “5f4dcc3b5aa765d61d8327deb882cf99” into a search engine, Google immediately tells you it’s plain text value. That’s because the MD5 of password is always 5f4dcc3b5aa765d61d8327deb882cf99, hashing the same input phase “password” always results in the same output MD5 hash aka “response”.
By using Message Digest Authentication we introduce a “nonce” value and mix it (“salt”) with the SIP realm, username, password and request URI, to ensure that the response is different every time.
Let’s look at this example REGISTER flow:
We can see a REGISTER message has been sent by Bob to the SIP Server.
REGISTER sips:ss2.biloxi.example.com SIP/2.0
Via: SIP/2.0/TLS client.biloxi.example.com:5061;branch=z9hG4bKnashds7
Max-Forwards: 70
From: Bob <sips:[email protected]>;tag=a73kszlfl
To: Bob <sips:[email protected]>
Call-ID: [email protected]
CSeq: 1 REGISTER
Contact: <sips:[email protected]>
Content-Length: 0
The SIP Server has sent back a 401 Unauthorised message, but includes the WWW-Authenticate header field, from this, we can grab a Realm value, and a Nonce, which we’ll use to generate our response that we’ll send back.
 SIP/2.0 401 Unauthorized
Via: SIP/2.0/TLS client.biloxi.example.com:5061;branch=z9hG4bKnashds7     ;received=192.0.2.201
From: Bob <sips:[email protected]>;tag=a73kszlfl
To: Bob <sips:[email protected]>;tag=1410948204
Call-ID: [email protected]
CSeq: 1 REGISTER
WWW-Authenticate: Digest realm="atlanta.example.com", qop="auth",nonce="ea9c8e88df84f1cec4341ae6cbe5a359",     opaque="", stale=FALSE, algorithm=MD5
Content-Length: 0
The formula for generating the response looks rather complex but really isn’t that bad.
Let’s say in this case Bob’s password is “bobspassword”, let’s generate a response back to the server.
We know the username which is bob, the realm which is atlanta.example.com, digest URI is sips:biloxi.example.com, method is REGISTER and the password which is bobspassword. This seems like a lot to go through but all of these values, with the exception of the password, we just get from the 401 headers above.
So let’s generate the first part called HA1 using the formula HA1=MD5(username:realm:password), so let’s substitute this with our real values: HA1 = MD5(bob:atlanta.example.com:bobspassword) So if we drop bob:atlanta.example.com:bobspassword into our MD5 hasher and we get our HA1 hash and it it looks like 2da91700e1ef4f38df91500c8729d35f, so HA1 = 2da91700e1ef4f38df91500c8729d35f
Now onto the second part, we know the Method is REGISTER, and our digestURI is sips:biloxi.example.com HA2=MD5(method:digestURI) HA2=MD5(REGISTER:sips:biloxi.example.com) Again, drop REGISTER:sips:biloxi.example.com into our MD5 hasher, and grab the output – 8f2d44a2696b3b3ed781d2f44375b3df This means HA2 = 8f2d44a2696b3b3ed781d2f44375b3df
Finally we join HA1, the nonce and HA2 in one string and hash it: Response = MD5(2da91700e1ef4f38df91500c8729d35f:ea9c8e88df84f1cec4341ae6cbe5a359:8f2d44a2696b3b3ed781d2f44375b3df)
Which gives us our final response of “bc2f51f99c2add3e9dfce04d43df0c6a”, so let’s see what happens when Bob sends this to the SIP Server.