In the last we covered what ENUM is and how it works, so to take this into a more practical example, I thought I’d share the details of the ENUM server I’ve setup in my lab, and the Docker container I’ve bundled it into.
Inside the Docker container we’ll be running Bind – this post won’t teach you much about Bind, there’s already lots of good information on it elsewhere, but we will cover the parameters involved in setting up ENUM records (NAPTR) for E.164 addresses.
Getting the Environment up and Running
First we’ll need to setup our environment, I’ve published the images for the container to Dockerhub, but we’ll build it from the Dockerfile so you can edit the files and rebuild as you play around:
git clone https://github.com/nickvsnetworking/ENUM_Playground
cd ENUM_Playground
docker build --pull --rm -f "Dockerfile" -t enum:latest "."
systemd-resolve on Ubuntu binds to port 53 by default, which can lead to some headaches, so we’ll create a new network in Docker for this to run in, so it doesn’t conflict with anything else you may be running:
sudo docker network create --subnet=172.30.0.0/26 enum_playground
And now we’ll run the ENUM container in the enum_playground network and with the IP 172.30.0.2,
docker run -d --rm --name=enum --net=enum_playground --ip=172.30.0.2 enum
Ok, that’s the environment setup, let’s run some queries!
E.164 to SIP URI Resolution with ENUM
In our last post we covered the basics of formatting an E.164 number and querying a DNS server to get it’s call routing information.
Again we’re going to use Dig to query this information. In reality ENUM queries would be run by an endpoint, or software like FreeSWITCH or Kamailio (Spoiler alert, posts on ENUM handling in those coming later), but as we’re just playing Dig will work fine.
So let’s start by querying a single E.164 address, +61355500911
First we’ll reverse it and put full stops / periods between the numbers, to get 1.1.9.0.0.5.5.5.3.1.6
Next we’ll add the e164.arpa prefix, which is the global prefix for ENUM addresses, and presto, that’s what we’ll query – 1.1.9.0.0.5.5.5.3.1.6.e164.arpa
Lastly we’ll feed this into a Dig query against the IP of our container and of type NAPTR,
dig @172.30.0.2 -t naptr 1.1.9.0.0.5.5.5.3.1.6.e164.arpa
So what did you get back?
Well, if everything is working your output should look something like the output I’ve got below,

So how do we interpret this? Well let’s break it down,
The first part is the domain we queried, simple enough in this case,
1.1.9.0.0.5.5.5.3.1.6.e164.arpa. 3600 IN NAPTR 10 100 "u" "E2U+sip" "!^.*$!sip:[email protected]!" .
Next up is the TTL or expiry, in this case it’s 3600 seconds (1 hour), shorter periods allow for changes to propagate / be reflected more quickly but at the expense of more load as results can’t be cached for as long. The class (IN) represents Internet, which is the only class commonly used, even on internal systems.
1.1.9.0.0.5.5.5.3.1.6.e164.arpa. 3600 IN NAPTR 10 100 "u" "E2U+sip" "!^.*$!sip:[email protected]!" .
Then we have the type of record returned, in our case it’s a NAPTR record,
1.1.9.0.0.5.5.5.3.1.6.e164.arpa. 3600 IN NAPTR 10 100 "u" "E2U+sip" "!^.*$!sip:[email protected]!" .
After that is the Order, this defines the order in which the rules are to be parsed. Lower numbers are processed first, if no matches then the next lowest, and so on until the highest number is reached, we’ll touch on this in more detail later in this post,
1.1.9.0.0.5.5.5.3.1.6.e164.arpa. 3600 IN NAPTR 10 100 "u" "E2U+sip" "!^.*$!sip:[email protected]!" .
The Pref is the processing preference. This is very handy for load balancing, as we can split traffic between hosts with different preferences. We’ll cover this later in this post too.
1.1.9.0.0.5.5.5.3.1.6.e164.arpa. 3600 IN NAPTR 10 100 "u" "E2U+sip" "!^.*$!sip:[email protected]!" .
The Flags represent the type of record we’re going to get, for most ENUM traffic this is going to be set to U, to denote a SIP URI with Regex, while the Service value we’ll be looking for will be “E2U+sip” service to identify SIP URIs to route calls to, but could be other values like Email addresses, IM Addresses or PSTN numbers, to be parsed by other applications.
1.1.9.0.0.5.5.5.3.1.6.e164.arpa. 3600 IN NAPTR 10 100 "u" "E2U+sip" "!^.*$!sip:[email protected]!" .
Lastly we’ve got the Regex part. Again not going to cover Regex as a whole, just the DNS particulars.
Everything between the first and second ! denotes what we’re searching for, while everything from the second ! to the last ! denotes what we replace it with.
In the below example that means we’re matching ^.* which means starting with (^) any character (.) zero or more times (*), which gets replaced with sip:[email protected],
1.1.9.0.0.5.5.5.3.1.6.e164.arpa. 3600 IN NAPTR 10 100 "u" "E2U+sip" "!^.*$!sip:[email protected]!" .
How should this be treated?
For the first example, a call to the E.164 address of 61355500912 will be first formatted into a domain as per the ENUM requirements (1.1.9.0.0.5.5.5.3.1.6.e164.arpa) and then queried as a NAPTR record against the DNS server,
1.1.9.0.0.5.5.5.3.1.6.e164.arpa. 3600 IN NAPTR 10 100 "u" "E2U+sip" "!^.*$!sip:[email protected]!" .
Only a single record has been returned so we don’t need to worry about the Order or Preference, and the Regex matches anything and replaces it with the resulting SIP URI of sip:[email protected], which is where we’ll send our INVITE.
Under the Hood
Inside the Repo we cloned earlier, if you open the e164.arpa.db file, things will look somewhat familiar,
The record we just queried is the first example in the Bind config file,
; E.164 Address +61355500911 - Simple no replacement (Resolves all traffic to sip:[email protected])
1.1.9.0.0.5.5.5.3.1.6 IN NAPTR 10 100 "u" "E2U+sip" "!^.*$!sip:[email protected]!" .
The config file is just the domain, class, type, order, preference, flags, service and regex.
Astute readers may have noticed the trailing . which where we can put a replacement domain if Regex is not used, but it cannot be used in conjunction with Regex, so for all our work it’ll just be a single trailing . on each line.
You can (and probably should) change the values in the e164.arpa.db file as we go along to try everything out, you’ll just need to rebuild the container and restart it each time you make a change.
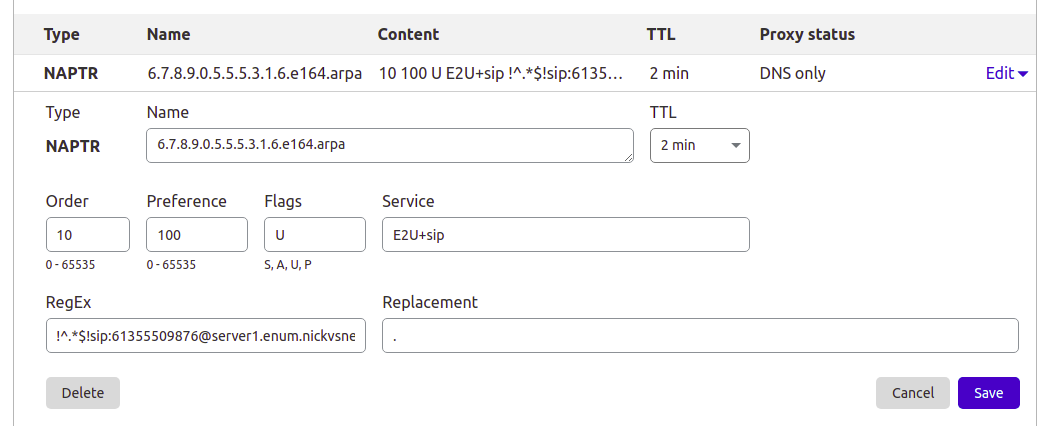
This post is going to focus on Bind, but the majority of modern DNS servers support NAPTR records, so you can use them for ENUM as well, for example I manage the DNS for this site thorough Cloudflare, and I’ve put a screenshot below of an example private ENUM address I’ve added into it.

Preference to Split Traffic between Servers
So with a firm understanding of a single record being returned, let’s look at how we can use ENUM to cleverly route traffic to multiple hosts.
If we have a pool of servers we may wish to evenly distribute all traffic across them, so that’s how E.164 address +61355500912 is setup – to route traffic evenly (50/50) across two servers.
Querying it with Dig provides the following result:
dig @172.30.0.2 -t naptr 2.1.9.0.0.5.5.5.3.1.6.e164.arpa
;; ANSWER SECTION:
2.1.9.0.0.5.5.5.3.1.6.e164.arpa. 3600 IN NAPTR  10 100 "u" "E2U+sip" "!^.*$!sip:[email protected]!" . 2.1.9.0.0.5.5.5.3.1.6.e164.arpa. 3600 IN NAPTR  10 100 "u" "E2U+sip" "!^.*$!sip:[email protected]!" .
So as the order value (10) is the same for both records, we can ignore it – there isn’t one value lower than the other.
We can see both records have a preference of 100, in practice, this means they each get 50% of the traffic. The formula for traffic distribution is pretty simple, each server gets the value of it’s preference, divided by the total of all the preferences,
So for server1 it’s preference is 100 and the total of all the preferences combined is 200, so it gets 100/200, which is equivalent to one half aka 50%.
We might have a scenario where we have 3 servers, but one is significantly more powerful than the others, so let’s look at giving more traffic to one server and less to others, this example gets a little more complex but should cement your understanding of how the preference works;
dig @172.30.0.2 -t naptr 3.1.9.0.0.5.5.5.3.1.6.e164.arpa
3.1.9.0.0.5.5.5.3.1.6.e164.arpa. 3600 IN NAPTR  10 100 "u" "E2U+sip" "!^.*$!sip:[email protected]!" . 3.1.9.0.0.5.5.5.3.1.6.e164.arpa. 3600 IN NAPTR  10 200 "u" "E2U+sip" "!^.*$!sip:[email protected]!" .
3.1.9.0.0.5.5.5.3.1.6.e164.arpa. 3600 IN NAPTR  10 100 "u" "E2U+sip" "!^.*$!sip:[email protected]!" .
So now 3 servers, again none have a lower order than the other, it’s set to 10 for them all so we can ignore the order,
Next we can see the total of all the priority values is 400,
Server 2 has a priority of 100 so it gets 100/400 total priority, or a quarter of all traffic. Server 1 has the same value, so also gets a quarter of all traffic,
Server 3 however has a priority of 200 so it gets 200/400, or to simplify half of all traffic.
The Bind config for this is:
; E.164 Address +61355500913 - More complex load balance between 3 hosts (25% server1, 25% server2, 50% server3)
3.1.9.0.0.5.5.5.3.1.6 IN NAPTR 10 100 "u" "E2U+sip" "!^.*$!sip:[email protected]!" . 3.1.9.0.0.5.5.5.3.1.6 IN NAPTR 10 100 "u" "E2U+sip" "!^.*$!sip:[email protected]!" .
3.1.9.0.0.5.5.5.3.1.6 IN NAPTR 10 200 "u" "E2U+sip" "!^.*$!sip:[email protected]!" .
Order for Failover
Primarily the purpose of the order is to enable wildcard routes (as we’ll see later) to be overwritten by more specific routes, but a secondary use in some implementations use Order as a way to list the preferences of the SIP URIs to route to. For example we could have two servers, one a primary and the other a standby, with the standby only to be used only if the primary SIP URI was not responding.
E.164 number +61355500914 is setup to return two SIP URIs,
dig @172.30.0.2 -t naptr 4.1.9.0.0.5.5.5.3.1.6.e164.arpa
;; ANSWER SECTION:
4.1.9.0.0.5.5.5.3.1.6.e164.arpa. 3600 IN NAPTR  10 100 "u" "E2U+sip" "!^.*$!sip:[email protected]!" . 4.1.9.0.0.5.5.5.3.1.6.e164.arpa. 3600 IN NAPTR  20 100 "u" "E2U+sip" "!^.*$!sip:[email protected]!" .
Our DNS client will first use the SIP URI sip:[email protected] as it has the lower order value (10), and if that fails, can try the entry with the next lowest order-value (20) which would be sip:[email protected].
The Bind config for this is:
; E.164 Address +61355500914 - Order example returning multiple SIP URIs to try for failover
4.1.9.0.0.5.5.5.3.1.6 IN NAPTR 10 100 "u" "E2U+sip" "!^.*$!sip:[email protected]!" . 4.1.9.0.0.5.5.5.3.1.6 IN NAPTR 20 100 "u" "E2U+sip" "!^.*$!sip:[email protected]!" .
Wildcards
If we have a 1,000 number block, having to add 1000 individual records can be very tedious. Instead we can use wildcard matching (thanks to the fact we’ve reversed the E.164 address) to match ranges. For example if we have E.164 numbers from +61255501000 to +61255501999 we can add a wildcard entry to match the +61255501x prefix,
I’ve set this up already so let’s lookup the E.164 number +6125501234,
dig @172.30.0.2 -t naptr 4.3.2.1.0.5.5.5.2.1.6.e164.arpa
;; ANSWER SECTION:
4.3.2.1.0.5.5.5.2.1.6.e164.arpa. 3600 IN NAPTR  50 100 "u" "E2U+sip" "!^.*$!sip:[email protected]!" .
If you look up any other number starting with +6125501 you’ll get the same result, and here’s the Bind config for it:
; Wildcard E.164 Address +61255501* - Wildcard example for all destinations starting with E.164 prefix +61255501x to single destination (sip:[email protected])
; For example E.164 number +6125501234 will resolve to sip:[email protected]
*.1.0.5.5.5.2.1.6 IN NAPTR 100 100 "u" "E2U+sip" "!^.*$!sip:[email protected]!" .
The catch with this is they’re all pointing at the same SIP URI, so we can’t treat the calls differently based on the called number – This is where the Regex magic comes in.
We can use group matching to match a group and fill it in the dialed number into the SIP Request URI, for example:
!(^.*$)!sip:+1\[email protected]!
Will match the E.164 number requested and put it inside sip:[email protected]
The +61255502xxx prefix is setup for this, so if we query +61255502000 (or any other number between +61255502000 and +61255502999) we’ll get the regex query in the resulting record.
Keep in mind DNS doesn’t actually apply the Regex transformation, just shares it, and the client applies the transformation.
dig @172.30.0.2 -t naptr 0.0.0.2.0.5.5.5.2.1.6.e164.arpa
;; ANSWER SECTION:
0.0.0.2.0.5.5.5.2.1.6.e164.arpa. 3600 IN NAPTR  100 100 "u" "E2U+sip" "!(^.*$)!sip:+1\[email protected]!" .
And the corresponding Bind config:
; Wildcard example for all destinations starting with E.164 prefix +61255502x to regex filled destination
; For example a request to 61255502000 will return sip:[email protected])
*.2.0.5.5.5.2.1.6 IN NAPTR 100 100 "u" "E2U+sip" "!(^.*$)!sip:+1\\[email protected]!" .
One last thing to keep in mind, is that Wildcard priorities are of any length.
This means +612555021 would match as well as +6125550299999999999999. Typically terminating switches drop any superfluous digits, and NU those that are too short, but keep this in mind, that length is not taken into account.
Wildcard Priorities
So with our wildcards in place, what if we wanted to add an exception, for example one number in our 61255502xxx block of numbers gets ported to another carrier and needs to be routed elsewhere?
Easy, we just add another entry for that number being more specific and with a lower order than the wildcard, which is what’s setup for E.164 number +61255502345,
dig @172.30.0.2 -t naptr 5.4.3.2.0.5.5.5.2.1.6.e164.arpa
;; ANSWER SECTION:
5.4.3.2.0.5.5.5.2.1.6.e164.arpa. 3600 IN NAPTR  50 100 "u" "E2U+sip" "!^.*$!sip:[email protected]!" .
Which does not return the same result as the others that match the wildcard,
Bind config:
; Wildcard example for all destinations starting with E.164 prefix +61255502x to regex filled destination
; For example a request to +61255502000 will return sip:[email protected])
*.2.0.5.5.5.2.1.6 IN NAPTR 100 100 "u" "E2U+sip" "!(^.*$)!sip:+1\\[email protected]!" .

; More specific example with lower order than +6125550x wildcard for E.164 address +61255502345 will return sip:[email protected]
5.4.3.2.0.5.5.5.2.1.6 IN NAPTR 50 100 "u" "E2U+sip" "!^.*$!sip:[email protected]!" .
We can combine all of the tricks we’ve covered here, from statically defined entries, wildcards, regex replacement, multiple entries with multiple orders and preferences, to create really complex routing, using only DNS.
Summary & Next Steps
So by now hopefully you’ve got a fair understanding of how NAPTR and DNS work together to translate E.164 addresses into SIP URIs,
Of course being able to do this manually with Dig and comprehend how it’ll route is only one part of the picture, in the next posts we’ll cover using Kamailio and FreeSWITCH to query ENUM routing information and route traffic to it,