For most Voice / Telco engineers IPsec is a VPN technology, maybe something used when backhauling over an untrusted link, etc, but voice over IP traffic is typically secured with TLS and SRTP.
IMS / Voice over LTE handles things a bit differently, it encapsulates the SIP & RTP traffic between the UE and the P-CSCF in IPsec Encapsulating Security Payload (ESP) payloads.
In this post we’ll take a look at how it works and what it looks like.
It’s worth noting that Kamailio recently added support for IPsec encapsulation on a P-CSCF, in the IMS IPSec-Register module. I’ll cover usage of this at a later date.
The Message Exchange
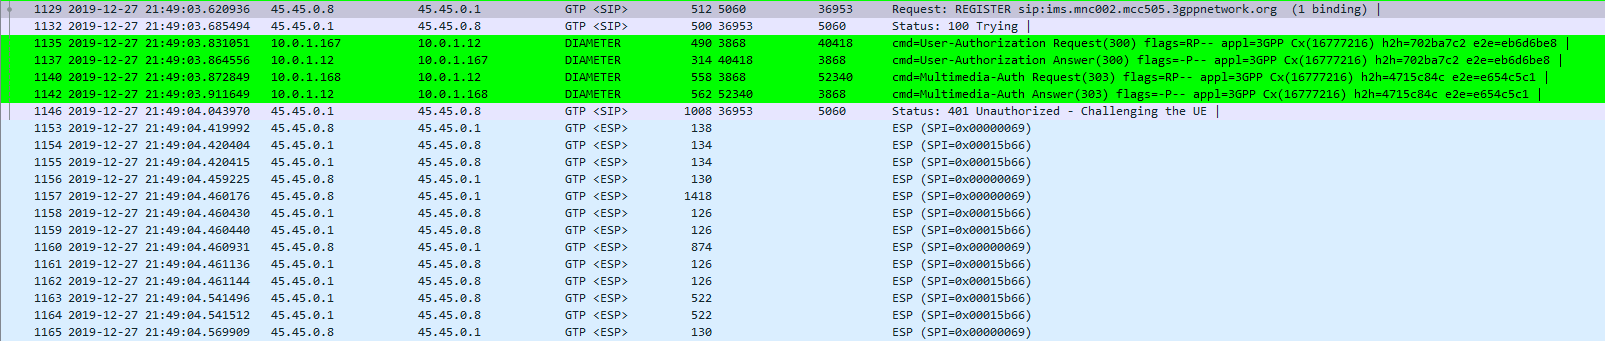
The exchange starts off looking like any other SIP Registration session, in this case using TCP for transport. The UE sends a REGISTER to the Proxy-CSCF which eventually forwards the request through to a Serving-CSCF.
This is where we diverge from the standard SIP REGISTER message exchange. The Serving-CSCF generates a 401 Unauthorized response, containing an authentication challenge in the WWW-Authenticate header, and also a Ciphering Key & Integrity Key (ck= and ik=) also in the WWW-Authenticate header.
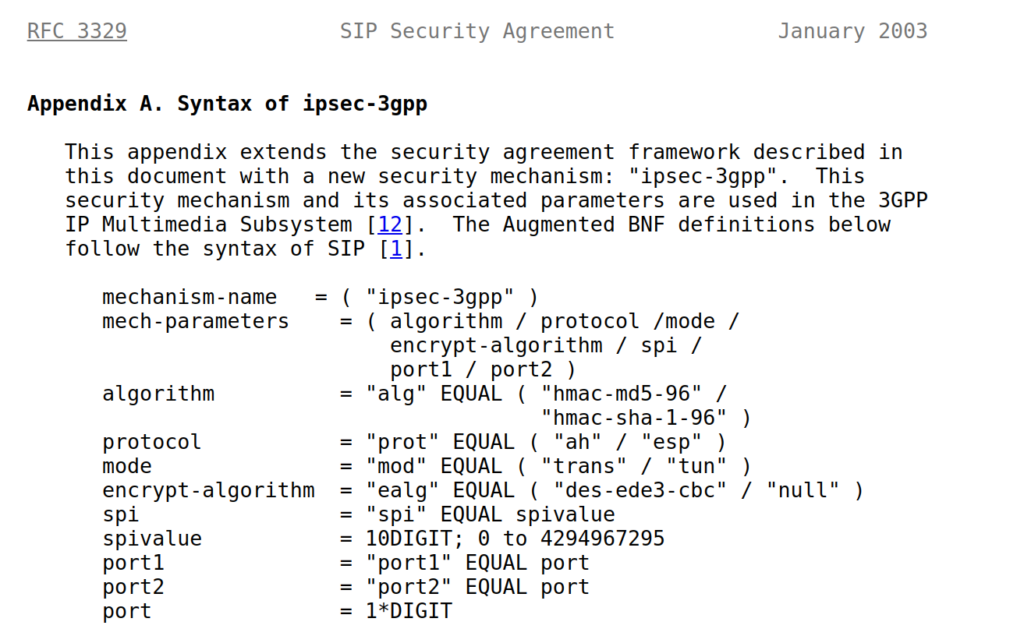
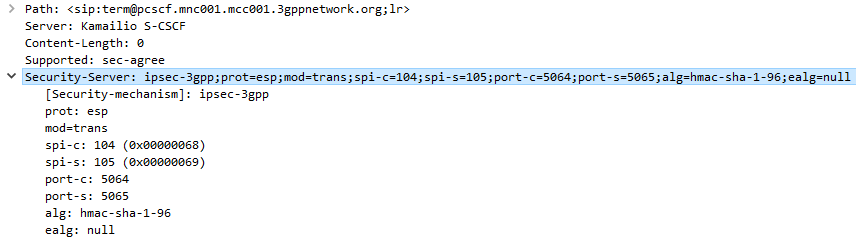
The Serving-CSCF sends the Proxy-CSCF the 401 response it created. The Proxy-CSCF assigns a SPI for the IPsec ESP to use, a server port and client port and indicates the used encryption algorithm (ealg) and algorithm to use (In this case HMAC-SHA-1-96.) and adds a new header to the 401 Unauthorized called Security–Server header to share this information with the UE.
The Proxy-CSCF also strips the Ciphering Key (ck=) and Integrity Key (ik=) headers from the SIP authentication challenge (WWW-Auth) and uses them as the ciphering and integrity keys for the IPsec connection.
Finally after setting up the IPsec server side of things, it forwards the 401 Unauthorized response onto the UE.
Upon receipt of the 401 response, the UE looks at the authentication challenge.
If the network is considered authenticated by the UE it generates a response to the Authentication Challenge, but it doesn’t deliver it over TCP. Using the information generated in the authentication challenge the UE encapsulates everything from the network layer (IPv4) up and sends it to the P-CSCF in an IPsec ESP.
Communication between the UE and the P-CSCF is now encapsulated in IPsec.
Wireshark trace of IPsec IMS Traffic between UE and P-CSCF
When learning to use Kamailio you might find yourself thinking about if you really want to learn to write a Kamailio configuration file, which is another weird scripting language to learn to achieve a task.
Enter KEMI – Kamailio Embedded Interface. KEMI allows you to abstract the routing logic to another programing language. In layman’s terms this means you can write your routing blocks, like request_route{}, reply_route{}, etc, in languages you already know – like Lua, JavaScript, Ruby – and my favorite – Python!
Why would you use KEMI?
Write in a language you already know;
You don’t need to learn how to do write complex routing logic in Kamailio’s native scripting language, you can instead do it in a language you’re already familiar with, writing your Routing Blocks in another programming language.
Change Routing on the Fly;
By writing the routing logic in KEMI allows you to change your routing blocks without having to restart Kamailio, something you can’t do with the “native” scripting language – This means you can change your routing live.
Note: This isn’t yet in place for all languages – Some still require a restart.
Leverage your prefered language’s libraries;
While Kamailio’s got a huge list of modules to interface with a vast number of different things, the ~200 Kamailio modules don’t compare with the thousands of premade libraries that exist for languages like Python, Ruby, JavaScript, etc.
Prerequisites
We’ll obviously need Kamailio installed, but we’ll also need the programming language we want to leverage setup (fairly obvious).
Configuring Kamailio to talk to KEMI
KEMI only takes care of the routing of SIP messages inside our routing blocks – So we’ve still got the Kamailio cfg file (kamailio.cfg) that we use to bind and setup the service as required, load the modules we want and configure them.
Essentially we need to load the app for the language we use, in this example we’ll use app_python3.so and use that as our Config Engine.
Kamailio is generally thought of as a SIP router, but it can in fact handle Diameter signaling as well.
Everything to do with Diameter in Kamailio relies on the C Diameter Peer and CDP_AVP modules which abstract the handling of Diameter messages, and allow us to handle them sort of like SIP messages.
CDP on it’s own doesn’t actually allow us to send Diameter messages, but it’s relied upon by other modules, like CDP_AVP and many of the Kamailio IMS modules, to handle Diameter signaling.
Before we can start shooting Diameter messages all over the place we’ve first got to configure our Kamailio instance, to bring up other Diameter peers, and learn about their capabilities.
C Diameter Peer (Aka CDP) manages the Diameter connections, the Device Watchdog Request/Answers etc, all in the background.
We’ll need to define our Diameter peers for CDP to use so Kamailio can talk to them. This is done in an XML file which lays out our Diameter peers and all the connection information.
In our Kamailio config we’ll add the following lines:
This will load the CDP modules and instruct Kamailio to pull it’s CDP info from an XML config file at /etc/kamailio/diametercfg.xml
Let’s look at the basic example given when installed:
<?xml version="1.0" encoding="UTF-8"?>
<!--

 DiameterPeer Parameters
  - FQDN - FQDN of this peer, as it should apper in the Origin-Host AVP
  - Realm - Realm of this peer, as it should apper in the Origin-Realm AVP
  - Vendor_Id - Default Vendor-Id to appear in the Capabilities Exchange
  - Product_Name - Product Name to appear in the Capabilities Exchange
  - AcceptUnknownPeers - Whether to accept (1) or deny (0) connections from peers with FQDN
    not configured below
  - DropUnknownOnDisconnect - Whether to drop (1) or keep (0) and retry connections (until restart)
    unknown peers in the list of peers after a disconnection.
  - Tc - Value for the RFC3588 Tc timer - default 30 seconds
  - Workers - Number of incoming messages processing workers forked processes.
  - Queue - Length of queue of tasks for the workers:
     - too small and the incoming messages will be blocked too often;
     - too large and the senders of incoming messages will have a longer feedback loop to notice that
     this Diameter peer is overloaded in processing incoming requests;
     - a good choice is to have it about 2 times the number of workers. This will mean that each worker
     will have about 2 tasks in the queue to process before new incoming messages will start to block.
  - ConnectTimeout - time in seconds to wait for an outbound TCP connection to be established.
  - TransactionTimeout - time in seconds after which the transaction timeout callback will be fired,
    when using transactional processing.
  - SessionsHashSize - size of the hash-table to use for the Diameter sessions. When searching for a
    session, the time required for this operation will be that of sequential searching in a list of
    NumberOfActiveSessions/SessionsHashSize. So higher the better, yet each hashslot will consume an
    extra 2xsizeof(void*) bytes (typically 8 or 16 bytes extra).
  - DefaultAuthSessionTimeout - default value to use when there is no Authorization Session Timeout
  AVP present.
  - MaxAuthSessionTimeout - maximum Authorization Session Timeout as a cut-out measure meant to
  enforce session refreshes.

 -->
<DiameterPeer
        FQDN="pcscf.ims.smilecoms.com"
        Realm="ims.smilecoms.com"
        Vendor_Id="10415"
        Product_Name="CDiameterPeer"
        AcceptUnknownPeers="0"
        DropUnknownOnDisconnect="1"
        Tc="30"
        Workers="4"
        QueueLength="32"
        ConnectTimeout="5"
        TransactionTimeout="5"
        SessionsHashSize="128"
        DefaultAuthSessionTimeout="60"
        MaxAuthSessionTimeout="300"
>

        <!--
                Definition of peers to connect to and accept connections from. For each peer found in here
                a dedicated receiver process will be forked. All other unkwnown peers will share a single
                receiver. NB: You must have a peer definition for each peer listed in the realm routing section
        -->
        <Peer FQDN="pcrf1.ims.smilecoms.com" Realm="ims.smilecoms.com" port="3868"/>
        <Peer FQDN="pcrf2.ims.smilecoms.com" Realm="ims.smilecoms.com" port="3868"/>
        <Peer FQDN="pcrf3.ims.smilecoms.com" Realm="ims.smilecoms.com" port="3868"/>
        <Peer FQDN="pcrf4.ims.smilecoms.com" Realm="ims.smilecoms.com" port="3868"/>
        <Peer FQDN="pcrf5.ims.smilecoms.com" Realm="ims.smilecoms.com" port="3868"/>
        <Peer FQDN="pcrf6.ims.smilecoms.com" Realm="ims.smilecoms.com" port="3868"/>

        <!--
                Definition of incoming connection acceptors. If no bind is specified, the acceptor will bind
                on all available interfaces.
        -->
        <Acceptor port="3868"  />
        <Acceptor port="3869" bind="127.0.0.1" />
        <Acceptor port="3870" bind="192.168.1.1" />

        <!--
                Definition of Auth (authorization) and Acct (accounting) supported applications. This
                information is sent as part of the Capabilities Exchange procedures on connecting to
                peers. If no common application is found, the peers will disconnect. Messages will only
                be sent to a peer if that peer actually has declared support for the application id of
                the message.
        -->
        <Acct id="16777216" vendor="10415" />
        <Acct id="16777216" vendor="0" />
        <Auth id="16777216" vendor="10415"/>
        <Auth id="16777216" vendor="0" />

        <!--
                Supported Vendor IDs - list of values which will be sent in the CER/CEA in the
                Supported-Vendor-ID AVPs
        -->
        <SupportedVendor vendor="10415" />

        <!--
                Realm routing definition.
                Each Realm can have a different table of peers to route towards. In case the Destination
                Realm AVP contains a Realm not defined here, the DefaultRoute entries will be used.

                Note: In case a message already contains a Destination-Host AVP, Realm Routeing will not be
                applied.
                Note: Routing will only happen towards connected and application id supporting peers.

                The metric is used to order the list of prefered peers, while looking for a connected and
                application id supporting peer. In the end, of course, just one peer will be selected.
        -->
        <Realm name="ims.smilecoms.com">
                <Route FQDN="pcrf1.ims.smilecoms.com" metric="3"/>
                <Route FQDN="pcrf2.ims.smilecoms.com" metric="5"/>
        </Realm>

        <Realm name="temp.ims.smilecoms.com">
                <Route FQDN="pcrf3.ims.smilecoms.com" metric="7"/>
                <Route FQDN="pcrf4.ims.smilecoms.com" metric="11"/>
        </Realm>
        <DefaultRoute FQDN="pcrf5.ims.smilecoms.com" metric="15"/>
        <DefaultRoute FQDN="pcrf6.ims.smilecoms.com" metric="13"/>


</DiameterPeer>
First we need to start by telling CDP about the Diameter peer it’s going to be – we do this in the <DiameterPeer section where we define the FQDN and Diameter Realm we’re going to use, as well as some general configuration parameters.
<Peers are of course, Diameter peers. Defining them here will mean a connection is established to each one, Capabilities exchanged and Watchdog request/responses managed. We define the usage of each Peer further on in the config.
The Acceptor section – fairly obviously – sets the bindings for the addresses and ports we’ll listen on.
Next up we need to define the Diameter applications we support in the <Acct id=” /> and <SupportedVendor> parameters, this can be a little unintuitive as we could list support for every Diameter application here, but unless you’ve got a module that can handle those applications, it’s of no use.
Instead of using Dispatcher to manage sending Diameter requests, CDP handles this for us. CDP keeps track of the Peers status and it’s capabilities, but we can group like Peers together, for example we may have a pool of PCRF NEs, so we can group them together into a <Realm >. Instead of calling a peer directly we can call the realm and CDP will dispatch the request to an up peer inside the realm, similar to Dispatcher Groups.
Finally we can configure a <DefaultRoute> which will be used if we don’t specify the peer or realm the request needs to be sent to. Multiple default routes can exist, differentiated based on preference.
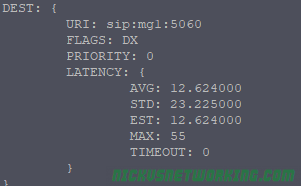
We can check the status of peers using Kamcmd’s cdp.list_peers command which lists the peers, their states and capabilities.
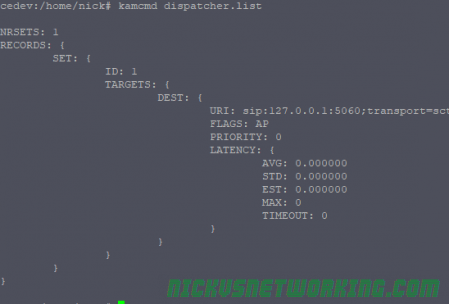
One question that’s not as obvious as it perhaps should be is the different states shown with kamcmd dispatcher.list command;
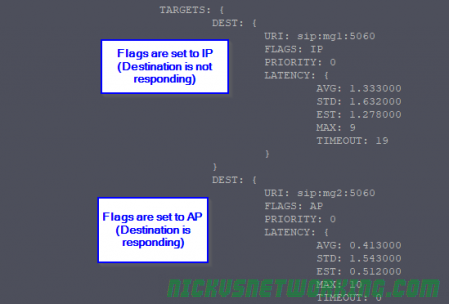
So what do the flags for state mean?
The first letter in the flag means is the current state, Active (A), Inactive (I) or Disabled (D).
The second letter in the flag means monitor status, Probing (P) meaning actively checked with SIP Options pings, or Not Set (X) denoting the device isn’t actively checked with SIP Options pings.
AP – Actively Probing – SIP OPTIONS are getting a response, routing to this destination is possible, and it’s “Up” for all intents and purposes.
IP – Inactively Probing – Destination is not meeting the threshold of SIP OPTIONS request responses it needs to be considered active. The destination is either down or not responding to all SIP OPTIONS pings. Often this is due to needing X number of positive responses before considering the destination as “Up”.
DX – Disabled & Not Probing – This device is disabled, no SIP OPTIONS are sent.
AX – Active & Not Probing– No SIP OPTIONS are sent to check state, but is is effectively “Up” even though the remote end may not be reachable.
In the third part of the Kamailio 101 series I briefly touched upon pseudovariables, but let’s look into what exactly they are and how we can manipulate them to change headers.
The term “pseudo-variable” is used for special tokens that can be given as parameters to different script functions and they will be replaced with a value before the execution of the function.
You’ve probably seen in any number of the previous Kamailio Bytes posts me use pseudovariables, often in xlog or in if statements, they’re generally short strings prefixed with a $ sign like $fU, $tU, $ua, etc.
When Kamailio gets a SIP message it explodes it into a pile of variables, getting the To URI and putting it into a psudovariable called $tU, etc.
We can update the value of say $tU and then forward the SIP message on, but the To URI will now use our updated value.
When it comes to rewriting caller ID, changing domains, manipulating specific headers etc, pseudovariables is where it mostly happens.
Kamailio allows us to read these variables and for most of them rewrite them – But there’s a catch. We can mess with the headers which could result in our traffic being considered invalid by the next SIP proxy / device in the chain, or we could mess with the routing headers like Route, Via, etc, and find that our responses never get where they need to go.
So be careful! Headers exist for a reason, some are informational for end users, others are functional so other SIP proxies and UACs can know what’s going on.
Rewriting SIP From Username Header (Caller ID)
When Kamailio’s SIP parser receives a SIP request/response it decodes the vast majority of the SIP headers into a variety of pseudovariables, we can then reference these variables we can then reference from our routing logic.
Let’s pause here and go back to the Stateless SIP Proxy Example, as we’ll build directly on that.
Follow the instructions in that post to get your stateless SIP proxy up and running, and we’ll make this simple change:
####### Routing Logic ########


/* Main SIP request routing logic
 * - processing of any incoming SIP request starts with this route
 * - note: this is the same as route { ... } */
request_route {

        xlog("Received $rm to $ru - Forwarding");
        $fU = "Nick Blog Example";   #Set From Username to this value
        #Forward to new IP
        forward("192.168.1.110");

}
Now when our traffic is proxied the From Username will show “Nick Blog Example” instead of what it previously showed.
We’ve talked about using a few different modules, like a SIP Registrar and Htable, that rely on data stored in Kamailio’s memory, the same is true for all the Stateful proxy discussion last week.
But what if you want to share this data between multiple Kamailio instances? This allows distributing workload and every server having the same information and therefore any server is able to process any request.
This allows memory data to be shared between multiple Kamailio instances (aka “Nodes”), so for example if you are storing data in Htable on one Kamailio box, all the other boxes/nodes in the DMQ pool will have the same HTable data.
Kamailio uses SIP to transfer DMQ messages between DMQ nodes, and DNS to discover DMQ nodes.
For this example we’ll share user location data (usrloc) between Kamailio instances, so we’ll create a very simple setup to store location data:
####### Routing Logic ########


/* Main SIP request routing logic
 * - processing of any incoming SIP request starts with this route
 * - note: this is the same as route { ... } */
request_route {

        #Enable record_routing so we see the BYE / Re-INVITE etc

        if(is_method("REGISTER")){

                save("location");
        }else{
                sl_reply("500", "Nope");
        }


}
Now if we register a SIP endpoint we should be able to view it using Kamcmd’s ul.dump call, as we talked about in the Kamailio SIP Registrar tutorial.
Next we’ll setup DMQ to allow this data to be shared to other nodes, so they also have the same userloc data available,
First we’ll begin by binding to an extra port for the DMQ messages to go to, to make it a bit clearer what is normal SIP and what’s DMQ,
So for this we’ll add a new line in the config to listen on port 5090:
/* uncomment and configure the following line if you want Kamailio to
 * bind on a specific interface/port/proto (default bind on all available) */
listen=udp:0.0.0.0:5060
listen=tcp:0.0.0.0:5060
listen=udp:0.0.0.0:5090
The server_address means we’re listening on any IP on port 5090. In production you may have an IP set here of a private NIC or something non public facing.
The notification address resolves to 2x A records, one is the IP of this Kamailio instance / node, the other is the IP of the other Kamailio instance / node, I’ve just done this in /etc/hosts
Finally we’ll add some routing logic to handle the DMQ messages coming in on port 5090:
####### Routing Logic ########


/* Main SIP request routing logic
 * - processing of any incoming SIP request starts with this route
 * - note: this is the same as route { ... } */
request_route {


        if (is_method("KDMQ") && $Rp == 5090)
        {
                dmq_handle_message();
        }

        #Enable record_routing so we see the BYE / Re-INVITE etc

        if(is_method("REGISTER")){

                save("location");
        }else{
                sl_reply("500", "Nope");
        }


}
We’ll put the same config on the other Kamailio instance and restart Kamailio on both.
We can now check the DMQ node status to confirm they’re talking to each other.
We talked a little about the Transaction module and using it for Transaction Stateful SIP Proxy, but it’s worth knowing a bit more about the Transaction Module and the powerful functions it offers.
So today I’ll cover some cool functionality TM offers!
Different Reply Routes
By calling the t_on_reply(); we can specify the reply route to be used for replies in this transaction.
route[RELAY]{

        #Use reply route "OurReplyRoute" for responses for this transaction
        t_on_reply("OurReplyRoute");

        #Relay (aka Forward) the request
        t_relay_to_udp("192.168.3.118", "5060");

}

onreply_route[OurReplyRoute] {
        #On replies from route[RELAY]

        #Check our AVP we set in the initial request
        xlog("for $rs response the value of AVP \"state_test_var\" is $avp(state_test_var) ");

        #Append a header so we can see this was proxied in the SIP capture
        append_hf("X-Proxied: For the reply\r\n");

}
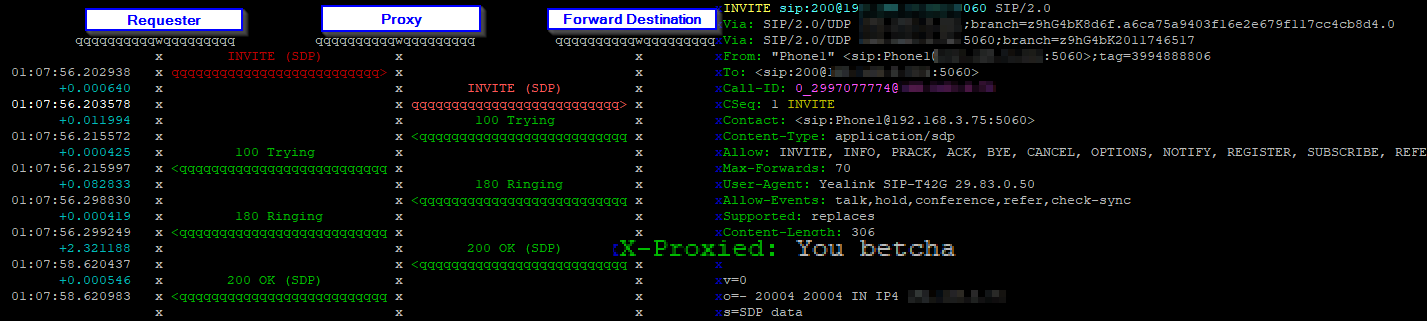
Any responses from the route[RELAY] routing block will go to onreply_route[OurReplyRoute], the beauty of this is it allows you to have multiple reply routes each with their own logic. For example for a call leg to a carrier you may want to preserve CLI, but for a call leg to a customer you may wish to restrict it if that’s the option the user has selected, and you can make these changes / modifications in the reply messages.
Failure Routes
Failure routes allow the transaction module to know to try again if a call fails, for example if no response is received from the destination, send it to a different destination, like a backup.
route[RELAY]{

        #Use reply route "OurReplyRoute" for responses for this transaction
        t_on_reply("OurReplyRoute");
        t_on_failure("OurFailureRoute");
        #Relay (aka Forward) the request
        t_relay_to_udp("192.168.1.118", "5060");

}

failure_route[OurFailureRoute]{
        xlog("At failure route");
        t_reply("500", "Remote end never got back to us");
        exit;
}
We can build upon this, and try a different destination if the first one fails:
request_route {

        #Enable record_routing so we see the BYE / Re-INVITE etc
        record_route();

        #Handle Registrations in a dumb way so they don't messy our tests
        if(is_method("REGISTER")){
                sl_reply("200", "ok");
                exit;
        }


                 #Append a header so we can see this was proxied in the SIP capture
                append_hf("X-Proxied: You betcha\r\n");

        if(is_method("INVITE")){
                        #Createa  new AVP called "state_test_var" and set the value to "I remember"
                        $avp(state_test_var) = "I remember";
        }
                #Let syslog know we've set the value and check it
                xlog("for $rm the value of AVP \"state_test_var\" is $avp(state_test_var) ");

                #Send to route[RELAY] routing block
                rewritehostport("nonexistentdomain.com");
                route(RELAY);

}

route[RELAY]{

        #Use reply route "OurReplyRoute" for responses for this transaction
        t_on_reply("OurReplyRoute");
        t_on_failure("OurFailureRoute");
        #Relay (aka Forward) the request
        t_relay();
}

failure_route[OurFailureRoute]{
        xlog("At failure route");
        #t_reply("500", "Remote end never got back to us");

                rewritehostport("192.168.3.118");
                append_branch();
                t_relay();

}

onreply_route[OurReplyRoute] {
        #On replies from route[RELAY]

        #Check our AVP we set in the initial request
        xlog("for $rs response the value of AVP \"state_test_var\" is $avp(state_test_var) ");

        #Append a header so we can see this was proxied in the SIP capture
        append_hf("X-Proxied: For the reply\r\n");

}
One thing to keep in mind is that there’s lots of definitions of failure, for example if you are sending a call to a carrier and get a 404 response back, you probably want to relay that through to the end user, because that destination isn’t there.
But if you get back a 5xx series response you may consider that to be a failure and select the next carrier for example.
Different conditions / requirements have different definitions of “failures” and so there’s a lot to think about when implementing this, along with timeouts for no replies, TCP session management, etc.
Parallel Forking the Call to Multiple Destinations
Parallel Forking is a fancy way of saying ring multiple destinations at the same time.
/* Main SIP request routing logic
 * - processing of any incoming SIP request starts with this route
 * - note: this is the same as route { ... } */
request_route {

        #Enable record_routing so we see the BYE / Re-INVITE etc
        record_route();

        #Handle Registrations in a dumb way so they don't messy our tests
        if(is_method("REGISTER")){
                sl_reply("200", "ok");
                exit;
        }


                 #Append a header so we can see this was proxied in the SIP capture
                append_hf("X-Proxied: You betcha\r\n");

        if(is_method("INVITE")){
                        #Createa  new AVP called "state_test_var" and set the value to "I remember"
                        $avp(state_test_var) = "I remember";
        }
                #Let syslog know we've set the value and check it
                xlog("for $rm the value of AVP \"state_test_var\" is $avp(state_test_var) ");

                #Send to route[RELAY] routing block
                route(RELAY);

}

route[RELAY]{

        #Use reply route "OurReplyRoute" for responses for this transaction
        t_on_reply("OurReplyRoute");

        #Append branches for each destination we want to forward to
        append_branch("sip:[email protected]");
        append_branch("sip:[email protected]");
        append_branch("sip:[email protected]");

        t_on_failure("OurFailureRoute");
        #Relay (aka Forward) the request
        t_relay();
}

failure_route[OurFailureRoute]{
        xlog("At failure route");
        t_reply("500", "All those destinations failed us");

}

onreply_route[OurReplyRoute] {
        #On replies from route[RELAY]

        #Check our AVP we set in the initial request
        xlog("for $rs response the value of AVP \"state_test_var\" is $avp(state_test_var) ");

        #Append a header so we can see this was proxied in the SIP capture
        append_hf("X-Proxied: For the reply\r\n");

}
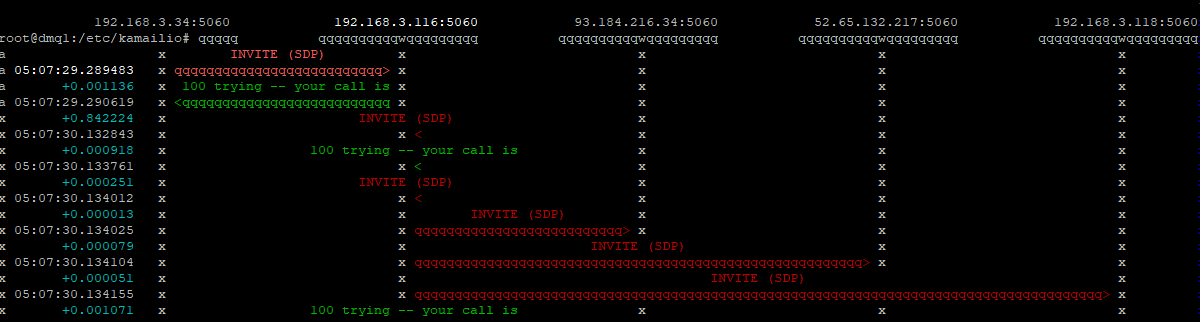
Bit of a mess but here we see the initial INVITE being branched to the 3 destinations at the same time (Parallel forking)
Serial Forking / Sequential Forking the calls to Multiple Destinations one after the Other
This could be used to try a series of weighted destinations and only try the next if the preceding one fails:
/* Main SIP request routing logic
 * - processing of any incoming SIP request starts with this route
 * - note: this is the same as route { ... } */
request_route {

        #Enable record_routing so we see the BYE / Re-INVITE etc
        record_route();


        #Send to route[RELAY] routing block
        route(RELAY);

}

route[RELAY]{

        #Use reply route "OurReplyRoute" for responses for this transaction
        t_on_reply("OurReplyRoute");

        append_branch("sip:[email protected]", "0.3");
        append_branch("sip:[email protected]", "0.2");
        append_branch("sip:[email protected]", "0.1");

        t_load_contacts();

        t_next_contacts();

        t_on_failure("OurFailureRoute");
        #Relay (aka Forward) the request
        t_relay();
        break;
}

failure_route[OurFailureRoute]{

        xlog("At failure route - Trying next destination");
        t_on_failure("OurFailureRoute");
        t_relay();


}

onreply_route[OurReplyRoute] {
        #On replies from route[RELAY]
        #Append a header so we can see this was proxied in the SIP capture
        append_hf("X-Proxied: For the reply\r\n");

}
Again this will try each destination, but one after the other based on the weight we added to each destination in the append_branch()
Here we see each destination being tried sequentially
The 3 different proxies all do the same thing, they all relay SIP messages, so we need a way to determine what state has been saved.
To do this we’ll create a variable (actually an AVP) in the initial request (in our example it’ll be an INVITE), and we’ll reference it when handling a response to make sure we’ve got transactional state.
We’ll also try and reference it in the BYE message, which will fail, as we’re only creating a Transaction Stateful proxy, and the BYE isn’t part of the transaction, but in order to see the BYE we’ll need to enable Record Routing.
Stateless Proof
Before we add any state, let’s create a working stateless proxy, and add see how it doesn’t remember:
####### Routing Logic ########


/* Main SIP request routing logic
 * - processing of any incoming SIP request starts with this route
 * - note: this is the same as route { ... } */
request_route {

        #Enable record_routing so we see the BYE / Re-INVITE etc
        record_route();

        #Handle Registrations in a dumb way so they don't messy our tests
        if(is_method("REGISTER")){
                sl_reply("200", "ok");
                exit;
        }


                 #Append a header so we can see this was proxied in the SIP capture
                append_hf("X-Proxied: You betcha\r\n");

        if(is_method("INVITE")){
                        #Createa  new AVP called "state_test_var" and set the value to "I remember"
                        $avp(state_test_var) = "I remember";
        }
                #Let syslog know we've set the value and check it
                xlog("for $rm the value of AVP \"state_test_var\" is $avp(state_test_var) ");

                #Forard to new IP
                forward("192.168.3.118");


}

onreply_route{
        #Check our AVP we set in the initial request
        xlog("for $rs response the value of AVP \"state_test_var\" is $avp(state_test_var) ");

        #Append a header so we can see this was proxied in the SIP capture
        append_hf("X-Proxied: For the reply\r\n");
}
Now when we run this and call from any phone other than 192.168.3.118, the SIP INVITE will hit the Proxy, and be forwarded to 192.168.3.118.
Syslog will show the INVITE and us setting the var, but for the replies, the value of AVP $avp(state_test_var) won’t be set, as it’s stateless.
Let’s take a look:
kamailio[2577]: {1 1 INVITE [email protected]} ERROR: : for INVITE the value of AVP "state_test_var" is I remember
kamailio[2575]: {2 1 INVITE [email protected]} ERROR: <script>: for 100 response the value of AVP "state_test_var" is <null>
kamailio[2576]: {2 1 INVITE [email protected]} ERROR: <script>: for 180 response the value of AVP "state_test_var" is <null>
kamailio[2579]: {2 1 INVITE [email protected]} ERROR: <script>: for 200 response the value of AVP "state_test_var" is <null>
kamailio[2580]: {1 1 ACK [email protected]} ERROR: <script>: for ACK the value of AVP "state_test_var" is <null>
kamailio[2581]: {1 2 BYE [email protected]} ERROR: <script>: for BYE the value of AVP "state_test_var" is <null>
We can see after the initial INVITE none of the subsequent replies knew the value of our $avp(state_test_var), so we know the proxy is at this stage – Stateless.
Doing the heavy lifting of our state management is the Transaction Module (aka TM). The Transaction Module deserves a post of it’s own (and it’ll get one).
We’ll load the TM module (loadmodule “tm.so”) and use thet_relay() function instead of the forward() function.
But we’ll need to do a bit of setup around this, we’ll need to create a new route block to call t_relay() from (It’s finicky as to where it can be called from), and we’ll need to create a new reply_route{} to manage the response for this particular dialog.
Let’s take a look at the code:
####### Routing Logic ########


/* Main SIP request routing logic
 * - processing of any incoming SIP request starts with this route
 * - note: this is the same as route { ... } */
request_route {

        #Enable record_routing so we see the BYE / Re-INVITE etc
        record_route();

        #Handle Registrations in a dumb way so they don't messy our tests
        if(is_method("REGISTER")){
                sl_reply("200", "ok");
                exit;
        }


                 #Append a header so we can see this was proxied in the SIP capture
                append_hf("X-Proxied: You betcha\r\n");

        if(is_method("INVITE")){
                        #Createa  new AVP called "state_test_var" and set the value to "I remember"
                        $avp(state_test_var) = "I remember";
        }
                #Let syslog know we've set the value and check it
                xlog("for $rm the value of AVP \"state_test_var\" is $avp(state_test_var) ");

                #Send to route[RELAY] routing block
                route(RELAY);

}

route[RELAY]{

        #Use reply route "OurReplyRoute" for responses for this transaction
        t_on_reply("OurReplyRoute");

        #Relay (aka Forward) the request
        t_relay_to_udp("192.168.3.118", "5060");

}

onreply_route[OurReplyRoute] {
        #On replies from route[RELAY]

        #Check our AVP we set in the initial request
        xlog("for $rs response the value of AVP \"state_test_var\" is $avp(state_test_var) ");

        #Append a header so we can see this was proxied in the SIP capture
        append_hf("X-Proxied: For the reply\r\n");

}
So unlike before where we just called forward(); to forward the traffic we’re now calling in a routing block called RELAY.
Inside route[RELAY] we set the routing block that will be used to manage replies for this particular transaction, and then call t_relay_to_udp() to relay the request.
We renamed our onreply_route to onreply_route[OurReplyRoute], as specified in the route[RELAY].
So now let’s make a call (INVITE) and see how it looks in the log:
kamailio[5008]: {1 1 INVITE [email protected]} ERROR: : for INVITE the value of AVP "state_test_var" is I remember
kamailio[5005]: {2 1 INVITE [email protected]} ERROR: <script>: for 100 response the value of AVP "state_test_var" is I remember
kamailio[5009]: {2 1 INVITE [email protected]} ERROR: <script>: for 180 response the value of AVP "state_test_var" is I remember
kamailio[5011]: {2 1 INVITE [email protected]} ERROR: <script>: for 200 response the value of AVP "state_test_var" is I remember
kamailio[5010]: {1 1 ACK [email protected]} ERROR: <script>: for ACK the value of AVP "state_test_var" is <null>
kamailio[5004]: {1 2 BYE [email protected]} ERROR: <script>: for BYE the value of AVP "state_test_var" is <null>
kamailio[5007]: {2 2 BYE [email protected]} ERROR: <script>: for 200 response the value of AVP "state_test_var" is <null>
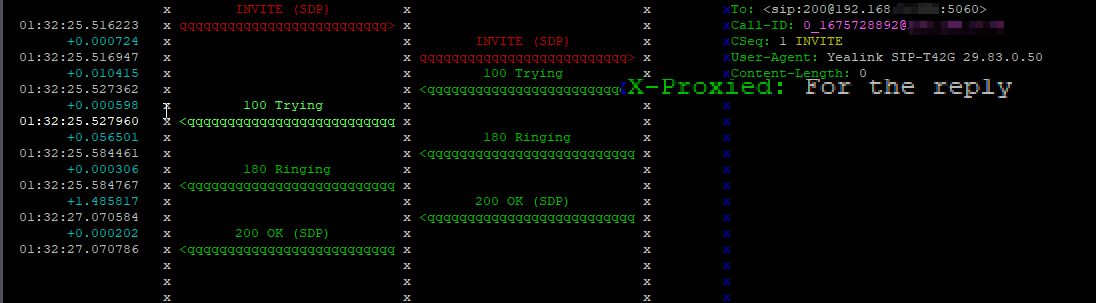
Here we can see for the INVITE, the 100 TRYING, 180 RINGING and 200 OK responses, state was maintained as the variable we set in the INVITE we were able to reference again.
(The subsequent BYE didn’t get state maintained because it’s not part of the transaction.)
One of the most searched keywords that leads to this site is Kamailio vs Asterisk, so I thought I’d expand upon this a bit more as I’m a big fan of both, and it’s somewhat confusing.
(Almost everything in this post I talk about on Asterisk is roughly true for FreeSWITCH as well, although FS is generally more stable and scalable than Asterisk. )
Asterisk
Asterisk is a collection of PBX / softswitch components that you can configure and put together to create a large number of different products with the use of config files and modules.
Asterisk can read and write the RTP media stream, allowing it to offer services like Voicemail, B2B-UA, Conferencing, Playing back audio, call recording, etc.
It’s easy to learn and clear to understand how it handles “calls”.
Kamailio
Kamailio is a SIP proxy, from which you can modify SIP headers and then forward them on or process them and generate a response.
Kamailio is unable to do manipulate the RTP media stream. It can’t listen to, modify or add to the call audio, it only cares about SIP and not the media stream. This means it can’t playback an audio file, record a call or serve voicemail.
Kamailio has a bit of a steep learning curve, which I’ve tried to cover in my Kamailio 101 series, but even so, Kamailio doesn’t understand the concept of a “call”, it deals in Sessions, as in SIP, and everything you want to do, you have to write into Kamailio’s logic. Awesome power but a lot to take in.
Note – RTPengine is growing in capabilities and integrates beautifully into Kamailio, so for some applications you may be able to use RTPengine for media handling.
Scale
Speed
Stability
Media Functions
Ease
Asterisk
X
X
Kamailio
X
X
X
Working Together
Asterisk has always had issues at scale. This is for a variety of reasons, but the most simplistic explanation is that Asterisk is fairly hefty software, and that each subscriber you add to the system consumes resources at a rate where once your system reaches a few hundred users you start to see issues with stability.
Kamailio works amazingly at scale, it’s architecture was designed with running at scale in mind, and it’s super lightweight footprint means the load on the box between handling 1,000 sessions and handling 100,000 sessions isn’t that much.
Because Asterisk has the feature set, and Kamailio has the scalability, so the the two can be used together really effectively. Let’s look at some examples of Asterisk and Kamailio working together:
Asterisk Clustering
You have a cluster of Asterisk based Voicemail servers, serving your softswitch environment. You can use a Kamailio instance to sit in front of them and route INVITEs evenly throughout the cluster of Asterisk instances.
You’d be using Asterisk’s VM functions (because Asterisk can do media functions) and Kamailio’s SIP routing functions.
You have a Kamailio based Softswitch that routes SIP traffic from customers to carriers, customers want a hosted Conference Bridge. You offer this by routing any SIP INVITES to the address of the conference bridge to an Asterisk server that serves as the conference bridge.
You’d be using Kamialio to route the SIP traffic and using Asterisk’s ability to be aware of the media stream and join several sources to offer the conference bridge.
Which should I use?
It all depends on what you need to do.
If you need to do anything with the audio stream you probably need to use something like Asterisk, FreeSwitch, YaTE, etc, as Kamailio can’t do anything with the audio stream.*
If it’s just signalling, both would generally be able to work, Asterisk would be easier to setup but Kamailio would be more scaleable / stable.
Asterisk is amazingly quick and versatile when it comes to solving problems, I can whip something together with Asterisk that’ll fix an immediate need in a faction of the time I can do the same thing in Kamailio.
On the other hand I can fix a problem with Kamailio that’ll scale to hundreds of thousands of users without an issue, and be lightning fast and rock solid.
Summary
Kamailio only deals with SIP signalling. It’s very fast, very solid, but if you need to do anything with the media stream like mixing, muxing or transcoding (RTP / audio) itself, Kamailio can’t help you.*
Asterisk is able to deal with the media stream, and offer a variety of services through it’s rich module ecosystem, but the trade-off is less stability and more resource intensive.
If you do require Asterisk functionality it’s worth looking into FreeSWITCH, although slightly harder to learn it’s generally regarded as superior in a lot of ways to Asterisk.
I don’t write much about Asterisk these days – the rest of the internet has that pretty well covered, but I regularly post about Kamailio and other facets of SIP.
I’m not a fan of Transcoding. It costs resources, often leads to reduced quality and adds latency.
Through some fancy SDP manipulating footwork we can often rejig the SDP order or limit the codecs we don’t support to cut down, or even remove entirely, the need for transcoding in the network.
There are no module parameters for SDP ops, we’ve just got to load the module with loadmodule “sdpops.so”
Use in Routing Logic
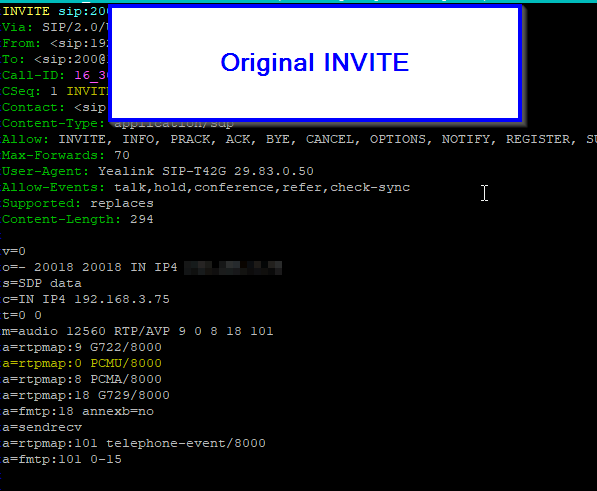
We’ll pickup where we left off on the Basic Stateless SIP Proxy use case (You can grab the basic code from that post), but this time we’ll remove PCMU (Aka G.711 μ-law) from the SDP body:
loadmodule "sdpops.so"
####### Routing Logic ########
/* Main SIP request routing logic
* - processing of any incoming SIP request starts with this route
* - note: this is the same as route { ... } */
request_route {
if(is_method("REGISTER")){
sl_reply("200", "Ok");
}
xlog("Received $rm to $ru - Forwarding");
append_hf("X-Proxied: You betcha\r\n");
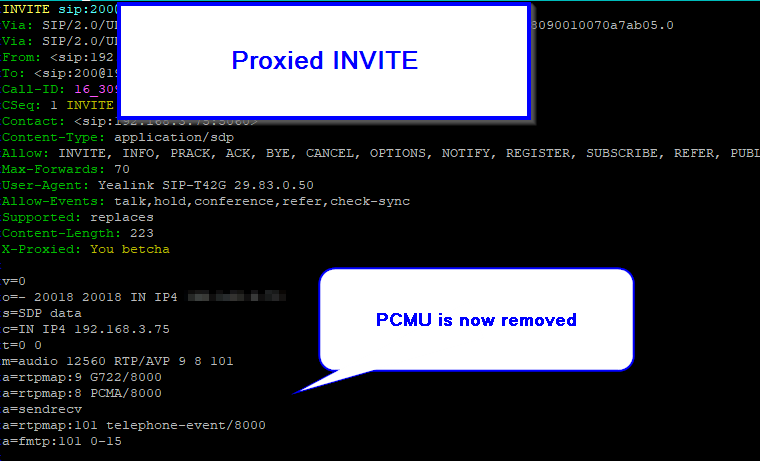
#Remove PCMU (G.711 u-law) by it's SDP Payload ID
sdp_remove_codecs_by_id("0");
#Remove PCMU by name
sdp_remove_codecs_by_name("PCMU");
#Forard to new IP
forward("192.168.3.110");
}
onreply_route{
xlog("Got a reply $rs");
append_hf("X-Proxied: For the reply\r\n");
}
We can remove the codec either by it’s name (PCMU) or by it’s payload ID.
Before traversing the ProxyAfter traversing the proxy
For removing it by name we just specify the name:
#Remove PCMU by name
sdp_remove_codecs_by_name("PCMU");
And by payload ID:
#Remove PCMU (G.711 u-law) by it's SDP Payload ID
sdp_remove_codecs_by_id("0");
We may want to remove all but one codec, again super simple:
We’ve talked a bit in the Kamailio Bytes series about different modules we can use, but I thought it’d be useful to talk about setting up a SIP Proxy using Kamailio, and what’s involved in routing a message from Host A to Host B.
When we talk about proxying for the most part we’re talking about forwarding, let’s look at the steps involved:
Our Kamailio instance receives a SIP request (for simplicity we’ll assume an INVITE).
Kamailio looks at it’s routing logic to lookup where to forward the request to. You could find out where to send the request to from a lot of different sources, you could consult the Dialplan Module or Dispatcher Module, perform an SQL lookup, consult UsrLoc table to find a AoR, etc.
Add it’s own Via header (more on that later)
Forward the Request (aka Proxy it) to the destination selected
Let’s take a look at a very simple way we can do this with two lines in Kamailio to forward any requests to 192.168.1.110:
####### Routing Logic ########


/* Main SIP request routing logic
 * - processing of any incoming SIP request starts with this route
 * - note: this is the same as route { ... } */
request_route {

        xlog("Received $rm to $ru - Forwarding");

        #Forard to new IP
        forward("192.168.1.110");

}
After we restart Kamailio and send a call (INVITE) to it let’s see how it handles it:
Let’s make a small modification, we’ll add a header called “X-Proxied” to the request before we forward it.
####### Routing Logic ########


/* Main SIP request routing logic
 * - processing of any incoming SIP request starts with this route
 * - note: this is the same as route { ... } */
request_route {

        xlog("Received $rm to $ru - Forwarding");

        append_hf("X-Proxied: You betcha\r\n");
        #Forard to new IP
        forward("192.168.1.110");

}
On the wire the packets still come from the requester, to the Proxy (Kamailio) before being forwarded to the forward destination (192.168.1.110):
We’ve now got a basic proxy that takes all requests to the proxy address and forwards it to an IP Address.
If you’re very perceptive you might have picked up the fact that the in-dialog responses, like the 100 Trying, the 180 Ringing and the 200 Ok also all went through the proxy, but if you look at syslog you’ll only see the initial request.
/usr/sbin/kamailio: Received INVITE to sip:[email protected]:5060 - Forwarding
So why didn’t we hit that xlog() route and generate a log entry for the replies?
But before we can talk too much about managing replies, let’s talk about Via…
It’s all about the Via
Before we can answer that question let’s take a look at Via headers.
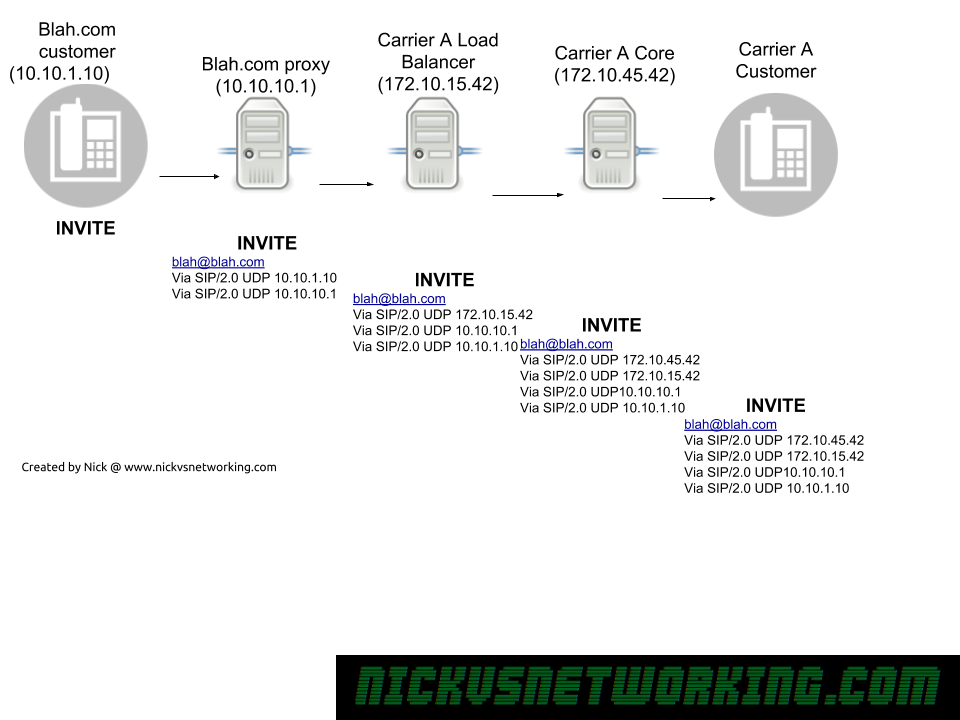
The SIP Via header is added by a proxy when it forwards a SIP message onto another destination,
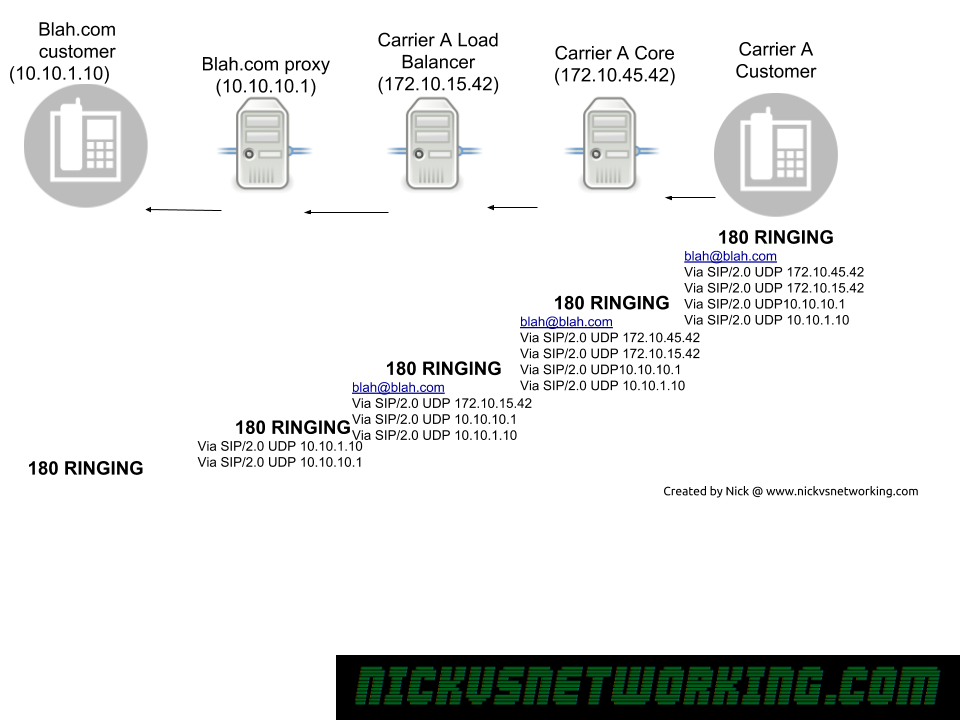
When a response is sent the reverse is done, each SIP proxy removes their details from the Via header and forwards to the next Via header along.
SIP Via headers in action
As we can see in the example above, each proxy adds it’s own address as a Via header, before it uses it’s internal logic to work out where to forward it to, and then forward on the INVITE.
Now because all our routing information is stored in Via headers when we need to route a Response back, each proxy doesn’t need to consult it’s internal logic to work out where to route to, but can instead just strip it’s own address out of the Via header, and then forward it to the next Via header IP Address down in the list.
Via headers are also used to detect looping, a proxy can check when it receives a SIP message if it’s own IP address is already in a Via header, if it is, there’s a loop there.
Managing Responses in Kamailio
By default Kamailio manages responses by looking at the Via header, if the top Via header is its own IP address, it strips it’s own Via header and forwards it onto the next destination in the Via header.
We can add our own logic into this by adding a new route called onreply_route{}
onreply_route{
        xlog("Got a reply $rs");
        append_hf("X-Proxied: For the reply\r\n");
}
Now we’ll create a log entry with the response code in syslog for each response we receive, and we’ll add a header on the replies too:
Recap
A simple proxy to forward INVITEs is easy to implement in Kamailio, the real tricky question is what’s the logic involved to make the decision,
Now we’ll put both together to create something functional you could use in your own deployments. (You’d often find it’s faster to use HTable to store and retrieve data like this, but that’s a conversation for another day)
The Project
We’ll build a SIP honeypot using Kamailio. It’ll listen on a Public IP address for SIP connections from people scanning the internet with malicious intent and log their IPs, so our real SIP softswitches know to ignore them.
We’ll use GeoIP2 to lookup the location of the IP and then store that data into a MySQL database.
Lastly we’ll create a routing block we can use on another Kamailio instance to verify if that the IP address of the received SIP message is not in our blacklist by searching the MySQL database for the source IP.
The Database
In this example I’m going to create a database called “blacklist” with one table called “baddies”, in MySQL I’ll run:
CREATE database blacklist;
CREATE TABLE `baddies` (
	`id` INT NOT NULL AUTO_INCREMENT PRIMARY KEY,
	`ip_address` INT unsigned UNIQUE,
	`hits` INT,
	`last_seen` DATETIME,
	`ua` TEXT,
	`country` TEXT,
	`city` TEXT
);
I’ll setup a MySQL user to INSERT/UPDATE/SELECT data from the MySQL database.
For storing IP addresses in the database we’ll store them as unsigned integers, and then use the INET_ATON('127.0.0.1') MySQL command to encode them from dotted-decimal format, and the INET_NTOA('2130706433') to put them back into dotted decimal.
Modparams
Now we’ll need to configure Kamailio, I’ll continue on from where we left off in the last post on GeoIP2 as we’ll use that to put Geographic data about the IP before adding the MySQL and SQLOps modules:
# ----- SQL params -----
loadmodule "db_mysql.so"
loadmodule "sqlops.so"

#Create a new MySQL database connection called blacklist_db
modparam("sqlops","sqlcon","blacklist_db=>mysql://root:yourpassword@localhost/blacklist")

#Set timeouts for MySQL Connections
modparam("db_mysql", "ping_interval", 60)
modparam("db_mysql", "auto_reconnect", 1)
modparam("db_mysql", "timeout_interval", 2)
After loading db_mysql and sqlops we create a new object / connection called blacklist_db with our MySQL Database parameters.
Now after a restart we’ll be connected to our MySQL database.
Honeypot Routing Logic
Now we’ll create a route to log the traffic:
####### Routing Logic ########


/* Main SIP request routing logic
 * - processing of any incoming SIP request starts with this route
 * - note: this is the same as route { ... } */
request_route {

        route(AddToBlacklist);
        sl_reply('200', 'Sure thing boss!');

}
route[AddToBlacklist]{
        xlog("Packet received from IP $si");
        sql_xquery("blacklist_db", "insert into baddies (ip_address, hits, last_seen, ua, country, city) values (2130706433, 10, NOW(), 'testua2', 'Australia', 'Hobart');");
}
Now for each SIP message received a new record will be inserted into the database:
 root@ip-172-31-8-156:/etc/kamailio# mysql -u root -p blacklist -e "select * from baddies;"
 Enter password:
 +----+------------+------+---------------------+---------+-----------+--------+
 | id | ip_address | hits | last_seen           | ua      | country   | city   |
 +----+------------+------+---------------------+---------+-----------+--------+
 |  1 | 2130706433 |   10 | 2019-08-13 02:52:57 | testua2 | Australia | Hobart |
 |  2 | 2130706433 |   10 | 2019-08-13 02:53:01 | testua2 | Australia | Hobart |
 |  3 | 2130706433 |   10 | 2019-08-13 02:53:05 | testua2 | Australia | Hobart |
 +----+------------+------+---------------------+---------+-----------+--------+
This is great but we’re not actually putting the call variables in here, and we’ve got a lot of duplicates, let’s modify our sql_xquery() to include the call variables:
Now we’re setting the IP Address value to the Source IP psedovariable ($si) and formatting it using the INET_ATON function in MySQL, setting the last_seen to the current timestamp and setting the user agent to the User Agent psedovariable ($ua).
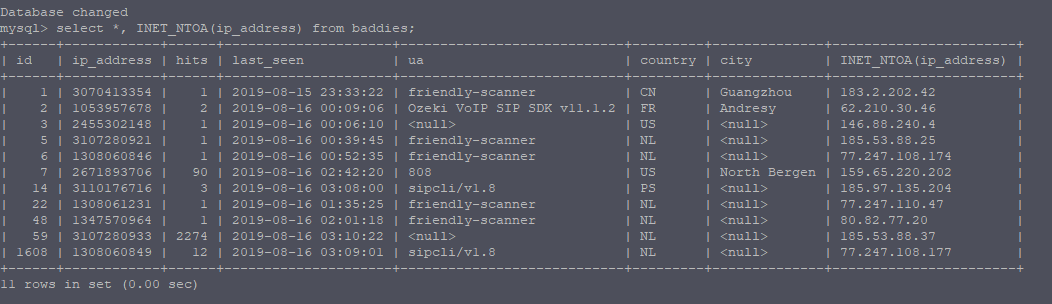
Let’s restart Kamailio, truncate the data that’s currently in the DB, send some SIP traffic to it and then check the contents:
mysql -u root -p blacklist -e "select *, INET_NTOA(ip_address) from baddies;"
Here you can see we’re starting to get somewhere, the IP, UA and last_seen values are all now correct.
We’re getting multiple entries from the same IP though, instead we just want to increment the hits counter and set the last_seen to the current time, for that we’ll just update the SQL query to set the time to be NOW() and if that IP is already in the database to update the last_seen value and incriment the hits counter:
route[AddToBlacklist]{
        xlog("Packet received from IP $si");
        geoip2_match("$si", "src"))
        sql_xquery("blacklist_db", "insert into baddies (ip_address, hits, last_seen, ua, country, city) values (INET_ATON('$si'), 1, NOW(), '$ua', '$gip2(src=>cc)', '$gip2(src=>city)') ON DUPLICATE KEY UPDATE last_seen = NOW(), hits = hits + 1;", "r_sql");

}
The only issue with this is if GeoIP2 doesn’t have a match, no record will be added in the database, so we’ll add a handler for that:
route[AddToBlacklist]{
        xlog("Packet received from IP $si");
        if(geoip2_match("$si", "src")){
                sql_xquery("blacklist_db", "insert into baddies (ip_address, hits, last_seen, ua, country, city) values (INET_ATON('$si'), 1, NOW(), '$ua', '$gip2(src=>cc)', '$gip2(src=>city)') ON DUPLICATE KEY UPDATE last_seen = NOW(), hits = hits + 1;", "r_sql");
        }else{          ##If no match in GeoIP2 leave Country & City fields blank
                sql_xquery("blacklist_db", "insert into baddies (ip_address, hits, last_seen, ua, country, city) values (INET_ATON('$si'), 1, NOW(), '$ua', '', '') ON DUPLICATE KEY UPDATE last_seen = NOW(), hits = hits + 1;", "r_sql");
        }
}
Now let’s check our database again and see how the data looks:
mysql -u root -p blacklist -e "select *, INET_NTOA(ip_address) from baddies;"
Perfect! Now we’re inserting data into our blacklist from our honeypot. Now we’ll configure a new routing block we can use on another Kamailio instance to see if an IP is in the blacklist.
I left this running on my AWS box for a few hours, and lots of dodgy UAs dropped in to say hello, one of which was very insistent on making calls to Poland…
Querying the Data
Now we’ve got a blacklist it’s only useful if we block the traffic from our malicous actors who we’ve profiled in the database.
You could feed this into BGP to null route the traffic, or hook this into your firewall’s API, but we’re going to do this in Kamailio, so we’ll create a new routing block we can use on a different Kamailio instance – Like a production one – to see if the IP it just received traffic from is in the blacklist.
We’ve already spoken about querying databases in the SQLops Kamailio bytes, but this routing block will query the blacklist database, and if the sender is in the database, one or more records will be returned, so we know they’re bad and will drop their traffic:
route[CheckBlacklist]{

        xlog("Checking blacklist for ip $si");

        #Define a variable containing the SQL query we'll run
        $var(sql) = "select INET_NTOA(ip_address) as ip_address from baddies;";

        #Log the SQL query we're going to run to syslog for easy debugging
        xlog("Query to run is $var(sql)");

        #Query blacklist_db running the query stored in $var(sql) and store the result of the query to result_sql
        sql_query("blacklist_db", "$var(sql)", "result_sql");

        #If more than 0 records were returned from the database, drop the traffic
        if($dbr(result_sql=>rows)>0){
                xlog("This guy is bad news. Dropping traffic from $si");
                exit;
        }else{
                xlog("No criminal record for $si - Allowing to progress");
        }


}
This Honeypot use case just put those elements together.
In reality a far better implementation of this would use HTable to store this data, but hopefully this gives you a better understanding of how to actually work with data.
Final Note
I wrote this post about a week ago, and left the config running on an AWS box. I was getting hits to it within the hour, and in the past week I’ve had 172 IPs come and say hello, and some like the FriendlyScanner instance at 159.65.220.215 has sent over 93,000 requests:
We’ve touched a tiny bit on basic database functionality in Kamailio, using MySQL to store User Data for authentication, ACLs or Dispatcher entries.
But with all those we were using Databases to load the config / dynamic data for a module.
We’ll build upon that, to connect to a Database that we can INSERT, UPDATE and SELECT data from within the dialplan.
For today’s example we’ll lookup the To address from a SIP INVITE and send back
Heads Up
There’s a lot of different use cases for reading and writing data from a database, but Kamailio also has a lot of native modules that handle this better, for example:
You might want to store a record of each INVITE and BYE you recieve for accounting, a better option is to use the Accounting Module in Kamailio.
You might want to authenticate user’s based on ACLs stored in a database, a better option would be to use Permissions Module.
User authentication info is best handled by Auth DB module.
The Dialplan module handles number translation really well and is lightning quick.
Just keep this in mind before jumping in that a lot of use cases have already been covered by a Kamailio module.
The Architecture
For today’s example we’ll be using MySQL as the database backend (db_mysl), but the db_mysql module simply connects us to a database, a bit like ODBC.
The real MVP is the SQLops module, that does all the heavy lifting by running the queries and managing the responses.
The majority of this config would work fine for other database backends, like PostGres, MongoDB, Oracle, etc.
I’ll demonstrate this same setup using different database backends in future posts.
MySQL Database
Before we get too excited we’ll need to setup a database to query. I’ll create a database called dyamic_routing with a table called routing storing source / destinations.
CREATE DATABASE phonebook;
USE  phonebook;
CREATE TABLE contacts (
     id INT NOT NULL AUTO_INCREMENT PRIMARY KEY,
     source TEXT,
     name TEXT
 );
INSERT INTO contacts VALUES (1, '200', 'Nick Deskphone');
I’ll setup a MySQL user to INSERT/UPDATE/SELECT data from the MySQL database the normal way.
Modparam
The module parameters for connecting to a database backend are fairly straight forward, but we’ll go into a bit of depth here to drive home the point.
# ----- SQL params -----
loadmodule "db_mysql.so"
loadmodule "sqlops.so"

#Create a new MySQL database connection called contacts_db
modparam("sqlops","sqlcon","contacts_db=>mysql://root:youshouldntrealluseroot@localhost/phonebook")

#Set timeouts for MySQL Connections
modparam("db_mysql", "ping_interval", 60)
modparam("db_mysql", "auto_reconnect", 1)
modparam("db_mysql", "timeout_interval", 2)
First off we load the two modules we need for this, db_mysql and sqlops. This is fairly self explanatory, if we were using db_postgres, db_mongodb or even db_text we’d load them instead of db_mysql.
The sqlops “sqlcon” modparam is where we define our MySQL database connection.
In this case we create a new database connection object called contacts_db– We can have connections to multiple databases, hence requiring a name.
The MySQL URL is fairly straightforward, database type, username, password, host and database:
mysql://root:password@localhost/phonebook
In production obviously you shouldn’t use root as the user account to log into the database, and lock it down to only the source IP of your Kamailio instance and with only the permissions it needs. (If it’s just selecting data there’s no need for GRANT…)
Basic Query
Now we’ve created a database connection it’s time to start using it.
request_route {
        if(method=="INVITE"){
                xlog("New request to $tU");

                #Query database object called "contacts_db", run the below query and store the output to a variable called result_sql
                sql_query("contacts_db", "select * from contacts;", "result_sql");

                #output number of rows in database returned
                xlog("number of rows in table is $dbr(result_sql=>rows)\n");
}
}
If the method is an INVITE we’ll query the database object called “contacts_db” to run the query select * from contacts;
We’ll then output the number of rows in the table to xlog.
The query actually happens in the sql_query() command, which takes the name of the database object ( contacts_db ), the query itself ( select * from contacts; ) and stores it into a variable called result_sql.
Finally xlog references the variable we stored our result in (result_sql) using the $dbr() handler to output the number of rows in the table.
If you save this and send an INVITE to any destination and watch the syslog you should see something along the lines of this:
/usr/sbin/kamailio[7815]: ERROR: : New request to 200
/usr/sbin/kamailio[7815]: ERROR: <script>: number of rows in table is 1
This means we’ve got a connection to the database and we can run queries.
Accessing the Output
Now we’ve got the data back from the database and stored it in result_sql we probably want to do something with the outputted data.
By wrapping the result_sql variable in the $dbr() tags we can access it’s jucy insides, let’s take a look:
                #output number of columns
                xlog("Result has $dbr(result_sql=>cols) Columns");
                #output number of rows
                xlog("Result has $dbr(result_sql=>rows) rows");
                #output contents of row 0, column 2
                xlog("Contents of row 0 col 2 is $dbr(result_sql=>[0,2]) ");
                #output name of column 2
                xlog("name of column 2 is $dbr(result_sql=>colname[2]) ");
If we add this after our last xlog line, restart Kamailio and view syslog it should look something like this:
/usr/sbin/kamailio[8249]: ERROR: <script>: New request to 200
/usr/sbin/kamailio[8249]: ERROR: <script>: number of rows in table is 1
/usr/sbin/kamailio[8249]: ERROR: <script>: Result has 3 Columns
/usr/sbin/kamailio[8249]: ERROR: <script>: Result has 1 rows
/usr/sbin/kamailio[8249]: ERROR: <script>: Contents of row 0 column 2 is Nick Deskphone
Now we can see the data in the result we’ll start to refine this down a bit, we’ll begin by limiting the SQL query to search for the called number.
For this we’ll update the sql_query(); function to:
sql_query("contacts_db", "select * from contacts where source = $tU;", "result_sql");
This will include the the To URI Username pseudo variable in our query, so will only return results if the number we dial has one or more matching “source” entries in the database.
If we dial 200 the query that’s actually run against the database will look like this:
select * from contacts where source = '200';
Now once we save and try again our traffic will look the same, except it’ll only return data if we dial 200, if we dial 201 the SQL server won’t have any matching results to return:
/usr/sbin/kamailio[9069]: ERROR: : New request from 2029
/usr/sbin/kamailio[9069]: ERROR: number of rows in table is 0
/usr/sbin/kamailio[9069]: ERROR: Result has 0 Columns
So that’s all well and good but we haven’t really got the data easily yet, while we’re outputting the contents of row 0 col 2 to syslog, it’s not going to handle multiple results being returned, or 0 results being returned, so we need a better way to handle this.
We’ll use a for loop to loop through all the results returned and output the second column of each (the “name” field in the database).
                #Loop through results
                #Create variable i to use as the counter
                $var(i) = 0;
                #While the contents of row i, position 2, is not null:
                while ($dbr(result_sql=>[$var(i),2]) != $null) {
                        #Output row i, position 2 (name)
                        xlog("name is $dbr(result_sql=>[$var(i),2])");
                        #increment i by 1
                        $var(i) = $var(i) + 1;
                }
So while the contents of row i, position 2, is not null, we’ll output the contents and increment i to get the next row in the database until there are none left.
Now we can give our code a bit of a clean up:
request_route {
        if(method=="INVITE"){
                xlog("New request from $tU");

                #Query database object called "contacts_db", run the below query and store the output to a variable called result_sql
                sql_query("contacts_db", "select * from contacts where source = $tU;", "result_sql");

                #Loop through results
                #Create variable i to use as the counter
                $var(i) = 0;
                #While the contents of row i, position 2, is not null:
                while ($dbr(result_sql=>[$var(i),2]) != $null) {
                        #Output row i, position 2 (name)
                        xlog("name $dbr(result_sql=>[$var(i),2])");
                        #increment i by 1
                        $var(i) = $var(i) + 1;
                }


        }
        if(method=="REGISTER"){ sl_reply('200', 'OK'); }
}
I’ve removed many of our xlog entries we put in for debugging and also added a handler to handle REGISTER requests to keep my IP phone happy.
Now if we make a call to number 200:
/usr/sbin/kamailio[9686]: ERROR: New request from 200
/usr/sbin/kamailio[9686]: ERROR: name Nick Deskphone
And for comparison a call to 201 (no matching database entry):
/usr/sbin/kamailio[9686]: ERROR: New request from 200
Using the Resulting Output
Now we’ve got access to the data from the database let’s do something with it.
Inside our loop we’ll send a reply to the SIP requester, with a 410 “Gone” response with the body containing the data returned from the database:
                        #Loop through results
                        #Create variable i to use as the counter
                        $var(i) = 0;
                        #While the contents of row i, position 2, is not null:
                        while ($dbr(result_sql=>[$var(i),2]) != $null) {
                                #Output row i, position 2 (name)
                                xlog("name $dbr(result_sql=>[$var(i),2])");
                                $var(name) = $dbr(result_sql=>[$var(i),2]);
                                #increment i by 1
                                $var(i) = $var(i) + 1;

                                #Reply with a 410 (User Gone) response with the name returned from the database
                                sl_reply("410", "Sorry $var(name) has gone home");
                                exit;
                        }
Now calls to 200 will get the message “Sorry Nick desk phone has gone home”.
Lastly we probably want to only loop through the output if there’s more than one row returned from the database, so we’ll put the looping code in an if statement that evaluates if the number of returned rows from the database is 1 or more, and if not just send a 404 response:
                #if one or more results are returned from the database
                if($dbr(result_sql=>rows)>0){

                        #Loop through results
                        #Create variable i to use as the counter
                        $var(i) = 0;
                        #While the contents of row i, position 2, is not null:
                        while ($dbr(result_sql=>[$var(i),2]) != $null) {
                                #Output row i, position 2 (name)
                                xlog("name $dbr(result_sql=>[$var(i),2])");
                                $var(name) = $dbr(result_sql=>[$var(i),2]);
                                #increment i by 1
                                $var(i) = $var(i) + 1;

                                #Reply with a 410 (User Gone) response with the name returned from the database
                                sl_reply("410", "Sorry $var(name) has gone home");
                                exit;
                        }
                }else{
                        #if 0 results are returned from database
                        sl_reply("404", "Never heard of them");
                }
INSERT, DELETE, UPDATE, etc
Although we only covered SELECT, queries that don’t return data like an INSERT, UPDATE, DELETE etc, can all be run the same way but we just don’t need to worry about managing the returned data.
For example we could delete a record using:
sql_query("contacts_db", "delete * from contacts where source = $tU;");
We don’t even need to store the output unless we need to.
Summary
Hopefully you’ve now got an idea how to query data from a database and view / manipulated the returned data.
Generally Kamailio functions as a SIP router, receiving SIP messages and then responding with SIP.
Sometimes we may have a use case where we need to interact with Kamailio but with a request that isn’t a SIP message.
You’ve got a motion activated IP Camera, and you want to send an alert to a SIP phone if it detects motion.
The problem? The IP camera doesn’t speak SIP. but it can send an HTTP request if it detects motion.
Enter xHTTP!
We’ll get Kamailio to listen for HTTP requests and send an instant message using method “MESSAGE” to a SIP phone to let someone know there’s been motion.
Use Case
The sending of the message is fairly straight forward, we’ll use the UAC module to perform a uac_req_send() and put it in it’s own routing block called “SEND_MESSAGE”, which we’ll add after the request_route{} block:
Now when we call the route ROUTE(SEND_MESSAGE); the SIP phone at 10.0.1.5 will get a message that pops up on the screen.
So the next step is getting something other than a SIP request to call our SEND_MESSAGE route.
For this we’ll use the xHTTP module, a barebones HTTP server for Kamailio.
It’s requirements are pretty easy, sl_reply needs to be loaded before xHTTP, and you may need to add tcp_accept_no_cl=yes to your core settings (aka Global Parameters at the top).
The two lines we’ll need to load and configure the module are equally as easy:
The url_match modparam just means that any HTTP request has to start with /sip/ in the URL.
Finally we’ll define an event route to handle any xHTTP requests after our request_route{} block:
event_route[xhttp:request] {
        xlog("Recieved HTTP request with request $hu");                         #Write to log the URL of http request.
        xhttp_reply("200", "OK", "text/html", "<html><body>OK</body></html>");  #Send HTTP response
}
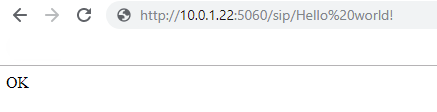
Now if we restart Kamailio, and open a browser pointed to the IP of your Kamailio server, port 5060 /sip/Hello World you should get a response of “OK” in the browser:
Perfect, we now have an HTTP server in Kamailio, and we can read the HTTP request URL into a variable.
Next up we can call the route(SEND_MESSAGE) and our SIP phone will get a message
event_route[xhttp:request] {
        xlog("Recieved HTTP request with request $hu");                         #Write to log the URL of http request.
        xhttp_reply("200", "OK", "text/html", "<html><body>OK</body></html>");  #Send HTTP response
        route(SEND_MESSAGE);
}
Presto! When we call that URL (http://your-kamailio-ip:5060/sip/whatever) a SIP SIMPLE MESSAGE is sent.
But why stop there, let’s make this a bit prettier, we’ll set the message to equal the part of the HTTP request after the /sip/ so we can send custom data, replace the %20 with underscores and send it:
route[SEND_MESSAGE]{
        $uac_req(method)="MESSAGE";
        $uac_req(ruri)="sip:192.168.3.227:5060";
        $uac_req(furi)="sip:nickvsnetworking.com";
        $uac_req(turi)="sip:thisphone";
        $uac_req(callid)=$(mb{s.md5});
        $uac_req(hdrs)="Subject: Test\r\n";
        $uac_req(hdrs)=$uac_req(hdrs) + "Content-Type: text/plain\r\n";
        $uac_req(body)=$var(message);
        uac_req_send();

}

event_route[xhttp:request] {
        xlog("Recieved HTTP request with request $hu");                         #Write to log the URL of http request.
        $var(message) = $hu;                                                    #Set variable $var(message) to equal the URL of http request.
        $var(message) = $(var(message){s.substr,5,0});                          #Cut off first 5 chars to exclude the /sip/ prefix from the HTTP request
        $var(message) = $(var(message){s.replace,%20,_});                       #Replace %20 of space in HTTP request with Underscore _ for spaces
        xlog("var message is $var(message)");                                   #Write to log the http request minus the /sip/ prefix
        xhttp_reply("200", "OK", "text/html", "<html><body>OK</body></html>");  #Send HTTP response
        route(SEND_MESSAGE);                                                    #Call the SEND_OPTIONS route (See above)
}
We’ll also set our core settings / gloabal parameters to listen on TCP port 80 as well as UDP port 5060 so we don’t need to specify the port in the browser:
Hopefully by now you can see some of the cool things you can do with the HTTP module. Kamailio is so much more than just a SIP router / proxy, and these external modules being able to interface with it give you so many options.
Want to offer webhooks to customers to control their calls? xHTTP can do that!
Want to play a message to all users on calls announcing to them lunch is ready? RTPengine and xHTTP can do that too!
If you’re planning on using this in production you probably want to automate the pulling of this data on a regular basis and keep it in a different directory.
I’ve made a very simple example Kamailio config that shows off some of the features of GeoIP2’s logic and what can be shown, so let’s look at the basics of the module:
if(geoip2_match("$si", "src")){
                xlog("Packet received from IP $si");
                xlog("Country is: $gip2(src=>cc)\n");
}
If we put this at the top of our request_route block every time we recieve a new request we can see the country from which the packet came from.
Let’s take a look at the output of syslog (with my IP removed):
#> tail -f /var/log/syslog
ERROR: <script>: Packet received from IP 203.###.###.###
ERROR: <script>: Country is: AU
ERROR: <script>: City is:  Melbourne
ERROR: <script>: ZIP is:  3004
ERROR: <script>: Regc is:  VIC
ERROR: <script>: Regn is:  Victoria
ERROR: <script>: Metro Code is:  <null>
We can add a bunch more smarts to this and get back a bunch more variables, including city, ZIP code, Lat & Long (Approx), timezone, etc.
        if(geoip2_match("$si", "src")){
                xlog("Packet received from IP $si");
                xlog("Country is: $gip2(src=>cc)\n");
                xlog("City is:  $gip2(src=>city)");
                xlog("ZIP is:  $gip2(src=>zip)");
                xlog("Regc is:  $gip2(src=>regc)");
                xlog("Regn is:  $gip2(src=>regn)");
                xlog("Metro Code is:  $gip2(src=>metro)");

                if($gip2(src=>cc)=="AU"){
                        xlog("Traffic is from Australia");
                }
        }else{
                xlog("No GeoIP Match for  $si");
        }
#> tail -f /var/log/syslog
ERROR: <script>: Packet received from IP ###.###.###.###
ERROR: <script>: Country is: AU
ERROR: <script>: City is:  Melbourne
ERROR: <script>: ZIP is:  3004
ERROR: <script>: Regc is:  VIC
ERROR: <script>: Regn is:  Victoria
ERROR: <script>: Metro Code is:  <null>
Using GeoIP2 you could use different rate limits for domestic users vs overseas users, guess the dialling rules based on the location of the caller and generate alerts if accounts are used outside their standard areas.
We’ll touch upon this again in our next post on RTPengine where we’ll use an RTPengine closes to the area in which the traffic originates.
I’m a big fan of RTPengine, and I’ve written a bit about it in the past.
Let’s say we’re building an Australia wide VoIP network. It’s a big country with a lot of nothing in the middle. We’ve got a POP in each of Australia’s capital cities, and two core softswitch clusters, one in Melbourne and one in Sydney.
These two cores will work fine, but a call from a customer in Perth, WA to another customer in Perth, WA would mean their RTP stream will need to go across your inter-caps to Sydney or Melbourne only to route back to Perth.
That’s 3,500Km each way, which is going to lead to higher latency, wasted bandwidth and decreased customer experience.
What if we could have an RTPengine instance in our Perth POP, handling RTP proxying for our Perth customers? Another in Brisbane, Canberra etc, all while keeping our complex expensive core signalling in just the two locations?
RTPengine to the rescue!
Preparing our RTPEngine Instances
In each of our POPs we’ll spin up a box with RTPengine,
The only thing we’d do differently is set the listen-ng value to be 0.0.0.0:2223 and the interface to be the IP of the box.
By setting the listen-ng value to 0.0.0.0:2223 it’ll mean that RTPengine’s management port will be bound to any IP, so we can remotely manage it via it’s ng-control protocol, using the rtpengine Kamailio module.
Naturally you’d limit access to port 2223 only to allowed devices inside your network.
Next we’ll need to add the details of each of our RTP engine instances to MySQL, I’ve used a different setid for each of the RTPengines. I’ve chosen to use the first digit of the Zipcode for that state (WA’s Zipcodes / Postcodes are in the format 6xxx while NSW postcodes are look like 2xxx), we’ll use this later when we select which RTPengine instances to use.
I’ve also added localhost with setid of 0, we’ll use this as our fallback route if it’s not coming from Australia.
Bingo, we’re connected to three RTPengine instances,
Next up we’ll use the Geoip2 module to determine the source of the traffic and route to the correct, I’ve touched upon the Geoip2 module’s basic usage in the past, so if you’re not already familiar with it, read up on it’s usage and we’ll build upon that.
We’ll load GeoIP2 and run some checks in the initial request_route{} block to select the correct RTPengine instance:
        if(geoip2_match("$si", "src")){
                if($gip2(src=>cc)=="AU"){
                        $var(zip) =  $gip2(src=>zip);
                        $avp(setid) = $(var(zip){s.substr,0,1});
                        xlog("rtpengine setID is $avp(setid)");
                }else{
                        xlog("GeoIP not in Australia - Using default RTPengine instance");
                        set_rtpengine_set("0");
                }
        }else{
                xlog("No GeoIP Match - Using default RTPengine instance");
                set_rtpengine_set("0");
        }
In the above example if we have a match on source, and the Country code is Australia, the first digit of the ZIP / Postcode is extracted and assigned to the AVP “setid” so RTPengine knows which set ID to use.
In practice an INVITE from an IP in WA returns setID 6, and uses our RTPengine in WA, while one from NSW returns 2 and uses one in NSW. In production we’d need to setup rules for all the other states / territories, and generally have more than one RTPengine instance in each location (we can have multiple instances with the same setid).
Hopefully you’re starting to get an idea of the fun and relatively painless things you can achieve with RTPengine and Kamailio!
I’ve talked a bit in the past about using RTPengine to act as an RTP proxy / media proxy in conjunction with Kamailio.
Recently transcoding support was added to RTPengine, and although the Kamailio rtpengine module doesn’t yet recognise the commands when we put them in, they do work to transcode from one codec to another.
This will mask all the other codecs and transcode into PCMU, simple as that.
Beware software based transcoding is costly to resources, this works fine in small scale, but if you’re planning on transcoding more than 10 or so streams you’ll start to run into issues, and should look at hardware based transcoding.
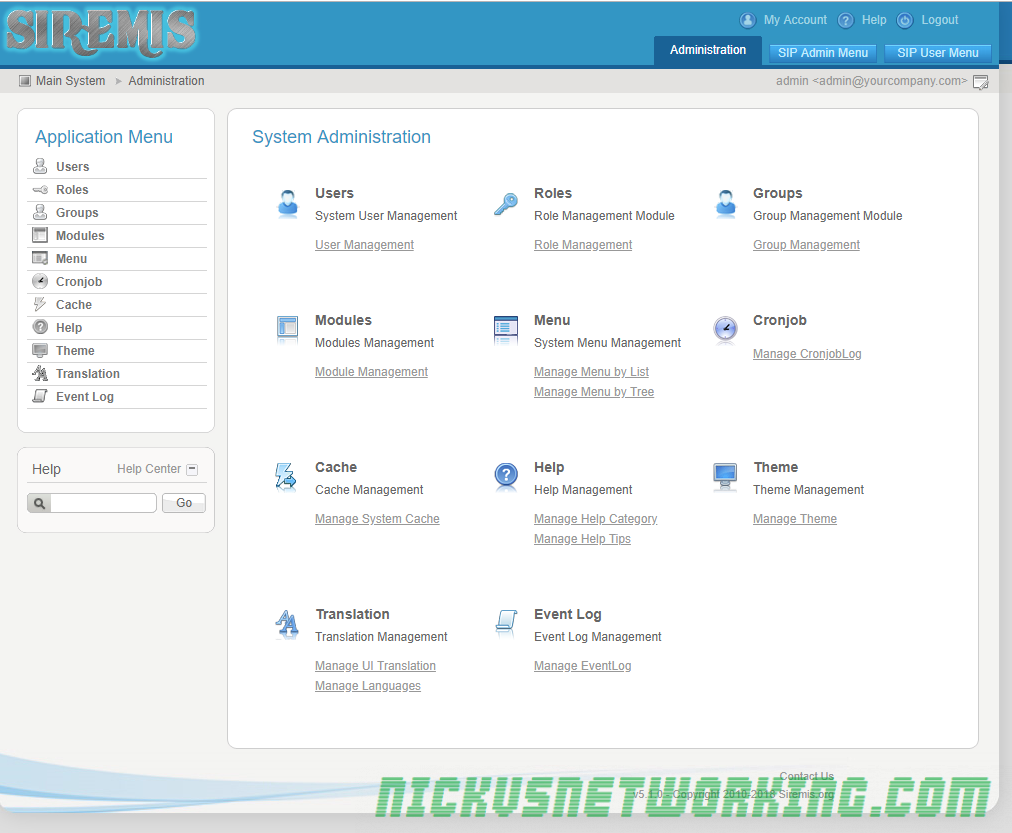
Siremis is a web interface for Kamailio, created by the team at Asipto, who contribute huge amounts to the Kamailio project.
Siremis won’t create your Kamailio configuration file for you, but allows you to easily drive the dynamic functions like dialplan, subscribers, dispatcher, permissions, etc, from a web interface.
Siremis essentially interfaces with the Kamailio database, kamcmd and kamctl to look after your running Kamailio instance.
Installation
I’ll be installing on Ubuntu 18.04, but for most major distributions the process will be the same. We’re using PHP7 and Apache2, which are pretty much universal available on other distros.
First we need to install all the packages we require:
Next we’ll download Siremis from the Git repo, and put it into a folder, which I’ve named the same as my Kamailio version.
cd /var/www/html/
git clone https://github.com/asipto/siremis kamailio-5.1.2
Now we’ll move into the directory we’ve created (called kamailio-5.1.2) and build the apache2 config needed:
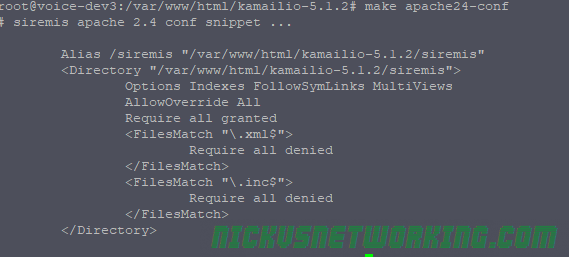
cd kamailio-5.1.2/
make apache24-conf
This then gives us a config except we can put into our Apache virtual host config file:
We can now copy and paste this into the end of an existing or new Apache virtual host file.
If this is a fresh install you can just pipe the output of this into the config file directly:
make apache24-conf >> /etc/apache2/sites-available/000-default.conf
service apache2 restart
Now if you browse to http://yourserverip/siremis you should be redirected to http://yourserverip/siremis/install and have a few errors, that’s OK, it means our Apache config is working.
Next we’ll set the permissions, create the folders and .htaccess. The Siremis team have also created make files to take care of this too, so we can just run them to set everything up:
make prepare24
make chown
With that done we can try browsing to our server again ( http://yourserverip/siremis ) and you should hit the installation wizard:
Now we’ll need to setup our database, so we can read and write from it.
We’ll create new MySQL users for Kamailio and Seremis:
mysql> GRANT ALL PRIVILEGES ON siremis.* TO siremis@localhost IDENTIFIED BY 'siremisrw';

mysql> CREATE USER 'kamailio'@'localhost' IDENTIFIED BY 'my5yhtY7zPJzV8vu';

mysql> GRANT ALL PRIVILEGES ON * . * TO 'kamailio'@'localhost';

mysql>  FLUSH PRIVILEGES;
Next up we’ll need to configure kamctlrc so it knows the database details, we covered this the Security in Practice tutorial.
We’ll edit /etc/kamalio/kamctlrc and add our database information:
Once that’s done we can create the database and tables using kamdbctl the database tool:
kamdbctl create
I’ve selected to install the optional tables for completeness.
Once this is done we can go back to the web page and complete the installation wizard:
We’ll need to fill the password for the Siremis DB we created and for the Kamailio DB, and ensure all the boxes are ticked.
Next, Next, Next your way through until you hit the login page, login with admin/admin and you’re away!
Troubleshooting
If you have issues during the installation you can re-run the installation web wizard by removing the install.lock file in /var/www/html/kamailio-5.1.2/siremis
You can also try dropping the Siremis database and getting the installer to create it again for you:
HTable is Kamailio’s implimentation of Hash Tables a database-like data structure that runs in memory and is very quick.
It’s uses only become apparent when you’ve become exposed to it.
Let’s take an example of protecting against multiple failed registration attempts.
We could create a SQL database called registration attempts, and each time one failed log the time and attempted username.
Then we could set it so before we respond to traffic we query the database, find out how many rows there are that match the username being attempted and if it’s more than a threshold we set we send back a rate limit response.
The problem is that’s fairly resource intensive, the SQL data is read and written from disks and is slow to do both.
Enter HTable, which achieves the same thing with an in-memory database, that’s lightning fast.
Basic Setup
We’ll need to load htable and create an htable called Table1 to store data in:
$sht(MessageCount=>test) is the logical link to the Htable called MessageCount with a key named test. We’re making that equal itself + 1.
We’re then outputting the content of $sht(MessageCount=>test) to xlog too so we can see it’s value in Syslog.
Now each time a new dialog is started the MessageCount htable key “test” will be incremented.
We can confirm this in Syslog:
ERROR: : MessageCount is 1
ERROR: : MessageCount is 2
We can also check this in kamcmd too:
htable.dump MessageCount
Here we can see in MessageCount there is one key named “test” with a value of 6, and it’s an integer. (You can also store Strings in HTable).
So that’s all well and pointless, but let’s do make it a bit more useful, report on how many SIP transactions we get per IP. Instead of storing our values with the name key “test” we’ll name it based on the Source IP of the message, which lives in Psedovariable $si for Source IP Address.
I’m calling the boilerplate AUTH block, and I’ve added some logic to increment the AuthCount for each failed auth attempt, and reset it to $null if authentication is successful, thus resetting the counter for that IP Address.
Now we’ve done that we need to actually stop the traffic if it’s failed too many times. I’ve added the below check into REQINIT block, which I call at the start of processing:
if($sht(AuthCount=>$si) > 5){
        xlog("$si is back again, rate limiting them...");
        sl_send_reply("429", "Rate limiting");
        exit;
}
Now if AuthCount is more than 5, it’ll respond with a Rate Limiting response.
Because in our modparam() setup for AuthCount we set an expiry, after 360 seconds (10 minutes), after 10 minutes all will be forgiven and our blocked UA can register again.
Advanced Usage / Notes
So now we’ve got Kamailio doing rate limiting, it’s probably worth mentioning the Pike module, which can also be used.
You’ll notice if you reboot Kamailio all the htable values are lost, that’s because the hashes are stored in memory, so aren’t persistent.
You have a few options for making this data persistent,
By using DMQ you can Sync data between Kamailio instances including htable values.
kamcmd can view, modify & manipulate htable values.
As we’ve seen before we can dump the contents of an htable using:
kamcmd htable.dump MessageCount
We can also add new entries & modify existing ones:
kamcmd htable.seti MessageCount ExampleAdd s:999
htable.seti is for setting integer values, we can also use htable.sets to set string values:
htable.sets MessageCount ExampleAdd Iamastring
We can also delete values from here too, which can be super useful for unblocking destinations manually:
htable.delete MessageCount ExampleAdd
As always code from this example is on GitHub. (Please don’t use it in production without modification, Authentication is only called on Register, and it’s just built upon the previous tutorials).